Wednesday 21 November 2018

Working with technical editor Tamara Gooderham

Hello! I have been a bit quiet across all my social media platforms lately and on this blog. I have been working away on various crochet projects (I'll share these in a future post) and I have been finalising my fabulous socks! pattern for release.

finished socks

After the testing stage and after making the necessary changes that were brought up I sent the pattern to Tamara Gooderham who many of you may know as craftyescapism, the well known crocheter, knitter,  podcaster, certified crochet teacher, blogger and vlogger! I have known Tamara for a few years now, having successfully worked with her on the Back to School Sweater blog hop in 2017 and this October on the Sock Along 2018 blog hop and I had heard that she had recently done her technical editing training and was looking for some experience so I got in touch with her.

toe and cuff detail

Tamara was excellent at keeping me informed of when she would be working on my pattern and how long the process would be likely to take. Within the agreed time frame she had emailed me with a draft of the pattern with lots of colour coded notes of changes to consider. There were suggestions for clarification, formating and grammar - all with their own colour of "marker pen" and cute little arrows as you can see in the screenshots below ...

screenshot of technical edit


screenshot of technical edit


Looking through now, I realise there were no grammar errors pointed out in pink and I am pretty chuffed with that! If you go ahead and purchase the pattern from Ravelry you will see that I followed through with most of Tamara's suggestions - they really did make the document flow better and look more professionally finished. This is the third time I have sent a pattern to a technical editor and I think the small fee is invaluable for making the pattern stand out from the crowd. It's a final step beyond sending it out to testers - yes, some of them may point out little formatting issues but generally the tester's job is checking the pattern for errors.

detail of heel

I would thoroughly recommend getting in touch with Tamara at the link above if you have a pattern for tech editing. I am sure, like me,  you will be very pleased with Tamara's attention to detail and excellent communication throughout the process.

My fabulous socks! pattern is now available as a pdf download from Ravelry.com, I hope you like it!

Happy hooking,

Marta xx

Thursday 25 October 2018

Some knitting for a change ...

Hello! Today I would like to break from my usual topic of crochet to share 2 knitting projects that I am working on. The first is an ongoing scrappy blanket and the second is a coat for my dog, Jazz.

my Mitred Square Blanket

I began the Sock Yarn Blanket AKA Mitred Square Blanket way back in April this year! By my calculations I am now about 85% of the way there as I embark on square 169 of 200! My progress has been fairly regular, working on approximately 1 square a day and now that the end is in sight I tend to fit in 2 squares a day, eager to finish this beauty!

reinforcements from Vicki Brown Designs

Almost all the yarn in this blanket is left over odds and ends from all the socks I have been crocheting (see previous posts if you want to know more about that!). Now and again I have added some mini skeins as seen in the photo above from Vicki Brown Designs and my husband has kindly chosen me a few from one of our local yarn shops, Fluph in Dundee, as seen in the photo below ...

Rusty Ferret mini skeins from Fluph in Dundee

Each square takes me about 25 minutes to complete and once I have 2 or more, the stitches are picked up from these previous squares meaning this is pretty much a no-sew blanket! I am forming a square by creating 4 triangles formed of 45/55 squares and the sides of these large triangles will need to be sewn together. The photo below should give you some idea of the construction technique, with all the mitred squares pointing towards the centre.

work in progress

The other knitted project, which I started on Tuesday this week, is a cosy coat for my working cocker spaniel Jazz. I am following Nikki Trench's pattern and knitting using Jenny Watson merino DK. So far I have completed the ribbed neck and have started increasing for the body.

progress on a coat for Jazz

Since this is a knitting post I would like to include a few photos here of a shawl which my mum knitted for me. She was looking for a knitting challenge and I suggested she try brioche knitting and together we chose this pattern by Stephen West. I am super happy with the finished shawl and worked ina merino/ silk blend it is so soft and warm. My eldest son Niall took the following photos for me, I hope you like them!

back of the Meandering Shawl

Me!

detail of the shawl

Until next time!

Marta xx

Saturday 13 October 2018

Colour and Colour Patterns in Crocheted Socks

Hello! I am here today as part of the Sock Along 2018 Blog Hop! Have you been following the blog hop? Last week's post by Jo Jo Twinkletoes was all about toe up vs cuff down sock designs and next week you can head to Crafternoon Treats for lots of helpful info on how to customise your own socks. Want to catch up on all the posts? I will put links to all the contributors at the end of this post!


Crocheted socks are an amazing way to be expressive with colour! They are a lovely size and shape for being creative and trying new combinations. What if the colours don't work out the way you imagined? Well, you still have a cosy pair of socks to wear around the house or in your wellies! 

Playing with colour has been a fascination of mine for a long time, probably all my life in fact! Back in June 2017 I wrote a blog post all about choosing colours in response to repeatedly being asked how I come up with my colour combinations. If you are interested in finding out more about colour theory and my personal colour choices head over to that post for an in depth read!

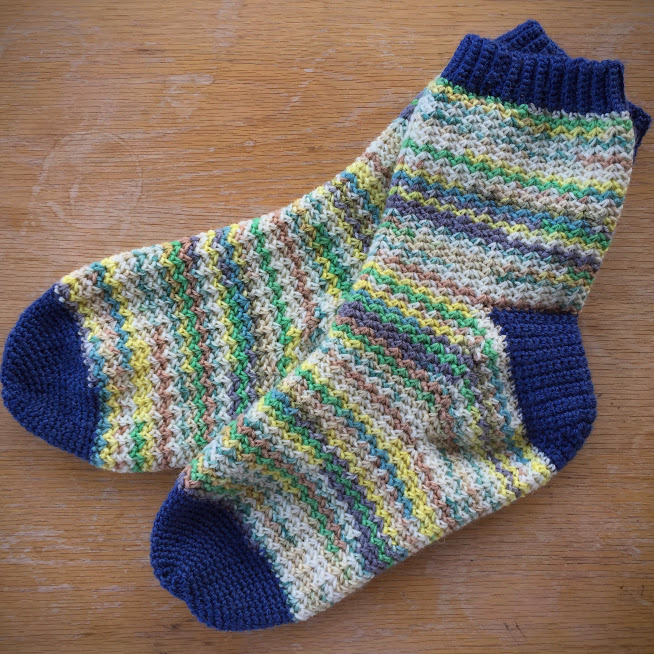
my La Becque Socks by Rohn Strong

The simplest form of colour in socks is a solid colour or almost solid colour like the pair of lilac socks above. The yarn is Sparkle (superwash merino, nylon and stellina blend) by Vicki Brown Designs and it has very subtle variations in hue together with a sparkly strand running through it - very pretty! So, grab your favourite colour (or your recipient's favourite colour!) and you can't go wrong with a single colour!

my Hop Socks by Vicki Brown

The sock yarn above is subtly mottled - it appears solid from a distance but close up has a good deal of variation going on. I liked how this ball worked up in the round, lovely swirls were created. The yarn is West Yorkshire Spinners Signature 4ply, one of my favourite big brand sock yarns.


WIP - my Magdalen Socks by Vicki Brown 

Another fab way to introduce colour is by using speckled yarns! There's a huge range of indie yarn out there created this way and it works up brilliantly in socks. The yarn above is from Vicki Brown Designs and it creates a wonderful dappled effect once it's crocheted up.


my Sweetheart Socks by Vicki Brown

This of course leads to a fourth way of playing with colour when crocheting socks - contrast details! This is perhaps one of the most fun elements of crocheting socks, choosing different coloured yarns for the toes, heels and cuffs. You could have as many as 4 colours going on or keep it simple with just 2 colours.


my Everyone (Needs) Socks by Kat Goldin

Then, there is a whole world of self striping yarns out there! Sock yarn, like the West Yorkshire Spinners Signature 4ply above, comes in a huge range of stripy colours, created with sock knitters and crocheters in mind. No need to change colour, simply stitch away and the stripes appear. WARNING! Working with these yarns can be addictive as the yearn to create "just one more row and see the next colour" is very strong!


my own design, Fabulous Socks, coming soon!

Something I love playing around with when using self striping yarns, such as the Paintbox Yarns Socks above, is the position of the stripes. You can simply start crocheting and leave it to chance or you can be a bit more strategic. One way of doing this is to start with the same point in the stripe sequence for each sock, making them matchy-matchy, which always looks very neat and professional. I often have a little fun and start sock 1 from the inside of the ball and sock 2 from the outside of the ball, creating a pair of socks that are almost the same, but not quite. 

my Fallen Leaves Socks by Vicki Brown

Once or twice I have cut the yarn after the heel turn so that the stripes mirror themselves on the second half of the sock. In the socks above the effect was quite subtle but with a stripy yarn with more pop it could be quite striking. This leads on to the field of colour manipulation, where you carefully calculate the way the colours are positioned, round by round in your socks. I would have to admit that this isn't something I have tried but search "colour pooling" and you should find some excellent examples online. Sometimes this colour pooling happens as a complete fluke, a bit like in my third photo where the pinks swirled together, and these happy accidents put a real smile on your face. Occasionally the colours line up in a way you really dislike and then it's a case of frog them or make them as welly socks!

One final point to consider - if your pattern is plain then stripes work really well, but if your pattern is more of a lacy design it generally looks best in a solid/ semi solid or lightly speckled yarn.

me, proudly wearing my crocheted socks!

I hope this insight has been inspiring for you! Why not leave me a comment on your experience of colour and colour patterns in crocheted socks?

Happy hooking,

Marta xx

#1 Sat 15th Sep - Sock Making Tips - Tamara (http://www.craftyescapism.com/)
#2 Sat 22nd Sep - Yarn Choice - Fay (https://www.knitit-hookit-craftit.com/)
#3 Sat 29th Sep - Knit vs Crochet Socks - Caroline (https://www.mindandmusecrafts.com/)
#4 Sat 29th Sep - Topic to be decided - Deanne (http://www.addydae.com/)
#5 Sat 6 Oct - Toe up vs Cuff down Socks - Jo (http://jojotwinkletoes.blogspot.com/)
#6 Sat 13th Oct - Topic to be decided - Marta (http://mrsdaftspaniel.blogspot.com/)
#7 Sat 20th Oct - Customising socks - Kathryn (http://crafternoontreats.com/)
#8 Sat 27th Oct - Crochet Sock Heels are not Scary - Karen (https://www.karenwhooley.com/)

Wednesday 26 September 2018

Are you joining in the Crochet Sock Along 2018?

Hello! Are you joining in the Crochet Sock Along 2018? If you know me, even a little, you will know that I am addicted to crocheting socks and you have probably guessed that I am joining in the fun! This crochet along (CAL) is being hosted by The Crochet Circle Podcast and Crochet Luna with an accompanying blog hop organised by Crafty escapism. The blog hop kicked off on the 15th of September and you can find that post on top tips for crocheting socks here.  I am really pleased to have been asked to take part in the blog hop and I will share a post on the 13th October focussing on colour and colour patterns.

my latest pair of crocheted socks

Last week I finished this pair of Sweetheart Socks by Vicki Brown working in Paintbox Yarns sock wool and West Yorkshire Spinners Signiature 4ply for the contrasting details. I really enjoyed making these and watching the colours emerge as I went along! You can find the pattern here.

I was crocheting fast to finish these socks and have time for a breather before the CAL starts this Saturday! I quickly decided upon Rohn Strong's Le Becque Socks as the pattern I would be following and ordered a skein of 4ply hand dyed SW merino/ nylon/ stellina blend from Vicki Brown Designs in a beautifully soft, pale purple colour called Mascari. It has subtle variations in tone and shade and SPARKLES! I love it and think it will work up beautifully in this design by Rohn.

my skein from Vicki Brown Designs

Then, I saw an instagram post by Tamara of Crafty escapism with news that Vicki Brown had released a special pattern for the CAL with yarn kits available too! A few clicks later and I had placed an order!

Magdalen Sock Kit

So, it turns out I will be crocheting 2 pairs of socks which should be achievable for me - I will certainly give it my best shot! Are you joining in too? I should add that if you are a knitter, you can join in too, the more the merrier!

Marta xx

Friday 21 September 2018

Free Crochet Pattern - Jute Plant Pot Cosy

Hello! I am back this week with another FREE pattern release! It's for a jute plant pot cosy, crocheted up using just 2 bobbins of Hoooked Natural Jute. The finished pot cosy has a raw, chunky quality which heightens the lush greenery of the plant placed in it. The pattern is written out below and is also available as a free pdf download in my Ravelry Store.

finished Jute Plant Pot Cosy

You will need:

2 bobbins of Hoooked 100% natural jute in colours of your choice (link above)
12mm wooden or metal crochet hook
stitch marker/ piece of yarn to keep track of rounds

Tension:

5.5 stitches and 6 rows per 10cm using 12mm hook or appropriate hook to achieve gauge.

Finished size:

22cm diameter, 19cm tall

Abbreviations (UK terms):

ss - slip stitch
dc - double crochet
BLO - back loop only

close up

Pattern:

Begin with a magic loop with 8dc worked into it.
Round 1 - 2dc in each dc around (16 stitches)
Round 2 - (2dc in 1st dc, 1dc in next dc) 8 times (24 stitches)
Round 3 - (2dc in 1st dc, 1dc in each of next 2dc) 8 times (32 stitches)
Round 4 - 1dc into the BLO of each dc (this is unseen from the outside of the pot but gives a good crease for the base of the pot cover) (32 stitches)
Rounds 5-10 - 1dc in each dc, changing colours once the first colour runs out.
Finish with a ss into the next st. Cut yarn and sew in ends.

That's it! A very simple pattern which you can easily adapt to suit the size of your plant pot! Simply continue increasing 8 stitches per round until you are a few centimetres short of your required diameter then move on to Round 4. Please note that the specified dimensions used almost 2 bobbins so you may need more yarn if you want to go bigger.  

end of Round 4 & piece of blue contrast yarn 

moving on to the second colour

I hope you enjoy following this pattern! If you are on Instagram, you can find me there - @mrsdaftspaniel - please tag your photos with #mrsdaftspaniel so that I can see them!

Happy hooking,

Marta xx


Friday 7 September 2018

Free Pattern Release: Heart Shaped Bunting

Hello! Today I am really pleased to be releasing my pattern for Heart Shaped Bunting - and the best thing for all you crochet fans out there? It's FREE!

Heart Shaped Bunting

I wrote this pattern in the summer of 2017 as an exclusive for Crate Crochet's subscription box. Crate Crochet are based in Australia and they deliver mystery boxes through your letterbox with a pattern and the yarn you need to make the item featured as well as a few other goodies - it's a wonderful idea! I have collaborated with Carmela at Crate Crochet on 3 occassions now and I have found it very rewarding, not only because of the coverage it gives me as a designer but due to the lovely, welcoming Facebook Group which she has formed. I love being involved in this project!

bunting hanging in the garden

So, after this period as an exclusive Crate Crochet design I can now release the pattern into the wild and have decided to make it a free pattern as a first Friday in September treat! Today my eldest son, Niall, helped me update my YouTube video with the tutorial for the back back loop stitch. We filmed this together back in October but the lighting was poor and Niall now has a better camera and microphone so I was keen to reshoot it. Today's video was fun to make - my parents' dog is in it, his head on the table in front of me, just out of focus! You can find it here.

My favourite platform for buying and selling patterns is Ravelry.com and this is where you can download the pattern for FREE: https://www.ravelry.com/patterns/library/heart-shaped-bunting

close up!

I hope you enjoy following thi pattern! If you do, please share your creations on social media, particularly Instagram where you can add the hashtag #mrsdaftspaniel for me to see and for the chance to be featured in my Insta gallery!

Marta xx

Thursday 30 August 2018

Two Finished Projects!

Hello! I am back this week with two finished projects to share with you! Firstly, my Skimming Stones Shawl and secondly, with the yarn leftover, my Malvern Cowl. As well as using the same yarn, both patterns were written by the same designer, Joanne Scrace!

finished Skimming Stones Scarf

finished Malvern Cowl

Kat Goldin and Joanne Scrace together form The Crochet Project and back in June they hosted a Mystery Crochet Along (MCAL) with the Skimming Stones pattern. Each week for 5 weeks a small part of the pattern was released without a single photo of what the finished shawl would look like! Hundreds of people joined in and there was a lovely community feel in their private Facebook Group and on Instagram.

detail of Skimming Stones Shawl

The recommended yarn for the MCAL was Carlisle Fingering by Eden Cottage Yarns and there were special kits available online. There was an alternative yarn suggestion, Milburn 4ply (85% blue faced leicister/ 15% silk), and I decided to go with this because I preferred the more solid looking colours. I bought the kit with 6 balls (2x main colour, 1x each of the 4 contrast colours) and also an extra ball of pale pink because I felt like mixing things up a little! This yarn was a joy to work with - it felt so soft and luxurious against my hands. I had a lot of fun following along with this project and enjoyed watching the unusual shape develop. I was a bit of a rebel and chose to ignore the set pattern of colours and introduced each colour in a random yet pleasing order.

edge detail

When I had finished my shawl I looked at how much yarn I had left, and together with the ball that came in the kit but didn't use, I reckoned I had enough to crochet a Malvern Cowl. I had had my eye on this pattern for a while and felt it would be a fantastic way to use up all of my yarn. The spike stitches give this pattern a real edgy look which I love and the stripes quickly built up to form the cowl. One change I made to the pattern was to twist the tube shape before sewing together to help to give it drape (I wasn't using the recommended yarn here and it was feeling slightly too rigid).

detail of Malvern Cowl

So, there you have it; two cosy items for winter crocheted out of 7 balls of yarn with next to nothing left over and I am really pleased with them both!

Marta xx

Wednesday 22 August 2018

Back to blogging ...

Hello! I have been a bit quiet on here over the summer due to wonderful weather, school holidays, days out, running a holiday club at church, family visiting from London and all the little day to day things that pop up in the summer months! So, here I am, schools are back, the weather is just beginning to turn and I am refocussing on my blog and my business! In this blog post I would like to share some of the projects that I have completed over the summer and a few of my current WIPs.

3 little cakes
I made these little cakes from a DMC Natura amigurumi kit and they were such fun to crochet!

toddler size socks
These toddler size socks for my niece were super quick to crochet up! I used Paint Box Yarns sock wool and mostly followed a Kat Goldin pattern with a change of heel design to add in a gusset.

Skimming Stones Shawl
 I couldn't resist joining in with The Crochet Project's MCAL, it was amazing to feel part of a big group of like minded people via Instagram and the Facebook group. I used Milbury 4ply (85% BFL, 15% silk) from Eden Cottage Yarns

unicorn!
Another one for my niece - a unicorn that I designed as I went along using up cotton from my stash.

Malvern Cowl
After the MCAL I had some yarn left over so I crochet a Malvern Cowl following Joanne Scrace's pattern, one I have had my eye on for a while!

Mitred Square Blanket
Since early summer I have been working on this Mitred Square Blanket using up scraps from my 4ply stash.  I knit 1 or 2 squares every day and it is slowly growing - hoping to be finished to gift this at Christmas time!

Hoooked project
This jute Hoooked yarn is a recent WIP - it's a bowl/ basket type thing, creating as the feel of the project takes me so I am not sure how it will end up yet.

more socks!
We have taken quite a few train trips this summer and I have always taken my crochet or knitting with me! I have begun another pair of Fallen Leaves socks by Vicki Brown using Cascade Yarns Heritage Prints.

on the train
Here I am on the train to Aberdeen with my knitting (I was knitting a square for my Mitred Square Blanket).

outside Wool For Ewe
Once in Aberdeen we walked out to Rosemount to visit Wool For Ewe - one of my favourite yarn shops! Here is my hubby just before popped in to squish all the yarn!

current project
Well, that take me up to my current project, an aran weight granny square blanket! This one is a stash buster, using up lots of random balls of aran I had accumulated (and perhaps buying a few more along the way!).

Now that I am re-establishing my term time routine I will be back with more regular updates so stay tuned,

Marta xx

Thursday 31 May 2018

Not crochet, but still creative ...

Hello! Recently I have begun chalk board art and today I wanted to share some of my latest boards with you. It will mostly be a pictorial blog post because chalk boards are a visual thing!


drinks menu, Gather, Carnoustie
photo credit - Niall Mitchell

I beagn by doing a few boards for  Bethany in Gather in Carnoustie just before Christmas. they were seasonal boards and because they were my first venture into chalk board art there were lots of little things I wasn't quite happy with so I didn't take any photos of them! However, early in the new year the café opened at Gather and I did a couple of menu boards for the café which I was much happier with.


specials board, Gather, Carnoustie

Soon after that I was approached by Vicky at Millie's Pet Services in Carnoustie and asked to do their internal chalkboard around the walls and the sandwich board outside. By this time I felt much more confident and I had a lot of fun with these boards, which I feel reflect the personality of the pet shop very well.


sandwich board, Millie's Pet Services, Carnoustie

detail of sandwich board, Millie's Pet Services, Carnoustie

sandwich board, Millie's Pet Services, Carnoustie

internal walls, Millie's Pet Services, Carnoustie
photo credit - Vicky Gunn

Back at Gather I helped to create an information board to make it clear to everyone that Gather is a dog friendly café - a trend which I am pleased to see is catching on in many cafés!


information board, Gather, Carnoustie

Now that the warmer weather is with us, I drew the board below for Gather to advertise their new iced latte. I use Pinterest for most of my hand lettering inspiration - there is so much chalk board art on there, it's amazing! I work out my ideas on scaled down pieces of paper before beginning on the boards. This really helps me to plan out the layout and see what is going to work in the space I have.


sandwich board, Gather, Carnoustie

I am always keen to take on new chalk board work, if you are reading this and are local please do get in touch below to discuss your requirements, I would love to work with more local businesses to promote their brand. If you are not so local, I hope that my photos have inspired you in some way - perhaps to take up chalk board art yourself!

Until next time,

Marta xx

How To Make Do And Mend With Crochet

  Make Do And Mend With Crochet Hello! This week I'd like to focus on one of my core values when it comes to crafting: How To "Mak...