Showing posts with label warm. Show all posts

Thursday 30 August 2018

Two Finished Projects!

Hello! I am back this week with two finished projects to share with you! Firstly, my Skimming Stones Shawl and secondly, with the yarn leftover, my Malvern Cowl. As well as using the same yarn, both patterns were written by the same designer, Joanne Scrace!

finished Skimming Stones Scarf

finished Malvern Cowl

Kat Goldin and Joanne Scrace together form The Crochet Project and back in June they hosted a Mystery Crochet Along (MCAL) with the Skimming Stones pattern. Each week for 5 weeks a small part of the pattern was released without a single photo of what the finished shawl would look like! Hundreds of people joined in and there was a lovely community feel in their private Facebook Group and on Instagram.

detail of Skimming Stones Shawl

The recommended yarn for the MCAL was Carlisle Fingering by Eden Cottage Yarns and there were special kits available online. There was an alternative yarn suggestion, Milburn 4ply (85% blue faced leicister/ 15% silk), and I decided to go with this because I preferred the more solid looking colours. I bought the kit with 6 balls (2x main colour, 1x each of the 4 contrast colours) and also an extra ball of pale pink because I felt like mixing things up a little! This yarn was a joy to work with - it felt so soft and luxurious against my hands. I had a lot of fun following along with this project and enjoyed watching the unusual shape develop. I was a bit of a rebel and chose to ignore the set pattern of colours and introduced each colour in a random yet pleasing order.

edge detail

When I had finished my shawl I looked at how much yarn I had left, and together with the ball that came in the kit but didn't use, I reckoned I had enough to crochet a Malvern Cowl. I had had my eye on this pattern for a while and felt it would be a fantastic way to use up all of my yarn. The spike stitches give this pattern a real edgy look which I love and the stripes quickly built up to form the cowl. One change I made to the pattern was to twist the tube shape before sewing together to help to give it drape (I wasn't using the recommended yarn here and it was feeling slightly too rigid).

detail of Malvern Cowl

So, there you have it; two cosy items for winter crocheted out of 7 balls of yarn with next to nothing left over and I am really pleased with them both!

Marta xx

Thursday 16 November 2017

Pattern Release; Fields of Lavender Cardigan

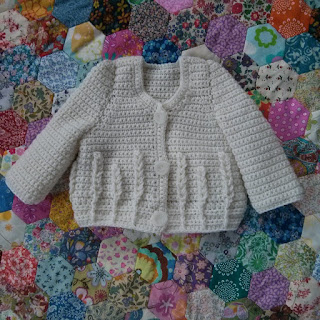
Hello! I am super excited to be ready to release my Fields of Lavender Cardigan crochet pattern today!! This pattern is possibly my favourite of all the patterns I have designed so far and I am really pleased to be able to share it with you at last!

cover photo for my Fields of Lavender Cardigan

The pattern includes two sizes; 3-6 months and 6-12 months, it is suitable for intermediate crocheters and it's written in UK terms throughout. The intricate lavender stalks may look like a complex design but I can assure you, they are not as tricky as they look to create!

I chose King Cole merino blend DK for this design for two reasons, firstly it's a superwash wool (a must for baby garments) and secondly because the finished cardigan will be really warm and snuggly for the little one. You will need 3x 50g balls for the smaller size and 4x 50g balls for the larger size.


cuff and waistband detail

The garment is constructed from the waist up, splitting into 3 sections at the armpit and then the sleeves are crocheted seperately before being sewn up and sewn into position.


the lavender stalks

The pattern is currently available as a pdf download from my Ravelry store and for the first week it will be on special offer for only £1.80. If you would like to purchase and download a copy you can find it here.

back of the cardigan

Look out for more pattern releases coming very soon - I have another winter project for you in the next week or so ...

Until then,

happy hooking,

Marta xx

Friday 15 September 2017

Using every scrap!

This week I noticed a common theme with all my current crochet WIPs - they are all scrap busting projects! I love this because apart from the economical use of yarn it is creative in using up every scrap from its source (whether plant, animal or man-made) to spinning then dying and finally retail.

The longest standing of these projects is my Virus Blanket. It is crocheted in 4ply and some of the scraps in this I have had for ages! The pattern is by Joanna Martinez and you can find it on Ravelry here.


Next up is this chunkier aran weight blanket. I hadven't made an aran weight blanket before, I always us double knitting thickness and this is working up so much faster, I love it! The pattern is Granny Shell Blanket and it's a twist on the traditional granny square, written by Remade By Sam. I have written my own final rounds to join the squares together, using the join-as-you-go method. Because of the weight I think I will keep this as more of a lap blanket, much smaller than usual. The colours are particularly clashy in this one, I'm not aiming for my usual colour harmony.


Something much smaller ... crocheted socks! This is only the second pair of crocheted socks I have ever made. The first were my own design (which I didn't write down, they never got past the experimental stage!) and now these by Joanne Scrace of The Crochet Project - you can find the pattern in the book, Crochet Yeah! or on Ravelry here.


My forurth WIP is one I have blogged about twice now, my 100 Days Project blanket. Progress is still going strong on this one - I have just passed the 50 square milestone! Below is a photo to show you some of the many, many coulours involved in this blanket. 


Finally, not a stash busting project but an exciting pattern release announcement! My Lavender Cardigan is at the final photo editing stage and is very, very nearly for release! I have been working on this project since the spring and I can not wait to share it with you! It will be available next week to download from Ravelry and Etsy.


Happy hooking,

Marta xx


Friday 3 March 2017

Yarn Review - King Cole merino blend DK

Today I thought I would continue with another yarn review - this time King Cole merino blend DK. These review posts are not sponsored by the wool companies, it's simply me, adding my thoughts and opinions on the yarns I like to use.

I have used King Cole merino blend DK for a wide variety of projects, from large blankets to teenie amigurumi to baby cardigans - it's a fantastic all purpose wool! Not all the yarn, but a significant amount of it, was King Cole merino blend DK in my Sophie's Universe Blanket (pictured below).


One of the reasons I love this wool is the amazing range of colours it is available in - there are 45 different colours ensuring there is a colour for everything and a colour for everyone! I enjoy making and designing amigurumi in bright colour combinations and I like choosing just one colour to make hats and baby cardigans. My most recent crochet project (and the prompt for this blog post) uses the gorgeous mustard colour!


King Cole merino blend DK is a superwash wool making it ideal for baby and toddler garments. It's nice and soft too which is lovely to work with and lovely to wear because it is not itchy. There are 104 metres in a 50g ball which works really well when pulled from the centre and worked from the inside out. King Cole merino blend DK is widely available online and in many local yarn shops. 


The friendly amigurumi monster called Malunna (pictured above) was designed and crocheted in King Cole merino blend DK. I love this colour combination - blues and oranges have always been a favourite of mine. If you are interested, the free pattern for this monster is available in my Ravelry store here

Have you used this wool before? What do you think of it? I am interested to know your opinions - please pop a comment below xx


Wednesday 1 March 2017

Fields of Lavender Cardigan - the design process


Over the last few weeks I have been working on various crocheted cardigan designs, with most of my focus being on the Fields of Lavender Cardigan, pictured below in 0-3 month size. This new design came about in an unusual way for me, it was suggested by one of my pattern testers, Jill Porter. 


Jill had tested out the pattern for my Fields of Wheat Hat (above - photo used with kind permission) in a beautiful purple coloured yarn and when she posted it online she received comments about how the wheat stalks looked like lavender and suggestions for designing a cardigan using the same motif. You can see Jill's pretty Instagram photos here. You can see my photos of this hat design in my last blog post.


After doing a few calculations (sighing once again at how much maths is needed in the crochet design process!) I was ready to start and using spare white pure wool in superwash DK I began to turn my hat design into the flatter format required for a cardigan. One thing which really pleases me about crocheting baby garments is the speed in which they are finished, I quickly had a completed design that I was pretty much happy with. There were a few niggles that I wanted to sort, the collar line wasn't quite right for starters, but overall I was satisfied and ready to embark on the next version using lavender coloured wool.


The lavender design is crocheted in King Cole merino blend DK which I have chosen for both its superwash qualities and because it is warm and cosy for a baby to wear. On this second cardigan I worked the design in the next size up (3-6 months), so that I will have a variety of sizes to offer when the pattern is published.


All the cardigan needs now is buttons, which sadly I can't buy in my town (I have tried the button boxes in the local charity shops, but no luck this time) so the buttons will have to wait until I am next off out on an adventure. The next steps in the design process are pattern testing and photography, both of which I am looking forward to!


Wednesday 2 March 2016

Free Crochet Pattern; Cabled Boot Cuffs

This month's pattern is for a pair of boot cuffs, designed in Artesano aran wool which provides a cosy and stylish addition to any boots.


The pattern is suitable for those with intermediate level of crochet ability.


There are 4 adult sizes available; small, medium, large and extra large. The photos show the medium size.

My pattern is for your personal use. If you follow my pattern and go on to sell the item, please state that I am designer. Thank you!


Materials
Small [medium, large, extra large] 1 [1,2,2] x 100g skein Artesano aran (132m / 144yds per 100g) any colour, I used “birch”
7 mm crochet hook
tapestry needle (for sewing in ends)
4 x 2cm diameter buttons
needle and thread for sewing on buttons


Tension
11 stitches x 8 rows in  a 10cm² / 4 inch²


Abbreviations (UK terms)
ftr foundation treble
ch chain
st stitch
dc double crochet
htr half treble
fpttr front post triple treble
blo back loop only
prev previous
cont continue
rep repeat
RS right side
patt pattern


Notes
The pattern begins with foundation treble stitches. If you are unfamiliar with how to do foundation stitches it is worth looking up on you tube. You could substitute these stitches with regular chain stitches and a row of trebles. Please note that if you take this option you will finish up at the wrong end of the boot cuff - simply reattach the yarn and carry on.


The front post stitches (fpttr) are worked into the front post of the stitches 2 rows below.


The turning chains all count as 1htr and the 1st stitch is missed. At the end of the row work 1htr into the turning chain.

The left and right cuffs differ slightly to allow the button overlap to fall correctly on each side. When starting the left cuff leave an 80 cm tail of wool - after completing the rows this will be used to add the button loops down the side. The right cuff has the loops on the opposite side - an extra length of wool needs to be joined in for this.


Pattern
Left Cuff
Foundation Row Using 7 mm hook, leaving an 80 cm tail, ftr 30 [38,46,54]. Turn


Row 1  Ch2 (counts as 1htr), 1htr into each st across, 1htr into turning ch. Turn (30 [38,46,54] stitches)


Row 2 Ch2 (counts as 1htr), 1fpttr into each of next 2ftr (foundation row), miss 3 st *1htr in each of next 4htr (row 1), 1fpttr in each of next 4 ftr (foundation row), miss 4 htr* rep from * to * 1 [2,3,4] more times, 1htr in each of next 4htr, 1fpttr in next 2 ftr, miss 2, 1htr in each st until end, 1htr in turn ch. Turn


Row 3 Ch2 (counts as 1htr), 1htr into each st across, 1htr into turning ch. Turn (30 [38,46,54] stitches)


Row 4 Ch2 (counts as 1htr), 1htr in each of next 2htr, 1fpttr in 1st 2fpttr (row 2), 1fpttr in each of next 2fpttr (row 2), *miss 4htr (row 3), 1htr in each of next 4htr, 1fpttr in each of next 4fpttr (row 2),* rep from *to* 1 [2,3,4] more times, 1htr in each st until end, 1htr into turning ch. Turn


Row 5 Ch2 (counts as 1htr), 1htr in each of next 8st, *1htr into next htr catching blo of fpttr of row 3, 1htr in each of next 7st* rep from * to * 1 [2,3,4] more times, 1htr in each st until end, 1htr in turn ch. Turn


Row 6 Ch2 (counts as 1htr), 1fpttr in 1st 2fpttr (row 4), miss 3st, *1htr in each of next 4htr (row 5), 1fpttr in each of next 4fpttr (row 4), miss 4htr* rep from * to * 1 [2,3,4] more times, 1htr in each of next 4htr, 1 fpttr in each of next 2fpttr, 1htr in each st until end, 1htr into turning ch. Turn


Row 7 Ch2 (counts as 1htr), 1htr in each of next 12st, *1htr into next htr catching blo of fpttr of row 5, 1htr in each of next 7st* rep from * to * 1 [2,3,4]  more times, 1htr in each st until end, 1htr in turn ch. Turn


Row 8 Ch2 (counts as 1htr), 1fpttr in 1st 2fpttr (row 6), miss 3htr, *1htr in each of next 4htr (row 7), 1fpttr in each of next 4fpttr (row 6), miss 4htr* rep from *to* 1 [2,3,4]  more times, 1htr in each of next 4htr (row 7), 1fpttr in each of next 2fpttr (row 6), 1htr in each st until end, 1htr into turning ch. Turn


Row 9 As row 7. Finish off, weaving in ends.


Button loops Using long 80 cm tail from ftr, RS facing, Ch1, working down side 1dc into next 2 end of row, ch2, 1dc into each of next 5 end of rows, ch 2 1dc into each of next 2 end of rows. Finish off, weaving in ends.


Right cuff
Foundation Row Using 7 mm hook, (no need for long tail) ftr 30 [38,46,54]. Turn


Row 1  Ch2 (counts as 1htr), 1htr into each st across, 1htr into turning ch. Turn (30 [38,46,54] stitches)


Row 2 Ch2 (counts as 1htr), miss 1htr, 1htr in each of next 5htr ... beg patt as left cuff


Row 3 - 9 As left cuff, with button space on opposite side


Button loops
RS facing, join wool at top left corner, ch1, working down side 1dc into next 2 end of row, ch2, 1dc into each of next 5 end of rows, ch 2 1dc into each of next 2 end of rows. Finish off, weaving in ends.


Finishing off
Using photo as a guide sew buttons on.

I hope you will enjoy following this pattern. 
Look out for more free patterns at mrsdaftspaniel.blogspot.com
Follow me on Instagram @mrsdaftspaniel

I am listing this and all my crochet patterns for free this month on Ravelry - go have a look here!

Happy hooking,

Marta xx

Tuesday 9 February 2016

Geometric Hat Pattern

This week I have finalised the pattern for my Geometric Hat! I did most of the designing on this hat back in September but didn't get as far as transferring my scribbles into neatly typed up format! I won't make that mistake again in a hurry - I ended up having to make another hat to make sense of it all! 

finished hat, with optional pompom

This hat uses spike stitches to create the surface geometric pattern. I had fun playing around with the placing of the spikes and I'm happy with how this one turned out. I have designed the hat in two adult sizes, large and medium.

me and Gwen, wearing matching hats! 

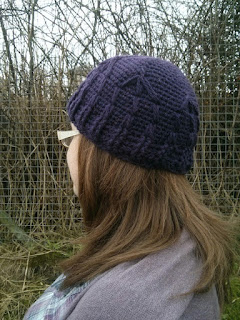
My friend Gwen came around for a cuppa and a catch up on Sunday and we had chat about my latest projects. When she tried on the purple version of this hat it suited her so well I said she could keep it if she modelled it for me! 

Gwen modelling the hat

I really like the above photo - it will be the cover shot for the pattern. The model's beautiful hair, dusky lilac cardigan and the wintry backdrop show off my design perfectly. A big thank you to Gwen for modelling for me!

This pattern is at the testing stage and I hope to publish it at the end of the month.

Edit: The pattern is now available for £3.60 in my Ravelry Store (http://www.ravelry.com/patterns/library/geometric-beanie-hat) and in my Etsy shop (https://www.etsy.com/uk/listing/462743720/geometric-beanie-hat-crochet-pattern?ref=shop_home_active_4)

Marta xx

Thursday 14 January 2016

Inspiring start to the year

I have had a lot of inspiration for new work so far this year which is not the way I expected January to turn out! I decided to challenge myself to write (and type up!) one new crochet pattern each month of 2016 because last year my pattern writing was somewhat unfocused and sporadic. I thought if I stuck to a seasonal item each time it would give me the focus I needed to create. Today is the 14th of January and so far I have a boot cuff pattern written (typed up and at the testing stage) and a hat pattern on the go!

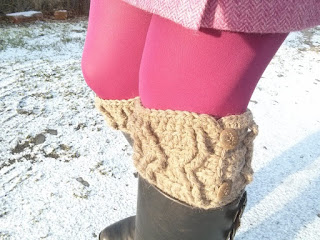
boot cuff design

The boot cuffs use the crocheted cable method to produced a raised, textural effect. I began with pen and paper, sketching out the cable pattern then transferred it to crochet. I chose Artesano aran alpaca wool blend for the project because I am slightly addicted to alpaca yarn at the moment and I knew this particular wool would be soft and cosy. The small and medium size boot cuffs use one skein, larger sizes use two skeins; you can buy Artesano aran here. Once I am happy that the pattern is fully tested I will publish it, keep your eyes peeled!

fresh off the hook


last night's dusting of snow provided the 
perfect back drop for my photo shoot 

My second crochet design is a beanie hat, made in two colours using spike stitches. Up until now I have tended to focus on single colour patterns when I am designing because they are so much easier to write up. Now that I have more experience I am going to bring my love of colour into my work. This is something I am really excited about for this year and I hope it will bring a pop of colour into the world!

design in progress

This time I am using MillaMia naturally soft merino aran, which you can buy here. I love these two intense colours together, they will make a super bright hat! There may even be enough yarn left over from two balls to make a pompom, I'm not sure at this stage. I will finish this design in the next few days and type it up promptly (not leave illegible scribbles in my notebook to be forgotten!). Again, once it is tested I will share it with you.

My third creative burst this year is a new sewing design which I hope to sell in my online Folksy shop later this month. I started with a simple idea of using a covered button and played around with various fabrics and textures to go with it to create a brooch. I had soon come up with something I liked and I hope others will too!

new brooch design

So, I seem to be off to a good start this year and I hope it continues to be a year full of inspiration and creativity! What about you? Have you any creative plans for the year? Have you made something exciting? Please share below, I'd love to see!

Marta xx
Thursday 31 December 2015

A year in 4 blankets

For me 2015 will be "The Year of the Blankets" because I seemed to spend a lot of my spare time knitting and crocheting blankets! I have just put my hook down and taken photos of my last blanket of the year. I really wanted to finish it by the end of today and with 9 hours to spare I was happy to achieve my deadline!

the 4 blankets

The first blanket I completed this year was crocheted following the gorgeous pattern, "Sophie's Universe", by Dedri Uys. You can find the link to Dedri's pattern here

Sophie's Universe in progress

I loved following this pattern because it taught me so many different stitch techniques and combinations, every day was a school day!

At the very start of the year I began work on my Beekeepers Quilt. This was a knitted blanket, formed by making "hexipuffs" which were worked on 3 double pointed needles. I wrote a blog post about the start of this quilt adventure in January this year if you would like more information on this one.

finished Beekeepers Quilt

I was inspired by an Instagram friend, Anthea, @theforestflower ( link here) to make 1 hexipuff a day for the year, creating enough hexies by the end of the year for a blanket. I made mine using all my scraps of double knitting wool, instead of 4ply wool as the pattern stated, resulting in a very thick and heavy blanket! I decided to stop knitting in the autumn and started to join them together because I was worried about the weight causing damage to the blanket. The pattern for the hexipuffs is by Tiny Owl Knits and is available on Ravelry here

detail of hexipuffs

Throughout the year I worked on another blanket, on and off when I felt like a break between projects or when I had accumulated fresh supplies of scrap yarn. This was the largest of the 4 blankets, big enough to cover our king size bed! It was made up of very simple granny squares, designed by Jan Eaton, it's in her 200 Crochet Blocks book.

my husband, snuggled in the large blanket


This project kept me sane in the run up to Christmas because the squares were so easy to crochet and allowed me to chill out from all the extra goings on at that time.

cuppa and crochet

detail of the large squares

My fourth blanket of 2015 was completely different from the others, this one was self coloured which was a real change for me! I crocheted it following a pattern by Shelley Husband called GREG which was released fortnightly as a mystery CAL (crochet along). This meant that I had no idea how the finished blanket would look but I had been following Shelley on Instagram, as Spincushions  for long enough to have faith in her pattern writing abilities and I knew it would be an awesome blanket!

GREG in progress

I quickly found that working in one single colour meant that little faults and flaws in my crocheting stood out much more than in multi colour work. I learnt a few new techniques to help conceal the start and end of rounds with and I was soon much happier with the finished squares. You can find a link to Shelley's blog which has a link to her new eBook here

another GREG in progress

As the year drew to a close I realised that I had not really considered who the recipients of these blankets would be! I had a feeling that the Beekeepers Quilt would go to my youngest son because he had been sneaking off with as soon as it was big enough to huddle under! The large king size bed blanket was for our bed, I wanted a blanket that was big enough to keep one half of!! The other 2 blankets, what to do with them? I decided to give them to my other 2 boys to keep everyone happy and give everyone an heirloom blanket which I hope will be treasured for years to come.

my boys, posing with their blankets!

Now that they are all finished, what shall I make next? 

Marta xx
Crochet and Sustainability: Your Guide to Being More Eco-Friendly

Hello! Are you l ooking for ways to reduce the environmental impact of your crochet? There are so many opportunities to create what we do in...