Tuesday 14 December 2021

December's pattern of the month


Hello! For December's pattern of the month I wanted to choose something cosy for the winter months ahead, and these mitts are certainly warm! I don't know about you but I find that my fingers are much warmer in mitts than in gloves. Apologies for not sharing this sooner, I realised today that it was still in 'Drafts', oops!


If you prefer the fingerless option that's worked into the pattern too - there's a point where I recommended that you stop.I know that when I'm walking the dog I prefer fingerless for picking up slobbery tennis balls, sandy bits & pieces I find on the beach (and poop!). Maybe I'll write a full glove pattern next year - would that be something you're interested in? Do let me know, I want to design things that you want to crochet! In the meantime, here are the details on these mitts ...
  • Pretty shell stitches form the basis of this design; my second mitts pattern.
  • They begin at the cuff, worked in rows, then work up to the fingertips in rounds.
  • The pattern is available as a pdf download from Ravelry & LoveCrafts.
  • Shaping is added to accommodate the thumb and create a beautiful fit.
  • Four sizes are included with the pattern; toddler, child, adult M & adult L.
  • There's plenty of scope for adjusting the fit of these mitts to suit the size you require. It will be easiest to select the circumference you need & then crochet more or less rounds to suit.
  • 100g of sock yarn is sufficient to make even the largest size. I used standard sock yarn from Vicki Brown Designs in the colourway Teal. Vicki kindly provided yarn support for this design.
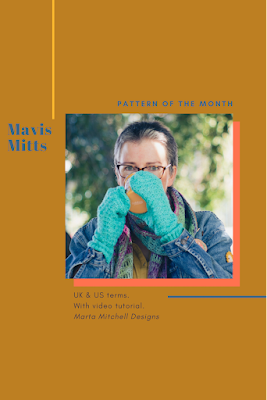
  • It's an intermediate level pattern, written in both UK & US terms.
  • There are charts & video tutorials included with the written pattern if you need them.
  • This mitts design has been tech edited & tested, giving you peace of mind to enjoy crocheting.
  • My patterns now all include a 'take it further' section with inspiration for you to add your own twist to my designs.
If there's anything I haven't covered here, please drop a comment below or send me a DM on Instagram and I'll happily answer any of your questions.


To take advantage of this month's offer, simply add the code DEC21 at the checkout on Ravelry for 20% off. The code is only valid against Mavis Mitts. Offer ends midnight (GMT) 31st December 2021 (the end of the year, eeek!) I've added the LoveCrafts link above too for anyone who can't access Ravelry. I can't create discount codes for LoveCrafts so please leave me a comment and I can arrange for you to receive the pattern at the discounted price via email & PayPal.

Until next time,

Marta xx

Thursday 2 December 2021

5 quick present ideas to crochet!


Hello! Is it just me that leaves it this late to start crocheting Christmas presents to give to family and friends? Ok, so I have made a few items throughout the year but the bulk of it will be done this month. Are you in the same boat?

I thought I'd theme this blog post around quick gifts to crochet - giving you some inspiration if you need it (or if you are super organised there might be something you can bookmark for next year!). All these patterns have been tried & tested by me. The opinions given and the photos are my own.


No. 1  Granny Square Zipper Pouch by Sewhappycreative. I made this earlier in the year and it was super quick & satisfying to crochet. The lining is optional, I decided to add it and I can say that the photo tuturial for doing so is excellent. This pouch would make an excellent pencil case for a child/ young person or a notions pouch for a crochet friend. You can find this pattern, alongside other granny square projects, on Etsy.


No. 2  Little Star Crochet Pattern by Judith Heller (Merino & Tomatoes). This cute pattern has been a life saver of a quick make for me! Once you've crocheted one, the pattern is easy to remember and they work up super fast! They can be gifted on their own to hang on the tree or strung together to make a garland. They would be cute added to a wrapped present as a decorative feature too! The pattern is easy to folllow, there's a chart too and it's free on Judith's blog.


No. 3  Slemish Thistle Scarf by Ruth Pedlow (Labours of Love Crochet). I absolutely love this scarf pattern! It's worked in 4ply yarn but with a much larger crochet hook than usual, meaning it works up faster. The instructions are clear to follow and there's a chart. The scarf is quite feminine and drapey - I think mums, sisters, teachers and helpful neighbours would all appreciate this being gifted to them. Once this scarf is blocked it looks even more stunning! You can find the pattern on LoveCrafts here.


No. 4  Saguaro by Emma Varnam. I crocheted this back in July for a school teacher friend of mine - it's the perfect addition to her classroom! The pattern is available in Emma's book, Crocheted Succulents. I have the book and I really need to make some more of the designs from it, the patterns are amazing! The Saguaro is a straight forward amigurumi style design made in 3 pieces with the option of crocheting soil too. It doesn't require much yarn and if you reuse a small pot or tin that you have laying around, an inexpensive present! You can find out how to get your hands on a copy of Emma's book on her website.


No. 5  Mavis Mitts - one of my own crochet patterns! These would make a lovely gift for someone close to you. The design is formed mostly of shells worked into the same space, making it a speedy crochet project - and if you're making them for a toddler - super speedy! Four sizes are available, going up to adult-large, with lots of customizable options. You can buy this pattern on LoveCrafts and Ravelry AND throughout the month of December you can get 20% off the usual price on Ravelry! Mavis Mitts are December's pattern of the month - I'll share more details on the pattern in next week's email - but if you can't wait till then, head to Ravelry and use the code DEC21. If you can't access Ravelry please let me know and I can't sort the discount out for you via email/ PayPal.

I hope you've found a pattern you like here - let me know what you think!

Until next time, happy crocheting,

Marta xx


Tuesday 23 November 2021

Printer Ink Scarf pattern release!

Hello! I've kept this scarf pattern under wraps for a while but now's the time to release it! Yay!

You may have spotted me wearing the scarf in the Mavis Mitts photos? Niall and I took the photos on the same location shoot and because the two went so well together I kept it on in the background.

The pattern is called Printer Ink Scarf, named after the set of 12 mini skeins which inspired the design called Printer Ink. I thought it described the colours so well that I also mimiced the printer bleed effect in the way I changed colours. Do you like the name?

Here are all the details you'll want to know ...
  • the design calls for a set of 12x 10g mini skeins. I used Printer Ink Shades from The Knitting Goddess but it would work well in scrap yarn or perhaps an Advent calendar mix if you have one of those?
  • this yarn is fingering/ 4ply weight (480m/ 120g, 40% British Blue Faced Leicester/ 20% British Wensleydale/ 20% British Alpaca/ 20% nylon) 
  • it's an intermediate level pattern, written in UK & US terms.
  • when you reach the border the colours are worked until they run out, making the most of your pretty yarn.
  • the finished scarf is 15cm x 200cm
  • the pattern includes a few ideas for taking the design further by adding your own twist.
  • 4mm hook required.
  • there's a chart for the main scarf pattern.
  • I'm here to help if you ever have any questions, no matter how big or small.
  • you can buy the pattern on Ravelry here.
  • you can buy the pattern on LoveCrafts here.
  • you can buy the pattern on my website here.
Did I miss anything? You can leave me a comment if you need more info.


I'm offering a 24 hour early bird discount on this pattern! Use the code PRINT15 on Ravelry to receive 15% off the pattern from now until midnight on Wednesday 24th November (GMT). If you can't access Ravelry, please leave me a comment and I'll arrange your discount through email/ Paypal.

I hope you love this pattern as much as I do!

Until next time, happy crocheting,

Marta xx

Thursday 4 November 2021

November's crochet pattern of the month!


Hello! I can't believe we are almost finished the first week of November and I haven't announced my pattern of the month! I'm actually really busy behind the scenes at the moment with a magazine commission that I need to keep a secret and a collaboration that I'll be sharing real soon! These things, as well as the day to day stuff are filling all my time at the moment - I can't wait to share more with you!

So, November's pattern of the month as you can tell from the image above, is my Sedimentary Beanie! I released the pattern last autumn and it's been very poular. It's a two colour design inspired by the sedimentary layers & textures found in rocks. The beanie is crocheted in rows with the side seam sewn up and the crown gathered to finished. It's a simple four row repeat which will soon become rhythmic and mindful.


The pattern is rated intermediate level and it's written in UK and US terms. I designed it in Coopknits Socks Yeah! DK weight (8ply) in colours Astra Planeti & Anemol (top photo) and Tartarus & Sphene (above). The beanie is written for 4 sizes; child, teen, adult M & adult L.

You can receive 20% off the pattern on Ravelry with the code NOV21. If you can't access Ravelry, let me know in the comments and I can sort it out for you via email.

Until next time, happy crocheting,

Marta xx


Tuesday 2 November 2021

Crochet Sock Workshop coming up in the New Year!


Hello! I have been BURSTING to bring you this news about my first crochet sock workshop which is happening in the New Year! It's an in person workshop taking place at the newly opened Central Scotland School of Craft in Dunblane.

Although it's my first crochet workshop it's not the first time teaching for me. Just before the pandemic I taught a needle felting workshop (pictured below) which went down a treat for everyone who attended. I also successfully help & teach in a non-official way at the local craft groups I go to.


The full day workshop takes place on Saturday the 7th February 2022. Yarn and hook will be provided and participants will receive a printed copy of my Synthesizer Sock design to take away with them.

Some previous crochet experience is necessary for this workshop – participants will need to know the following basic crochet techniques; working in the round, double crochet stitches, half treble stitches, treble stitches (all in UK terms), how to increase & decrease stitches.


If you're interested in booking a space please visit the Central Scotland School of Craft website here, I'd love for you to join me!

Until next time, happy crocheting,

Marta xx


Tuesday 19 October 2021

It's crochet pattern release day for my Mavis Mitts!

photo © Niall Mitchell

Hello! I'm really excited to bring you my Mavis Mitts pattern! The design was tech edited, tested & photographed last month, I was just waiting for the photos coming in, which they did first thing yesterday morning!

photo © Niall Mitchell

So, what's this pattern all about? Allow me to dive in with the key points here ...

  • Pretty shell stitches form the basis of this design; my second mitts pattern.
  • They begin at the cuff, worked in rows, then work up to the fingertips in rounds.
  • The patterns is available as a pdf download from Ravelry & LoveCrafts.
  • Shaping is added to accommodate the thumb and create a beautiful fit.
  • Four sizes are included with the pattern; toddler, child, adult M & adult L.
  • There's plenty of scope for adjusting the fit of these mitts to suit the size you require. It will be easiest to select the circumference you need & then crochet more or less rounds to suit.
  • 100g of sock yarn is sufficient to make even the largest size. I used standard sock yarn from Vicki Brown Designs in the colourway Teal. Vicki kindly provided yarn support for this design.
  • This is an intermediate level pattern, written in both UK & US terms.
  • There are charts & video tutorials included with the written pattern if you need them.
  • This mitts design has been tech edited & tested, giving you peace of mind to enjoy crocheting.
  • My patterns now include a 'take it further' section with inspiration for you to add your own twist to my designs.
If there's anything I haven't covered here, please leave me a comment below and I'll happily answer any queries you may have.

photo © Niall Mitchell

To celebrate the release of this pattern, I'm offering you 30% on Ravelry with the code RELEASE. Hurry, offer expires at midnight tomorrow (Wednesday 20th October BST)

I hope you enjoy my new pattern! Until next time, happy crocheting,

Marta xx

Friday 15 October 2021

How to design crochet socks that fit


Hello! This week I'd like to delve into my design process with you and let you know how I go about designing crochet socks that fit. There are two key things which really help me in this process; firstly crocheting lots (and lots!) of socks and secondly my specialisation in Sculpture at art college. I feel it's these two elements together which help me manipulate crochet stitches and create the shapes I need.

I frequently crochet socks using my own patterns and I also follow patterns from other designers to learn how they use crochet stitches to create the heel in particular. I love the way that in crochet, unlike in knitting, the results are instant - you don't have to wait until your work is off the needles to see if your idea has worked, it's there for you to see right away. 

Socks almost always begin either at the toe as toe-up socks, or at the cuff as cuff-down socks. It's possible to crochet socks sideways too, but I've yet to try this technique! When crocheting toe-up socks I begin at the toe and increase stitches until I reach the correct circumference for the foot. I keep my blocker by my side so I can try it on the blocker as I go along and get the fit spot on. 


With cuff-down socks like my Fiddle Socks above, I use the same technique. I know approximately how many stitches I need for the cuff because I've got the numbers in my head from crocheting so many pairs of socks. Once I've worked 3 or 4 rounds of cuff I'll try it on my blocker for size - making sure it fits over the heel too!

Going back to my student days, I graduated from studying Fine Art, Sculpture at Duncan of Jordanstone College of Art & Design in the year 2000. I specialised in making life sized (and life like) sculptures of the human figure in clay and casting them into resin reinforced with fibre glass. Alongside this I drew hundreds of large self portraits and made small terracotta clay self portraits from memory which were fired in the kiln.

Working from life models and using what I could see in front of me to create in clay or on paper is definitely a skill which has transferred itself to my crochet practice. Somehow my brain just takes the shape & size of a heel and says "oh yeah, the next row will be 10 stitches with a decrease at either end" - I don't think I can explain it better than that!


As you can see in the photo above, it's not always right first time! Last week I was working on my latest sock design (which is going to be called Fiddle Socks) and I was on the gusset. Within a few rounds I could tell that my calculations were way off and the gusset and heel section were going to be huge! A quick bit of rattling down (you may have seen my frogging reel on Instagram?) and by working less stitches down the side of the heel flap things were back on track. I am super pleased with this heel, it fits my blocker and my foot perfectly!

If you're keen to start designing your own crocheted socks my advice would be to follow lots of other designers patterns for ideas on technique (not to copy their designs!) and to work with a sock blocker at your side. If you're working with sock yarn it will rattle down easily when things don't go to plan, which will happen! Use your mistakes to learn and to work out how to shape differently next time. 

I'll finish with a quick update on where I'm at with this new pattern and my other recent designs. I need to do a few calculations to work the heel stitch numbers out across the different sizes for my Fiddle Socks before I send it to be tech edited and then tested. My Mavis Mitts are very nearly ready for release - I'm just waiting for the photos back from eldest son, we had an excellent photo shoot together. As for my Air Balloon Beanie, it's been tech edited and is currently at the testing stage. To keep up to date with these future releases (and receive more generous discount codes than anywhere else on the internet) subscribe to my mailing list here.

Until next time, happy crocheting,

Marta xx 


Friday 8 October 2021

5 of the best crochet sock patterns!


Hello! I'm here today to share 5 of the best crochet sock patterns - tried & tested by me! I love crocheting socks, they're one of my favourite things to make - partly because they're a small project so they work up fast, partly because there's such a beautiful range of sock yarn out there to choose from. Some of these patterns I have Ravelry links to, others require a bit more tracking down as you will see. All the photos below are my versions of them, let's have a look ...


No.1  Tipping The Scales by Joanne Scrace. This pattern was released on Boxing day 2020 as a 5 part mystery crochet along and I remember starting straight away on that day! It's now available as a complete pattern on Ravelry for £4.00. Written for 7 sizes (baby to adult) this pattern is a fantastic stash buster. I made mine in a UK2, they're tiny! 


No.2  Brickyard Socks by Rohn Strong. One of my favourite sock patterns - I've made about 5 pairs of these! I love Rohn Strong's sock patterns, they're easy to follow and often combine more than 1 colour throughout the sock which keeps things interesting. I had a look online and can only find the pattern in Rohn's book 'Step Into Crochet'. I've crocheted about half the socks in this book, I'd definitely recommend it.


No.3  Sparkler Socks by Vicki Brown. I had a hard job choosing my favourite Vicki Brown sock pattern, I've made quite a few of these too! This design uses linked half trebles (UK terms) to create a lovely flat fabric - perfect for socks. Available in 3 adult sizes, you can download it from Ravelry on its own or as part of a 6 sock pattern bundle which is excellent value. Popping Vicki's website here too, although this pattern isn't on there, many other good ones are!


No.4  Everyone (Needs) Socks by Kat Goldin. This is the first pair of socks I ever crocheted so they're very special (on that note, please excuse my photography - this was back in 2017 and my photography skills have come a long way since then!). I can't seem to find this pattern anywhere online, but it is available in Kat's 2nd crochet book 'Hook, Stitch & Give' - another book well worth investing in. Amazingly it's written for 12 sizes, from baby throught to UK12 and it's very adaptable for different widths.


No.5  is one of my own designs - Fabulous Socks! This is my most purchased pattern and an excellent choice for the first time sock crocheter. It's a toe-up design with extended double crochet stitches for stretch and finished with a ribbed cuff. Designed using Paintbox Yarns sock wool, 100g is enough for each of the 3 adult sizes available. The pattern is downloadable from Ravelry & LoveCrafts for £3.50.

I hope you've found this mini guide useful! I send regular emails to my list covering topics like this, together with discount codes, free patterns, crochet tips & advice. If you'd like to subscribe to my list please sign up here

Until next time, happy crocheting,

Marta xx


Friday 1 October 2021

Banjo Socks - crochet sock pattern release!


Hello! I'm here today with exciting news of my latest pattern release - Banjo Socks! If you've been following me for a while, you probably saw these socks back in May when they were released as a Crate Crochet subscription box exclusive. I now have the rights to the pattern and I'm really pleased to finally be able to publish it for you to download.


My Banjo Socks are completely different from my other sock designs because they're designed to be crocheted in aran weight yarn. They're more of a house sock than a wear inside your shoes type sock and boy are they cosy! The puff stitches on the upper foot make the fabric of the sock more dense and there's a fold down cuff which helps keep the drafts out. I know I'm going to be wearing these a lot this winter!


Here's the nitty gritty on the pattern details ...
  • It's available in UK and US terms. 
  • Downloadable from Ravelry and LoveCrafts.
  • Instructions for 4 sizes, ranging from UK size 2 to 12 with plenty of scope for adjustments.
  • It's a toe-up pattern, crocheted in the round.
  • Intermediate skill level required.
  • It's been tested and tech edited, giving you peace of mind and an easy to follow pattern.
  • Half hour YouTube tutorial to accomapany the pattern.
  • Designed in Fiddlesticks Grange Ten - aran weight yarn/ 10ply (40% wool/ 40% acrylic/ 20% alpaca)
  • 2x 100g balls is sufficient for the smallest size, 3x 100g balls needed for the larger sizes.
  • 5.5mm crochet hook required

If there's anything I haven't covered here please leave me a comment, I'm happy to answer your questions.


Banjo Socks will be my pattern of the month for October. You can receive 20% off the pattern throughout October on Ravelry with the code OCT21. Code valid on my Banjo Socks pattern only.

I hope you enjoy this pattern, don't forget to tag me on Instagram so I can see and share your makes!

Until next time, happy crocheting,

Marta xx


Tuesday 28 September 2021

Organised October WiP-Along, Top Tip Tuesday 2


Hello! I'm back this Top Tip Tuesday with lots of ideas for being creative with your WIPs! If you missed my announcement about the Organised October WiP-Along or last Tuesday's post about making friends throughout the WiP-Along, it's probably best to check out those blog posts first ...

Being creative with your WiPs is probably one of the key things to finishing them quickly & in a fun way, so I'm here to give you a few suggestions on how to go about it.

Maybe the colours you chose at the start don't resonate with you in the same way the did in the beginning. Can you add some fresh colour or take a colour out? Playing with colour is a fantastic way to lift your mood and bring about the excitement you had when you started the project.

Perhaps it's a long term WiP that you've been working on for absolutely ages. You know you want to finish it, but the progress just seems to be sooooo slow. By taking yourself and your project to a new space you'll find the different environment will give you fresh inspiration and energy. This could mean taking your WiP with you to the beach or the park, it could be going to a cafe and sitting in a quiet corner to work on it, or it could simply be moving to a different room in your house. The change of scene will do you good!

And then there are those projects where you simply don't like the way they're going. Have a think - is there anything you can change? Let's say it's a crochet cardigan. Perhaps you don't like the way the shaping is going and you don't think it's going to fit properly. How can you alter it? Crochet is very easy to increase and decrease to suit shaping (and if it doesn't work, it's easy to frog and start again!). 


Finally, there are some WiPs that have sat so long in your pile that you can't remember why you even started them in the first place! Bring these projects out, have a good look at them and make either a commitment to finishing them (following my advice above) or the decision to pull them apart and use the components for something else.

As you know the WiP-Along is open to all crafts and I know most of you will be crocheting but these principles apply to books you have had sitting around (please don't pull them apart, simply donate them to the charity shop!), paintings that are sitting in a corner, sewing projects that you've half started etc.

I hope you found some useful tips in this post! The WiP-Along starts this Friday, so don't forget to share your WiPs on Instagram and remember we'll be cheering you on and sharing your progress in our stories.

Until next time, happy crocheting,

Marta xx

Thursday 23 September 2021

My 10 top tips for taking amazing flatlay photos!


Hello! Are you struggling to take good flatlay photos? Do you look at other people's perfect little squares on Instagram and wonder how they do it? Or perhaps you've been taking flatlay photos for a while and are looking for some tips to improve your skills?

I'm here with my 10 top tips for taking amazing flatlay photos!

I first began taking these images for my Instagram grid back in 2017 and through experience and via online courses, I've been learning ever since. I also dipped my toe in photography when I was at art college and it's this knowledge together with a solid grounding in composition which have helped me.

My biggest piece of advice to you would be to have a go. Try things out! If they don't work, make one or two changes and try again. Unlike when I was learning photography, photos on our phones don't cost us anything and we can take multiple shots making minor adjustments as we go. And, like most skills, there's a learning curve and it will become easier!


Here are my 10 top tips ...

1.  Set up your photo on a table or similar flat surface as close to the window as you can get. If it means pulling the sofa across the room, do it! The more natural light you can get, the better.

2.  The time of day and the weather play a big part in your lighting too. Avoid the beginning and end of the day when the shadows are longer. Avoid really bright, sunny days and dark, overcast days - you want something in the middle. If you have a lightweight roller blind or net curtains this helps to diffuse overly bright light. You could rig something up if you don't have something fixed to your window.

3.  Start with your background. You want something with a bit of interest but not too much. Battered old baking tins, wrapping paper, a scratched and weathered table top, vintage maps, self coloured fabric or fabric with with small ditsy floral print on it are all good choices. I invested in some backdrops from a company called Black Velvet Styling and I find them perfect to simply pull out and work on top of. I should add, this is not a sponsored post, I really do love them!

4.  Begin slowly. Once you've decided your background, you might want to add fabric down one side or across at an angle. In my photo below, I started with the mitts I was wanting to photograph and added the dried flowers- sweeping them across at an angle. This helps to add a bit of depth to your photo.

5.  When you have your background and your main subject, gather together small items that fit your theme. You may wish to start a props box to keep all these sorts of things close to hand - small things like buttons, shells, stones and feathers are all easy to aquire. Charity shops, car boot sales and antiques stores are an excellent source of smaller items to help give your flatlay interest and appeal.

6.  However, don't overload your photo with too many items! It's extrememly hard to read an image that's too cluttered. Allow your main subject (if it has one) plenty of space; it's perfectly fine to have a large area with nothing in it. Take photos as you're playing around and take a moment to assess whether things are working well together or not. Have a look at the image below - the feather was just too much!


7.  Have a few items spill out of the picture; a flatlay should feel as if it extends beyond the frame. As you are building up your composition look for things which can go over the edge.Scatter smaller items such as buttons or shells - making sure they go well beyond the frame. This all helps make the final image look more natural.

8.  Give your image plenty of space to breathe - don't go in too close. You final photo will feel hemmed in if it doesn't have enough space. This is something you can experiment with.

9.  Once you're happy with your composition, a photography bounce board will help to brighten the shadows and even out the contrast. If you're on a budget, simply use a large piece of white card.

10. If you're taking photos for Instagram, use your phone (or camera if it has the function available) on the square setting. That way you're seeing exactly the same dimensions as your final photo. Also make sure that you're holding your phone or camera parallel to your surface. A flatlay should be flat - not taken at a bit of an angle! Most phones have a function you can select in settings which acts like a spirit level, telling you when you're parallel.

I hope you've found this post useful! If you have, please bookmark it or pin it to Pinterest - thank you!

Until next time,

Marta xx


Tuesday 21 September 2021

6 tips for making friends during the Organised October WiP-Along


Hello! Today I'd like to share my 6 top tips for making new friends during the Organised October WiP-Along! If you're not sure what this challenge is about, you probably want to read my last blog post first. 

For me, making new friends is one of the best things about joining in with challenges like these! The WiP-Along is taking place on Instagram, the social platform with a suer friendly and supportive crafting community. Whether you have taken part in the WiP-Along or a CAL (Crochet A-Long) or a KAL (Knit A-Long) or something similar before or not, there's sure to be something useful in this post for you.

For me, making new friends is one of the best things about joining in with challenges like these! The WiP-Along is taking place on Instagram, the social platform with a suer friendly and supportive crafting community. Whether you have taken part in the WiP-Along or a CAL (Crochet A-Long) or a KAL (Knit A-Long) or something similar before or not, there's sure to be something useful in this post for you.

Let's dive in ...

  1. If someone leaves a lovely comment on any of your posts, take a moment to leave a friendly reply. If you're not already following them, go and check out their account.
  2. Make sure you're following the hosts. They'll be sharing posts in their stories and you'll be introduced to new accounts. My co-hosts are @andintothetrees, @goslingandplumb, @laboursoflovecrochet and @sewcraftynaz.
  3. Follow the hashtags #wipalong21 and #organisedoctober21 - this way you'll see a few posts everytime you scroll through your feed from accounts you're not following. If you do see posts that interest you, click on them to see more of the other person's posts. Like, comment, save, share, follow - if you like what you see.
  4. Leave lots of encouraging comments on posts or in stories. The chances are, you'll get a reply and the start of a blossoming friendship.
  5. Share other people's content to your stories! This lets them know you appreciate their content and widens everyone's circle of friends! 
  6. If someone new follows you, take a moment to check out their account. If they look like a good match for you, follow them back!


... and I have a bonus tip which is something I try my best to impliment because it's a super friendly way to reach out and connect with new friends - I send new followers a short DM (direct message) introducing myself! When I send these DMs I almost always receive a lovely reply with a bit more information about the other person and our relationship is off to a flying start! If you have a business account you can set this up as a shortcut in DMs. If you don't have a business account, you can set one up in the notes app on your phone and copy & paste from there.

Like I said at the start of this post, the crafting community on Instagram is a positive, supportive one, so don't feel shy about joining in with comments and feedback, everyone is very friendly. I know I've made some really good friends there and I'm sure you will too!

If you have any questions about the WiP-along you can leave a comment below or you can reach out to me on Instagram, I'd love to hear from you! 

Also, if you'd like to keep up to date with my blog posts, receive free patterns, crochet tips & advice, see sneak peeks and more, you can subscribe to my mailing list here.

Until next time,

Marta xx


Friday 17 September 2021

Organised October WiP-Along


Hello! Next month, over on Instagram, I'm co-hosting the Organised October WiP-Along and I'd love you to join us!

What's a WiP-Along? Well, firstly "WiP" stands for Work in Progress and is widely used on Instagram to refer to projects that are on the go. The "Along" refers to the community support of cheering each other on to finish these projects.

If you have a project (or 2, or 5, or 95!) on the go, then this challenge is for you! Dig out those WiPs and take a a look at what needs to be done to finish them. Do you need to order more yarn/fabric/paint etc? Do you need help choosing colours? Do you simply need to get your head down and work on it?

As an extra incentive, there are printables to go along with this too! Laura (goslingandplumb on Instagram) has created a monthly planner, a weekly planner and even a fun bingo sheet with rewards! They are FREE to download so if you're into pretty stationary you should definitely check them out!

my current WiP pile - a mix of crochet & knitting

There will be prompts to encourage you to share photos of your progress - Motivation Monday, Share Saturday etc. We would really like you to post photos of your progress firstly to give you something to look back on and secondly for others to leave you lovely comments, motivating you to continue.

As well as myself and Laura, the other hosts are Ruth (@laboursoflovecrochet), Hannah (@andintothetrees) and Nasreen (@sewcraftynaz). There will be to be tips from all the hosts on tackling your WiPs, covering topics such as setting achievable goals, not comparing yourself to others and challenging yourself.

This annual challenge started back in 2017 and it's not just yarny projects that are welcomed either - you could include sewing, reading, gardening, DIY, calligraphy ... anything creative really!

Are you going to join in? We'd love to see as many of you as possible finishing projects, getting creative, making new friends and cheering each other on, Look out for more details over on Instagram and next week there will be a blog post on Tuesday with some top tips for making the most of this challenge. If you'd like updates straight to your inbox please subscribe to my mailing list here.

If you have any questions, please hit reply to this email or drop me a DM over on Instagram (you know that's my fave hangout!)

Until next time,

Marta xx

Wednesday 8 September 2021

5 Of The Best Slouchy Beanie Crochet Patterns!


Hello! I've picked out 5 slouchy beanie patterns for you to crochet this autumn! They've all been tried & tested by me and I think you're going to love them! I've chosen designs requiring a variety of yarn thicknesses with some free and some paid for patterns. Let's dive in ...

No. 1. is the Lake's Edge Hat by Kat Goldin. This is a free pattern with lots of tutorials to help you if you need them. The hat works up quickly in aran weight yarn (10ply) using V-stitch. I made this hat for my youngest a few years ago and it's still going strong! You can find the pattern here.


No.2 Is the Skipton Hat by Vicki Brown Designs. I loved making this hat, especially in this variegated yarn - the colours kept changing, keeping things interesting. This one is DK weight (8ply) and I added a faux fur pompom! You can find the free pattern here.


No.3 is the Puppy Love Heart Slouchy by Bethany Dearden. The basic pattern in 1 adult size is free on the blog or you can buy the pattern which gives you multiple sizes and eliminates the adverts. This design calls for aran weight (10ply) yarn and it works up super fast! I enjoyed the way the hearts formed in this pattern - I definitely want to make another one!  You can find the free version of the pattern here.


No.4 is the Bromsgrove Hat by Joanne Scrace. This super slouchy design is worked in 4ply and is a great stash buster, you could use as many colours as you like! There are lots of different stitch techniques needed in the rounds, but nothing too tricky - it's rated as easy. This pattern is £4.00 on Ravelry, you can find it here.


No.5 is one of my own designs! This is the Barista Beanie, originally an exclusive for Crate Crochet subscription box in Australia. The pattern alternates between working in rows and working in rounds which gives it lovely drape. Fingering weight (4ply) yarn is required and it finishes with a crochet tie rather than a pompom. Find this pattern on Lovecrafts.com here.

Subscribe to my newsletter to receive more crochet inspiration, free patterns, crochet tips & advice here. I hope you've found this post useful. Let me know if you give any of them a try, I'd love to know how you get on!

Until next time, happy crocheting,

Marta xx

Friday 3 September 2021

My crochet pattern of the month for September is ...


Hello! It's suddenly September and I know that many of you are starting to crochet warmer items for the months ahead, so I have chosen socks as my featured pattern this month.

My Fabulous Socks! are a toe up design using extended stitches to create excellent stretch around the foot. The pattern includes a link to my YouTube tutorial showing you exactly how to create these stitches.


The cuffs are worked in rows of back loop only stitches, creating a snug finish around the ankles.

100g of sock weight yarn is sufficient for each of the sizes. I used Paintbox Yarns sock yarn in Stripes - Rainbow, but any sock yarn will work for this pattern.

I've rated this pattern as intermediate level. If you've never crocheted socks before but have are confident beginner level onwards, you'll be absoloutely fine with this pattern. 


Throughout the month of September you can use the code SEPT21 at the checkout on Ravelry to receive 20% off this pattern.

If you have any questions you can drop me a comment below or you can send me a DM on  Instagram, I'm more than happy to help you out. Don't forget to tag me on Instagram if you crochet a pair too, I'd love to see!

Until next time, happy crocheting, 

Marta xx

How To Make Do And Mend With Crochet

  Make Do And Mend With Crochet Hello! This week I'd like to focus on one of my core values when it comes to crafting: How To "Mak...