Showing posts with label buttons. Show all posts

Wednesday, 28 April 2021

Finding things in charity shops


Hello! Today I was really happy to be able to get back to the charity shops hunting for yarn related bargains! Here in Scotland, lockdown restrictions eased on Monday, allowing non-essential shops to re-open. and I have really missed having a rummage in my local charity shops. There are currently 4 in my town and whilst one focuses on baby & childrens items, the rest are an all round excellent source of second hand items. Charity shops, also known as op shops or thrift shops, are one of my favourite places to look for yarn, fabric, thread, needles, hooks and other haberdashery items. 


Today I was searching for some buttons and I knew exactly which shop had them all sorted into colours (see pic above). I was sucesful in finding just the ones I needed! In another shop I stumbled across 4 unopened bags of wool tops -  I bought the White Dorset Horn, Wensleydale and the White Perndale but left the purple one with sparkles but I may well go back for it! In another shop I found a 50g ball of Louisa Harding Grace - silk & wool and an unlabelled ball of yarn which I'm pretty sure is Rowan felted tweed. The top photo shows my purchases, all this for £4, score! 

A few years ago, I was on a bus and I overheard someone behind me saying to her friend "don't make it obvious you're looking, but see that woman sitting diagnally in front of us - she's a bit of a charity shopper, I often see her going in and out of them". They could only have been talking about me as the bus was practically empty - I decided to take it as a compliment and couldn't stop smirking!

I just love how you never know what you might find, one person's trash really is another's treasure! My local shops all donate to local causes too, which gives me the added satisfaction of knowing that my spare change is being used locally (and it means the shops are not half full of their own brand merchandise). What about you? Do you like charity shopping for craft items? What's the best thing you've found?

Thursday, 8 June 2017

Choosing Colours

Hello! This week's blog post is all about choosing colours! Colour is of massive importance to me when I'm crocheting and it's often something that people compliment me on, so I thought I would share with you a little bit about colour theory in general before taking a look at how I personally pick colours. I'll also give you some practical tips for choosing colours for your own projects.


To illustrate my blog post I'm going to use this crocheted hexagon blanket - it's also the source of inspiration for this topic so it seemed appropriate. The information I am sharing in this post is not just for crocheters - anyone who is seeking more advice on how to choose and combine colours should find it useful. 

I've always enjoyed colour and combining colours together but it wasn't until my Portfolio Art Course at Angus College (now Dundee and Angus College) that I began to learn the science of colour theory. This new-to-me teaching and the further guidance and instruction I gained at art college (I studied at Duncan of Jordanstone College of Art and Design, Dundee) gave me the firm foundation that I now base almost all my colour choices on.

The colour wheel is the most common theory which I refer to when choosing colours. Nowadays I don't even think about it, it's like tying my shoelaces, but back then I learnt the principles and applied them every time. So, what is this colour wheel? I decided to have a play about with buttons to create one ...


The colour wheel is a diagram showing where all the colours are in relation to each other. There are 3 primary colours; RED, BLUE and YELLOW. These 3 colours are used in combination to form all the other colours. The secondary colours are ORANGE, GREEN and PURPLE - these are formed by mixing 2 primary colours together. For example, if you look at the colour wheel above, you can see that YELLOW and RED mixed together produces ORANGE. Now, half shut your eyes so that you are squinting at your screen - look at yellow then look at red and watch them blur into orange. 

Complimentary colours (sometimes called contrasting colours) are the colours opposite each other on the colour wheel, ie. BLUE/ ORANGE, RED/ GREEN and YELLOW/ PURPLE. Note that each complimentary colour is made up of 1 primary colour and 1 secondary colour. When choosing colours, complimentary colours go well with each other, they compliment one and other and are usually a safe choice. The two complimentaries which I use over and over are BLUE/ ORANGE and PURPLE/ YELLOW. I tend to have "red and green should never be seen, except on the Christmas tree" in my head when I think of green and red together! However, they do often work; especially pale, lime green with a darker red.


In the image above you can see my clear use of yellow with purple (the most predominant colour combination in this blanket!) and in the centre pale green surrounded by darker reds. 

The colours which are side by side on the colour wheel are analogous colours, ie. PURPLE/ BLUE, BLUE/ GREEN, GREEN/ YELLOW etc. If you are looking for a more subtle colour combination pick analogous colours (these are sometimes referred to as harmonious colours, you can see why!). If your colour scheme requires a trio of colours, choosing 1 primary colour with the 2 secondary colours either side is an excellent combination, ie GREEN/ BLUE/ PURPLE


White, black and grey are used to lighten or darken colours. There is a range called an achromatic scale which can be produced for each colour, starting with the pale, pastel shades through to the very dark, almost black shades. When choosing colours you may wish to stick with colours which are on a similar level of the chromatic scale (eg all pastels or all dark, moody colours) or you may wish to pick colours from different levels on the scale to create greater contrast in tone. I had fun with buttons again and created an achromatic scale for purple ...


So, that's all the basic colour theory that I wanted to share with you - if you're interested in finding out more there is a wealth of information to be found online or in your local library. In the second half of this blog post I want to pass on some practical tips on bringing the theory into your own colour choices. 

One of my favourite ways of looking for new colour combinations is to play around with paint cards from the DIY store! Either keep them as they are (usually 3 to 5 colours in an achromatic colour scale) or cut the strips up to create isolated colour chips. Now try and form some colour trios, basing your 3 colours on the colour theory I have mentioned. There are infinite possibilities and there are no right or wrong answers, go on, explore! You may wish to start a notebook and glue your favourite combinations in it, ready to refer back to when you need inspiration.


Another technique is to create mood boards. Grab a pile of magazines (National Geographic magazines are my favourite for this and are usually fairly cheap in charity shops), some paint cards or fabric samples, scraps of wool, small items from a nature walk - whatever you have to hand - and get creative! If you don't feel like getting hands on, use Pinterest! You can search for millions of different images on Pinterest and if you don't feel like sharing your board with the rest of the world you can set it to "secret".


For colour inspiration the best piece of advice I could give you is to go out and explore! Take photos of colour combinations you find pleasing, draw or record in a notebook things you've seen, collect interesting colours (napkins, leaves, theatre tickets, flower petals, plastic washed up on the beach) - open your eyes, colour is just waiting to be found!


I hope you've found this blog post useful, let me know in the comments if you have! For more colour inspiration, follow me on Instagram.

Marta xx


Wednesday, 2 March 2016

Free Crochet Pattern; Cabled Boot Cuffs

This month's pattern is for a pair of boot cuffs, designed in Artesano aran wool which provides a cosy and stylish addition to any boots.


The pattern is suitable for those with intermediate level of crochet ability.


There are 4 adult sizes available; small, medium, large and extra large. The photos show the medium size.

My pattern is for your personal use. If you follow my pattern and go on to sell the item, please state that I am designer. Thank you!


Materials
Small [medium, large, extra large] 1 [1,2,2] x 100g skein Artesano aran (132m / 144yds per 100g) any colour, I used “birch”
7 mm crochet hook
tapestry needle (for sewing in ends)
4 x 2cm diameter buttons
needle and thread for sewing on buttons


Tension
11 stitches x 8 rows in  a 10cm² / 4 inch²


Abbreviations (UK terms)
ftr foundation treble
ch chain
st stitch
dc double crochet
htr half treble
fpttr front post triple treble
blo back loop only
prev previous
cont continue
rep repeat
RS right side
patt pattern


Notes
The pattern begins with foundation treble stitches. If you are unfamiliar with how to do foundation stitches it is worth looking up on you tube. You could substitute these stitches with regular chain stitches and a row of trebles. Please note that if you take this option you will finish up at the wrong end of the boot cuff - simply reattach the yarn and carry on.


The front post stitches (fpttr) are worked into the front post of the stitches 2 rows below.


The turning chains all count as 1htr and the 1st stitch is missed. At the end of the row work 1htr into the turning chain.

The left and right cuffs differ slightly to allow the button overlap to fall correctly on each side. When starting the left cuff leave an 80 cm tail of wool - after completing the rows this will be used to add the button loops down the side. The right cuff has the loops on the opposite side - an extra length of wool needs to be joined in for this.


Pattern
Left Cuff
Foundation Row Using 7 mm hook, leaving an 80 cm tail, ftr 30 [38,46,54]. Turn


Row 1  Ch2 (counts as 1htr), 1htr into each st across, 1htr into turning ch. Turn (30 [38,46,54] stitches)


Row 2 Ch2 (counts as 1htr), 1fpttr into each of next 2ftr (foundation row), miss 3 st *1htr in each of next 4htr (row 1), 1fpttr in each of next 4 ftr (foundation row), miss 4 htr* rep from * to * 1 [2,3,4] more times, 1htr in each of next 4htr, 1fpttr in next 2 ftr, miss 2, 1htr in each st until end, 1htr in turn ch. Turn


Row 3 Ch2 (counts as 1htr), 1htr into each st across, 1htr into turning ch. Turn (30 [38,46,54] stitches)


Row 4 Ch2 (counts as 1htr), 1htr in each of next 2htr, 1fpttr in 1st 2fpttr (row 2), 1fpttr in each of next 2fpttr (row 2), *miss 4htr (row 3), 1htr in each of next 4htr, 1fpttr in each of next 4fpttr (row 2),* rep from *to* 1 [2,3,4] more times, 1htr in each st until end, 1htr into turning ch. Turn


Row 5 Ch2 (counts as 1htr), 1htr in each of next 8st, *1htr into next htr catching blo of fpttr of row 3, 1htr in each of next 7st* rep from * to * 1 [2,3,4] more times, 1htr in each st until end, 1htr in turn ch. Turn


Row 6 Ch2 (counts as 1htr), 1fpttr in 1st 2fpttr (row 4), miss 3st, *1htr in each of next 4htr (row 5), 1fpttr in each of next 4fpttr (row 4), miss 4htr* rep from * to * 1 [2,3,4] more times, 1htr in each of next 4htr, 1 fpttr in each of next 2fpttr, 1htr in each st until end, 1htr into turning ch. Turn


Row 7 Ch2 (counts as 1htr), 1htr in each of next 12st, *1htr into next htr catching blo of fpttr of row 5, 1htr in each of next 7st* rep from * to * 1 [2,3,4]  more times, 1htr in each st until end, 1htr in turn ch. Turn


Row 8 Ch2 (counts as 1htr), 1fpttr in 1st 2fpttr (row 6), miss 3htr, *1htr in each of next 4htr (row 7), 1fpttr in each of next 4fpttr (row 6), miss 4htr* rep from *to* 1 [2,3,4]  more times, 1htr in each of next 4htr (row 7), 1fpttr in each of next 2fpttr (row 6), 1htr in each st until end, 1htr into turning ch. Turn


Row 9 As row 7. Finish off, weaving in ends.


Button loops Using long 80 cm tail from ftr, RS facing, Ch1, working down side 1dc into next 2 end of row, ch2, 1dc into each of next 5 end of rows, ch 2 1dc into each of next 2 end of rows. Finish off, weaving in ends.


Right cuff
Foundation Row Using 7 mm hook, (no need for long tail) ftr 30 [38,46,54]. Turn


Row 1  Ch2 (counts as 1htr), 1htr into each st across, 1htr into turning ch. Turn (30 [38,46,54] stitches)


Row 2 Ch2 (counts as 1htr), miss 1htr, 1htr in each of next 5htr ... beg patt as left cuff


Row 3 - 9 As left cuff, with button space on opposite side


Button loops
RS facing, join wool at top left corner, ch1, working down side 1dc into next 2 end of row, ch2, 1dc into each of next 5 end of rows, ch 2 1dc into each of next 2 end of rows. Finish off, weaving in ends.


Finishing off
Using photo as a guide sew buttons on.

I hope you will enjoy following this pattern. 
Look out for more free patterns at mrsdaftspaniel.blogspot.com
Follow me on Instagram @mrsdaftspaniel

I am listing this and all my crochet patterns for free this month on Ravelry - go have a look here!

Happy hooking,

Marta xx

Wednesday, 17 February 2016

A Bunny for Easter

I have been very productive over the last week or so, designing and crocheting new things! I was asked by my brother in law, Ian, to make a bunny for his goddaughter's birthday, a challenge I immediately accepted! I love crocheting soft toys and a wee bunny sounded like a cute idea! I decided that as it was coming up for Easter it was an excellent opportunity to design the pattern myself and write it up for others to make one too!

finished bunny

I have been making various crocheted animals for years and have designed a few myself already so I simply followed basic construction techniques I have learnt along the way to "build" the bunny up. Ian was lucky that I had some appropriate wool in my stash to get started right away - I used James C. Brett "Legacy", a really soft pure wool.
progress photo

The ears were one of the hardest things for me to crochet, I had to keep going back and forth asking family members for their opinions but eventually they turned out how I wanted them!

completed bunny

Once I had finished crocheting I still had a day until Ian was popping round to collect her so I decided to have some fun making a dress! I chose some pretty Liberty fabric, which was actually from a vintage blouse I found in a charity shop and cut up. I made up a simple gathered style maxi dress and studded it at the back to show off the bunny's cute tail!

back view

The bunny was opened up by her new owner yesterday. Apparently she was pulled out by the ears (ouch!) and then hugged and kissed! Awww, I love my job!

close up

Now the bunny is finished I have started a new project which I will share in my next blog post, or hop over to Instagram if you can't wait till then! 


Marta xx


Thursday, 14 January 2016

Inspiring start to the year

I have had a lot of inspiration for new work so far this year which is not the way I expected January to turn out! I decided to challenge myself to write (and type up!) one new crochet pattern each month of 2016 because last year my pattern writing was somewhat unfocused and sporadic. I thought if I stuck to a seasonal item each time it would give me the focus I needed to create. Today is the 14th of January and so far I have a boot cuff pattern written (typed up and at the testing stage) and a hat pattern on the go!

boot cuff design

The boot cuffs use the crocheted cable method to produced a raised, textural effect. I began with pen and paper, sketching out the cable pattern then transferred it to crochet. I chose Artesano aran alpaca wool blend for the project because I am slightly addicted to alpaca yarn at the moment and I knew this particular wool would be soft and cosy. The small and medium size boot cuffs use one skein, larger sizes use two skeins; you can buy Artesano aran here. Once I am happy that the pattern is fully tested I will publish it, keep your eyes peeled!

fresh off the hook


last night's dusting of snow provided the 
perfect back drop for my photo shoot 

My second crochet design is a beanie hat, made in two colours using spike stitches. Up until now I have tended to focus on single colour patterns when I am designing because they are so much easier to write up. Now that I have more experience I am going to bring my love of colour into my work. This is something I am really excited about for this year and I hope it will bring a pop of colour into the world!

design in progress

This time I am using MillaMia naturally soft merino aran, which you can buy here. I love these two intense colours together, they will make a super bright hat! There may even be enough yarn left over from two balls to make a pompom, I'm not sure at this stage. I will finish this design in the next few days and type it up promptly (not leave illegible scribbles in my notebook to be forgotten!). Again, once it is tested I will share it with you.

My third creative burst this year is a new sewing design which I hope to sell in my online Folksy shop later this month. I started with a simple idea of using a covered button and played around with various fabrics and textures to go with it to create a brooch. I had soon come up with something I liked and I hope others will too!

new brooch design

So, I seem to be off to a good start this year and I hope it continues to be a year full of inspiration and creativity! What about you? Have you any creative plans for the year? Have you made something exciting? Please share below, I'd love to see!

Marta xx

Monday, 5 October 2015

Introducing my Sasha doll; Belinda

I would like to introduce you to my Sasha doll called Belinda. I have had her since I was very small, making her one of the earlier versions of the design. If you are unfamiliar with Sasha dolls, have a look at this link


I made the pink and blue outfit above as my entry in the "dressed doll" category at my local flower show and she won first prize! This was before I had started up my craft business and this recognition gave me the confidence to make a go of it!


About a month ago I stumbled across a box of my child hood toys in the attic, and Belinda was inside! Then last week I was looking for a quick project and decided to make Belinda a new dress. I looked through my baby clothes patterns, found a newborn one and made it in 3ply yarn instead of double knitting (8ply) in order to achieve the correct fit. It was fiddly working in such fine wool, but it crocheted up really fast so it was rewarding!


I have a large selection of vintage pattern books which I love! These 2 are particularly inspiring at the moment. Toys to Knit and Crochet has several pages of patterns especially for Sasha dolls. It was kindly passed on to me from my friend Teresa - thanks Teresa!!

On Saturday I made a very speedy dress in vintage 4ply cotton. It worked up so quickly I got carried away, finished it, sewed in all the the ends, sewed the buttons on ... the inside! Today I went back and sorted them, and I'm happy with the vintage style on Belinda - what do you think?


Do you have a Sasha doll? If so, I would love to see photos, please share them!

Marta xx
Saturday, 30 May 2015

Adding Colour to the Playground, Part 2

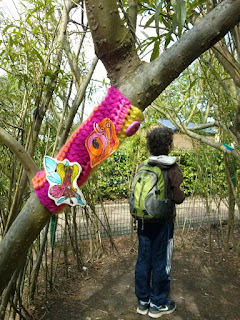
I managed to dodge the heavy showers this week and install the yarnbombs at my boys' school! I did have to run in for cover half way through and there was an extremely heavy shower of rain and hail just after I finished, good timing!

 entrance to the fairy garden

I worked quickly, hoping that I wouldn't be spotted by the children because I wanted them to find the pieces for themselves at lunch time. I sewed the crocheted rectangles around fence posts and willow tunnel branches.

 another fence post piece


 several were sewn onto the willow branches

I had to twist and turn into all sorts of funny positions to fit in the child sized willow tunnel, it was good to stretch full height afterwards!

a much longer yarnbomb

 I love the shrinkies the children coloured!

In another area of the playground I installed 3 yarnbombs with amigurumi monsters attached to them! 

monster yarnbomb 

I crocheted the monsters for fun over 5 years ago without any real purpose in mind for them. Since then they have been moved around my studio space gathering dust. I thought this project would literally breath some fresh life into them!

a happy smile

I hope the children enjoy interacting with these small pockets of colour in their playground. I know they have plans to further transform the area and I look forward to seeing what they come up with!

Wednesday, 29 April 2015

Badge Bombing!!

Last Friday I took a trip to Dundee to go badge bombing for the first time! I went around the centre of Dundee and attached small badges to places for other people to come along, find them and keep them!

the finished badges, day before my trip

For a while now I have been following the adventures of @dymagate and @whimsicallush on Instagram and they both inspired me to leave something small of my own in a public place for someone else to stumble upon. I chose to make little badges with big smiley faces to brighten up someone's day.

 badge left near Dundee train station

I kept the badges simple, just button eyes and an embroidered mouth, and I hand stitched the word "Daft" on the back (my Instagram name is @mrsdaftspaniel but that was too long to stitch!). 

this one made me smile!

There were plenty of places to leave the badges, for example attached to fencing or abandoned cord and I pinned one to a yarnbombed tree!

 I like this one, blending with background colours

I had also brought a sample of weaving with me to sew onto a lamp post or something and I found the bench in the photo below to be the perfect size for it! I sat on the bench and sewed it on during lunch hour, I wonder if anyone even saw me?

and of course I did a yarnbomb!

As soon as I could I uploaded photos of my badge bombing to my Instagram and Facebook pages and was surprised to see that the badges were quickly found by people! Of the 5 badges I placed I know that 3 were found and brought a smile to those who found them, which makes it all worthwhile!

Help me!!

I am already planning my next adventure when I will set another load of badges free! Follow me on Instagram if you would like to stay updated :)


Choosing Yarn For Crocheting Socks

Hello! As you know, this week I released a new crochet sock pattern, Dunkeld Slipper Socks and I received a sweet review from Rosemary, who...