Hello, I'm returning, as promised, with the second installment of my two part series on designing your own crocheted cowl. I hope you found the first part useful and have perhaps even begun to think about your first möbius cowl crochet design. However, if you missed that blog post, not to worry, you can find it here.
Crocheting Your Own Möbius Cowl Design: Step-by-Step Guide
Once you're happy with your cowl design idea, gather your materials and follow these steps:
Work out how many pattern repeats, if any, you're going to need (for a super simple one stitch cowl, there won’t be a pattern repeat): I suggest the circumference of your möbius tube should be around 40cm, but this will depend on the length of your pattern repeats, it may be a little less or a little more. So, for a 5cm pattern repeat you will need 8 repeats to achieve a round of 40cm (thus creating a tube which is 20cm across).
Create a Foundation Chain: Begin with the appropriate number of chains based on your calculations in step 1. Join to work in the round, making sure your chain isn’t twisted.
Work Your Stitch Pattern: Follow your chosen stitch pattern to create the desired length of your cowl (I suggest around 80cm).
Colour changes: If you’re using more than one colour, yarn can be carried up the inside of your cowl. If it’s a longer jump, cut the yarn and knot the two ends together after joining - with this design method all ends will be hidden inside the tube.
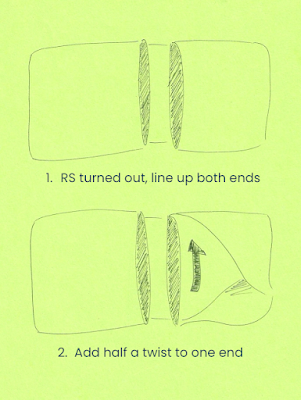
Join the Ends: To achieve the möbius twist; (1) with RS turned out, line up both ends of the tube, (2) add a half twist to one end to offset the line up, pin in place. Thread the long tail on a needle & sew the ends together with mattress stitch. Sew in these 2 final ends.
Tips for Success:
Write notes as you go: Keep a notepad or use your phone to keep track of everything you do. It will make it so much easier to come back to, especially if you decide to make a second one or write up the pattern!
Practice Makes Perfect: I know it's a cliché, but practice really does make perfect, so don't be discouraged if your first attempt isn't quite how you imagined it would be. Simply enjoy the learning process and go along with your own journey of creating. As with all things. It does get easier (promise!).
Ignore Imposter Syndrome: This kind of follows on from my tip above; try not to compare yourself too much with established crochet designers. They will have been doing this for much longer than you, they'll have more experience and will have made all sorts of mistakes along the way.
Show Off Your Creation: Share your masterpiece with the world! Post photos on social media of your process and your finished cowl to inspire others.
Next steps:
Did you know I’ve written a course to help you write up your first crochet pattern? If you’re ready to take your scribbled notes to the next level and publish your crochet pattern, check out my How To Write Up A Crochet Pattern Course which will guide you through all the steps in the writing up process. I really encourage you to give this a go and, as always, I'm on hand to answer any questions you have.
Final Words of Encouragement from Me:
Designing and crocheting your own cowl is a very fulfilling experience that allows you to express your creativity at the same time as crocheting a functional accessory you'll cherish for years to come. So, why not discover your inner designer (I bet you’ll surprise yourself!), go gather what you need and embark on this exciting crafting adventure!
Until next time, happy crocheting,
Marta xx

.png)


