Showing posts with label creative. Show all posts

Friday 17 September 2021

Organised October WiP-Along


Hello! Next month, over on Instagram, I'm co-hosting the Organised October WiP-Along and I'd love you to join us!

What's a WiP-Along? Well, firstly "WiP" stands for Work in Progress and is widely used on Instagram to refer to projects that are on the go. The "Along" refers to the community support of cheering each other on to finish these projects.

If you have a project (or 2, or 5, or 95!) on the go, then this challenge is for you! Dig out those WiPs and take a a look at what needs to be done to finish them. Do you need to order more yarn/fabric/paint etc? Do you need help choosing colours? Do you simply need to get your head down and work on it?

As an extra incentive, there are printables to go along with this too! Laura (goslingandplumb on Instagram) has created a monthly planner, a weekly planner and even a fun bingo sheet with rewards! They are FREE to download so if you're into pretty stationary you should definitely check them out!

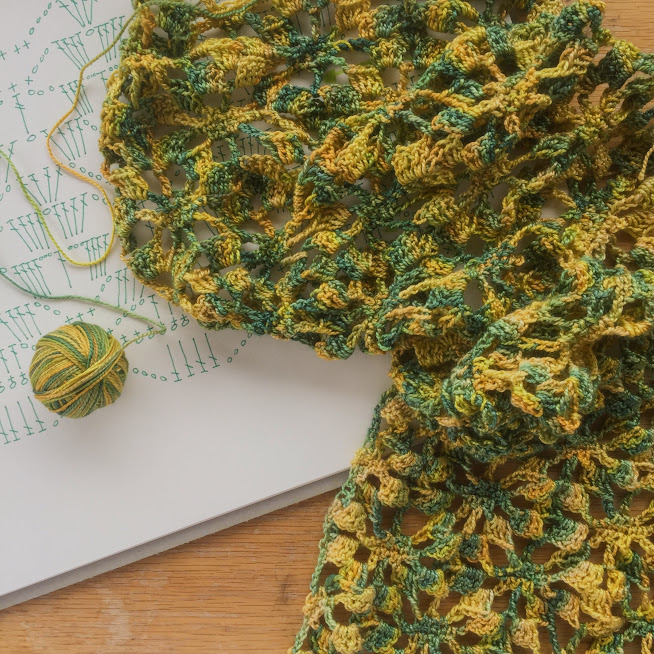
my current WiP pile - a mix of crochet & knitting

There will be prompts to encourage you to share photos of your progress - Motivation Monday, Share Saturday etc. We would really like you to post photos of your progress firstly to give you something to look back on and secondly for others to leave you lovely comments, motivating you to continue.

As well as myself and Laura, the other hosts are Ruth (@laboursoflovecrochet), Hannah (@andintothetrees) and Nasreen (@sewcraftynaz). There will be to be tips from all the hosts on tackling your WiPs, covering topics such as setting achievable goals, not comparing yourself to others and challenging yourself.

This annual challenge started back in 2017 and it's not just yarny projects that are welcomed either - you could include sewing, reading, gardening, DIY, calligraphy ... anything creative really!

Are you going to join in? We'd love to see as many of you as possible finishing projects, getting creative, making new friends and cheering each other on, Look out for more details over on Instagram and next week there will be a blog post on Tuesday with some top tips for making the most of this challenge. If you'd like updates straight to your inbox please subscribe to my mailing list here.

If you have any questions, please hit reply to this email or drop me a DM over on Instagram (you know that's my fave hangout!)

Until next time,

Marta xx

Thursday 15 April 2021

Playing about with adding Liberty fabric to crochet

Hello! This week I've been playing about with adding pretty Liberty fabric to one of my crochet projects and I've been having a lot of fun with it! I love the way that fabric totally changes the way a crocheted item looks and how the different texture & surface pattern brings the whole thing to life.

The project I've been working on is an amigurumi wolf pattern. She is called Iris and she is the follow up to Agnes the bunny pattern that I created in 2017. The Agnes pattern includes a photo of the bunny wearing a Liberty Tana Lawn dress with the caption "Feeling creative? Why not make your bunny a dress!" - I certainly wasn't feeling creative or experienced enough at the time to write up the instructions for the dress I had cobbled together!

Fast forward 4 years and I decided to create another amigurumi pattern in a similar style to Agnes. I decided on a wolf because I knew the proportions would work out similarly and because wolves have large enough ears to embelish with fabric. Don't worry, she's definitely a friendly wolf!

I used Agnes the bunny as a template for the main body parts which gave me the opportunity to refresh her pattern at the same time (as I've mentioned here before, my pattern writing style has changed in the last few years and it's much more consistent now). Obviously the ears, snout and tail are very different and I had fun designing those elements. I used the same yarn as I had for the bunny, but a different colourway - Juniper Moon Farm extra fine baby alpaca in Travertine. Agnes is free to download from Lovecrafts here and from Ravelry here (please note that Ravelry may cause issues for people with visual disturbances, proceed with caution).


For Iris' ears I used Liberty Tana Lawn in Ffion because I had a little scrap left over from an english paper piecing project which was the right size. When it came to the dress I couldn't choose between Betsy (the grey pattern) and Poppy and Daisy (the brighter red, yellow & blue pattern) so I popped a poll in my Instagram stories to see what my follwers liked best. The vote was a near 50/ 50 split so I decided to make 2 dresses, one in each fabric! Which one do you prefer? Let me know in the comments.

I used my sewing machine to make the prototype dress in Poppy and Daisy and besides a few minor adjustments I was happy with how it went. For the Betsy dress I wanted to make it entirely by hand, firstly to check it was possible and secondly because it's easier to stop and start for taking photos. The dress pattern will be accompanied with step-by-step photos because I want it to be as clear as possible to follow.

The good news is that the dress pattern will fit Agnes the bunny and Iris the wolf which I am really chuffed about! At the moment the entire pattern is with my testing team and when I have their feedback and once I've done the official photo shoot the pattern will be ready to release - hopefully in the next couple of weeks. 

Until next time,

Marta xx


Friday 26 February 2021

3 tips to help you choose colours for your projects


Hello again! Have you ever struggled with choosing colours for a crochet or knitting project? I'm frequently asked how I go about choosing my colour schemes and so in this blog post I am going to share 3 practical tips to help you make the most of colour.


Tip no. 1.  Play with colour! 

Start by keeping things simple with just 3 colours at a time. Choose balls of yarn from your stash to help you with this or perhaps you have yarn wound round pegs or you could even use paint swatch cards from the DIY store. Look at your 3 colours and ask yourself "Do they go together?  Are they working in harmony?" If you like them, take a quick photo, if not substitute just one colour and try again. 

The more you play around with colours and experiment with what works for you, the easier it will become. Back in June 2017 I wrote an extensive blog post about choosing colours with a little bit of colour theory thrown in too. If you'd like to read that blog post, you can find it here.


Tip no. 2.  Create a mood board

Pinterest is an amazing resource to use when planning projects. You can create a board that saves colour schemes you like and can refer back to (f you like, you can make it a secret board). Try not to overthink it, simply save pins with colour schemes that appeal to you. Once you've saved a few pins have a look and see what they have in common. Ask yourself "Which colours work well together? What colours am I drawn to?" If you haven't used Pinterest before it's a wonderful resource - think of it as a big search engine for looking for creative ideas. Warning: pinning can become addictive! 

If Pinterest isn't your thing, you can always create scrap book pages with colour combinations you find pleasing. Rip out colour schemes you like from the interiors section of magazines, add in strands of yarn, buttons, bits of food packaging, ribbons, photos, paint swatch cards, feathers and other found items. Keep adding new pages with new colour combinations to look back on. (These torn pages were taken from Mollie Makes magazine).


Tip no. 3.  Look to the natural world

Go for a walk outside and bring your camera with you! Take time to notice colours that sit side by side in nature and look good together. If you spot a pleasing colour combination, take a photo! You can even print it and add it to your mood board, helping to build a bigger picture. 

Think of seasonal colours that work in harmony: oranges, rich browns, burgundays in the autumn; pale blues, lilacs and fresh green in the spring. Or consider the colours of the landscape: blues, sandy oranges and yellow at the seaside; a range of greens and browns in the forest. Nature has an amazing colour range - copy it!


I hope you have found these 3 tips helpful. Leave me a comment below or find me on Instagram if you have any questions or want to share your recent colour combinations, I'd love to see them!

Marta xx

Wednesday 24 February 2021

Bee Happy - child's scarf crochet pattern published!

Hello, I'm on a roll with the crochet pattern releases this year with yet another pattern published this week! The latest pattern is my Bee Happy child's scarf - a practical, cosy accessory with a fun twist - there's a honeycomb shaped pocket with room for a little amigurumi bee! 


This scarf is designed for a young child, 3-8 years of age. It's inspired by my 4 year old niece who does not like layering up to go out in the cold and I thought the little bee would make putting on a scarf more fun. The bee can go along for all her adventures!


To make the scarf you will need just 3x 100g balls of Paintbox Yarns wool mix aran (50% wool/ 50% acrylic); 1x pure black, 1x champagne white, 1x daffodil yellow. You will also need 2x 6mm safety eyes and a small amount of toy stuffing. The pattern is rated intermediate; the scarf is worked in linked half trebles and the bee is crocheted in the amigurumi style.


The pattern is available from Lovecrafts here. This listing has direct links to the correct colours of yarn sold on Lovecrafts, so only 1 payment required. It's also available to download from Ravelry here.

I designed the pattern at the end of last year and quickly had it tested ready for release in the new year. However, I was holding off for a photo shoot with my niece to show it off at its best. With the current Covid restrictions I can't see her and her family at the moment so decided to go ahead and publish without model photos. I can always rerelease once we do get together later in the year! I hope you like the current photos, I tried to aim for a playful look.

I'm chuffed that I am keeping up with blogging this year too, next post shouldn't be too long,

Marta xx


Monday 29 June 2020

crocheted doll CAL

Hi everyone! I have decided to launch my very first CAL (crochet-a-long) starting next Wednesday 8th July! You can follow ANY crocheted doll pattern, it doesn't have to be my pattern - however, if you do follow mine it will give you double the chances of winning a prize!

Coral, Gabriella & Leo
Last week I published the crochet pattern for these dolls (known as Coral, Gabriella & Leo) on Ravelry, you can find the pattern here at the early bird price of just £3.50! I will keep it at this intoductory price until the start of the CAL. You may remember seeing Coral and Leo back in January of this year, they were part of my Fun-a-Day Dundee project. When I was preparing the pattern for release I decided they needed a friend and crocheted them Gabriella. I think the trio make a lovely set, don't you?

close up of Gabriella
If you are working on a crocheted doll just now (or maybe have one lurking in a cupboard somewhere?) feel free to dig it out and use it for the CAL, WIPs are definitely welcome!

close up of Leo's shoes
The time frame for the CAL will be 3 weeks, ending at midnight on Tuesday 28th July (BST). This should allow plenty of time to crochet a doll and make some lovely clothes for them to wear. If you have time left you could crochet another season's wardrobe, or a bag, or a toy for them, or ... the possibilies for creativity are endless!

Coral has the amazing hair!
At the end of the CAL I will look through all the photos on Instagram under the hashtag #crocheteddollCAL and choose the winners! There will be an overall First Prize for my favourite crocheted doll - the winner will receive the pattern for Coral, Gabriella & Leo (or reimbursement) AND all the yarn to make their own doll! There will be lots of runners up - every photo posted will enter you into the daw - and these prizes will be pdf copies of my doll pattern (or reimbursement). Like I said at the start, if you follow my pattern each photo you post will count as 2 entries.

me and my crocheted dolls
all photos in this blog post by Niall Mitchell
If you have any questions please leave them in the comments or get in touch directly via Instagram. I can't wait to see all your creations,

Marta xx

Wednesday 11 March 2020

Workshop Review - needlefelting for beginners at Dalmore Croft

the stove is lit and I am all set up and ready to go!

Hello! Last Saturday I held my first ever craft workshop at Dalmore Croft, Barry and I wanted to share my experience here in this blog post because the morning went very well, the ladies all enjoyed themselves and they learnt a new skill. I should add at this point that all recommendations are my own, this post has not been sponsored.

materials and tools

I have been needlefelting for many years now and I almost exclusively use gilliangladrag.co.uk for my felting supplies. It's a bricks and mortar shop in Dorking, England which also has an amazing online shop - go check it out! I am a huge lover of colour so for me this online shop is a delight and I would love to go to the shop itself one day, it's on my list!

craft and tea!

When I arrived at the studio on Saturday the stove had been lit and it was wonderful and cosy with the fairy lights twinkling too; the scene was set for a creative morning. It didn't take me long to unpack the wool tops, needles etc and shortly after that my students started to arrive. There was tea, coffee, freshly made scones and homemade blueberry muffins for everyone to enjoy.

so much concentration

The first project was a simple pincushion with a vintage cotton reel for the base. This taught the basics of how to handle and manipulate the fibre into the shape they wanted. Smooth Merino wool tops was on offer for this project in a large variety of colours - something to suit all tastes. The next project was a bunny brooch which was slightly more challenging but everyone approached it with the confidence of their new found skills. To mix things up I offered various British, undyed wool tops for this stage, to allow the students to work with something a bit different and experiment with texture.

nearly finished

By the end of the morning my students had a finished pincushion and a finished (or very nearly finished) bunny brooch. If anyone wasn't quite finished they had the skills and materials to take it away and finish it off at home. I handed out feedback forms at the end are here are a few of the comments I received in the "what did you like about the course?" section; "Everything! Marta was a very good teacher and I loved doing a new craft." and "I liked learning the basics of a new craft and having a finished product."

So, I am definitely going to be running future workshops - more needlefelting ones, including advanced needlefelting - but also other handcrafts. I feel that people enjoy taking time out of their busy lives to stop, take a break and try something new. If you would like to keep up to date with news of all my future workshops please sign up to receive my newsletter.

Until next time,

Marta xx


Thursday 20 February 2020

my Fun a Day Dundee project


my finished Fun a Day project

Hello! Today's blog post is all about a project I was involved with in January. For the second year in a row I took part in Fun a Day Dundee, a project which has been running in the city since 2011. "The premise is simple: pick a project (take a photograph, make the bed, draw a picture, bake a cake, etc) and do it every day in January, then show your work the following month in a big group exhibition." (quote taken from the Fun a Day Dundee website).

initial sketchbook ideas

Last year I drew a flower every day for the month using various methods and a wide array of materials. Whilst I thoroughly enjoyed making 1 finished piece every day it did feel quite pressured and there were days when I was pushed for time or simply didn't feel very creative. This year I decided to crochet a doll over the course of the month, working on it a little every day - more time or less time depending on what else I had on and my creative energy.

beginning to have character

I have made quite a few crocheted dolls over the years because I love the satisfaction of making something tangible, full of character and personality in a fairly short space of time. For this project I chose to design the doll myself writing the pattern for it as I went along.

Hello!

I crocheted the body using Rico Creative Cotton in the colourway Powder because I really liked the pale skin colour of this yarn. The huge mop of curly hair is created by needlefelting Debbie Bliss Lara (in the colourway Anna) in place - I love the bouncy curl it has. After crocheting the doll I began working on a little outfit for the chilly wee boy - it was January! I knew that I wanted to add lots of little optional details to my pattern and I had great fun designing pockets and even adding orange thread top stitching.


tiny details

shoes with laces

The shoes were possibly the most tricky design element because the feet are essentially quite shapeless and the shoes have to be able to be pulled on without stretching them or the doll out of shape. I added little contrast soles and gave them laces too, giving them more destinguishing features.

making him a friend!

By the 25th of January I was finished the doll and the clothes and had to make a decision: make more clothes and accessories or make another doll? As you can see from my first photo, make another doll won! I knew the process would be much faster this time because I had my pattern written up, ready to follow.

needlefelting the hair

Sure enough, I had a second doll in next to no time (not an awful lot else got done in these few days mind!). I decided to give the girl doll bright orange, Japanese manga style hair so I ordered Cascade Magnum in the colourway Living Coral and when it arrived it was perfect! I needlefelted the hair in place again, a technique which I had followed in the past and really wanted to use in my pattern too.

January 31st
So, by 31st of January I had 1 completely finished doll and 1 almost finished doll - she just needed her hair sorting and some more clothes. I was chuffed with how productive I had been! It was lovely to have feedback and encouragment from fellow participants on Instagram and in turn to follow their creative journeys - I loved this aspect of the project!


more details

Last week I added the final touches to the girl doll's outfit - a green cardigan and a pair of sandals. for both dolls I used DMC Narura cotton yarn partly because I like to have a different texture for clothing when I make a doll and partly because the colour range in this cotton is fantastic - so many to choose from! All I need to do now is add the final touches to my pattern and do an outdoor photo shoot of both the dolls. The weather here hasn't been in my favour and I think I will leave it another few weeks for some spring flowers too. Also, both dolls need names! If you have any suggestions, please leave them in the comments.


finished doll

The group exhibition for Fun a Day Dundee takes place over the Easter weekend, 10th - 12th April at Generator Projects in Dundee - my dolls will be there alongside so many other different projects, I can't wait!

Until next time,

Marta xx


Wednesday 5 February 2020

Introduction to Needlefelting

bunny brooches - perfect for Spring time!

Hello! I have some very exciting news to share today - I am going to be teaching my first workshop! This is something that I have wanted to do for a long, long time but have never actually taken the time out to fully visualise, plan and organise ... until now!! 

pincushion in progress
So, what is needlefelting? Put simply, needlefelting is the transformation of wool into 3D objects using a very sharp, barbed needle. The wool fibres become tangled and then tighten causing them bond together into a solid shape. You can manipulate the wool in many different ways creating a huge variety of effects. It's a craft that I really enjoy because it very quickly develops from a smooshy handful of wool into a finished piece - it's very satisfying and addictive!

needlefelting in action!
My first workshop will be held on the morning of Saturday 7th March at Dalmore Croft, Barry near Carnoustie. Dalmore Croft is a 12 acre small holding owned and run as a small mixed farm by Rosemary and Dan Champion, and the workshop will take place in their wonderfully cosy, converted outhouse - complete with wood burning stove and comfy chairs.

the studio at Dalmoe Croft

bunny brooches with the cosy
wood burner in the background
Over the course of the morning I am going to teach my students to make a small pincushion with a vintage cotton reel base and a bunny brooch. There will be lots of colour options available in the Merino wool for the pincushion, playing with colour combinations will be fun! The brooch can be tailored to suit lots of different styles and made in natural Blue Faced Leicester wool or in the bolder colours of the dyed Merino fibre. By the end of the morning my students will have the skills and confidence to carry on with the craft at home - the possibilities are endless!

... and me!
 All photos taken by Niall Mitchell
As you can tell, I am really excited about the opportunity to start teaching - I hope this is the first of many! If you would like to join me on this course you can book here. If you have any questions, please get in touch via the comments below or directly with Dalmore Croft.

Until next time,

Marta xx

Wednesday 15 January 2020

getting back to it ...

Hello and a belated Happy New Year to you all. It's been a while since I posted on here, hasn't it? Well, I am here today to put that right! Firstly, I want to take a moment to introduce myself to those of you who don't know me, or have just started following me.

me, at the beach on a windy day!

I'm Marta and I enjoy writing crochet patterns. I have been designing for around 4 years and I feel confident that I have reached a level in my pattern writing skills to know that they are going to be easy for others to read and enjoyable for them to follow. All my patterns are tested by at least 3 crocheters and often I send them to be tech edited too. I particularly like using natural fibres in my designs because I enjoy the feel of wool, cotton, linen, bamboo etc on my hands. I do like to knit as well as crochet but crochet will always be my first love!

finished Advent Socks
Of course I follow other designers patterns and want to share a few projects with you which I completed at the end of last year. I challenged myself to knit a pair of socks following Natalie Sheldon's Advent Socks pattern. These were a real joy to knit, I absolutely loved watching each new stripe appear!

Beekeepers' Quilt, a work in progress
close up, aren't they cute?
The Beekeepers Quilt is a long term project that I began in April 2019 with the intention of knitting one hexagon a day for a year! At the moment I have exactly the same number of hexies a s days but I hit pause for 2 months (December - Christmas prep & January - Fun a Day) with the intention of starting again in February. The hexagons are knitted on double pointed needles using scrap 4ply yarn from my stash of leftovers from crocheting socks.

sketchbook work & my chosen yarns
My current WIP is an amigurumi doll that I am crocheting as part of the Fun a Day Dundee project. It's a doll that I am designing myself, crocheting a little everyday and writing up the pattern as I go. I began with some simple sketches and ideas of the direction I wanted to go in - quickly discovering that it should be a boy doll! I am finding real inspiration in following the hashtag #FADD2020 on Instagram and seeing what everyone else is doing every day - we can be a real encouragement to each other in what can sometimes be a long and bleak month.

beginning to look like a little person
So, let's hope this is the first blog post of many! I have certainly scheduled future posts in my diary and have a list of potential post titles. Is there anything specific you would like me to blog on? Share your ideas in the comments below!

Until next time,

Marta xx

Thursday 22 February 2018

Daffodil Shawl update


Hello! I have been doing a real mix of creative things lately including bullet journalling, drawing, learning to make barista style coffee, chalk board lettering, baking and of course crochet!! Today I wanted to update you on my Daffodil Shawl design progress because I have just finished crocheting the shawl this afternoon!

I started this design in mid January and very quickly worked up 2 of the 3 skeins of Koigu Mori I had set aside for it (see previous blog post with a review of this gorgeous yarn here). For some reason I then became caught up in other projects and this shawl took a bit of a back seat (this often happens with projects - my attention can be quite fleeting!). When I went back to it last week I realised that I wasn't happy with the proportion of the shawl - worked width-wise, it was far too skinny and scarf like! My initial yardage calculations must have been a bit off and it turned out I did have enough yarn to increase the width by 33%, a significant difference, so ... I unravelled the scarf right back to the beginning ...

the moment of realisation, a lot of stitches to unravel ...

I began working up the new dimensions straight away and was very quickly back on track. As you can see in the above photo, I have worked on a chart to accompany the written pattern for this scarf too. In fact, the pattern writing part of the design process is almost complete, I only have a few details to add and then it will be ready for testing.

back on track and first edge complete

next step: blocking!

In other news I found out yesterday that my blog has made it into the Top 50 UK Crochet Blog list! You can see all the blogs listed here and there is so much inspiration, it's well worth a look. This has given me just the encouragement I need to carry on doing what I am doing here, so thank you everyone for stopping by to see what I get up to with my hook and yarn!

Happy hooking,

Marta xx


Crochet and Sustainability: Your Guide to Being More Eco-Friendly

Hello! Are you l ooking for ways to reduce the environmental impact of your crochet? There are so many opportunities to create what we do in...