Showing posts with label crochet terms. Show all posts

Thursday, 9 May 2024

Cracking the Code: How to Read and Understand Crochet Patterns

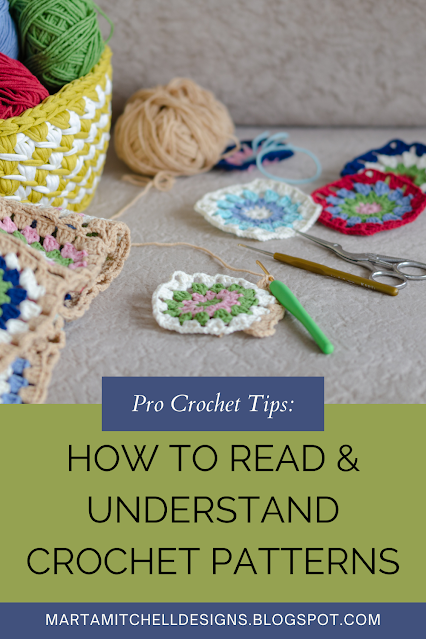
Image shows a crocheted squares scattered about, crochet hooks, scissors and to the left there's a basket filled with yarn.

How to Read and Understand Crochet Patterns

Hello! As you've probably come to realise, the world of crochet is filled with endless possibilities, from squishy scarves to adorable amigurumi. This blog post is especially for all the newbies out there, because if you're a beginner staring down at a crochet pattern can feel like deciphering hieroglyphics, can't it?
 
Fear not, aspiring crocheters! The guide I've put together for you here will equip you with the tools and confidence to decipher patterns and make your crochet dreams a reality.
 

Understanding the Structure of a Crochet Pattern:

Firstly, let's look at the typical layout of a pattern:
Materials: This section usually comes at the top and it lists the yarn, hook size, and any other supplies you'll need. Make sure you have all the required items before you start.
Gauge: Gauge (often referred to as tension) refers to the number of stitches and the number of rows which fall within a square (usually 10cm x 10cm/ 4" x 4"). Crocheting a gauge swatch allows you to adjust your hook size if your tension is too loose or too tight, thus meeting gauge helps ensure your project ends up the correct size. I devoted a whole blog post to this subject, so if you want to know more, you can read it here.
Notes: This section includes any special techniques or stitch variations used in the pattern, as well as useful information such as where the pattern starts, yarn substitution, sizing information etc.
Instructions: Here's where the pattern begins! The instructions are written in rows (for flat pieces) or rounds (for working in circles). They'll tell you exactly which stitches to make and where to place them. Take each row/ round in turn; do what it tells you to do, count your stitches at the end, move onto the next row/ round. It's a good idea to have a skim through the whole pattern to get a general idea of what's expected before you begin.


Learning the Language:

You'll first need to get to grips with abbreviations. Crochet patterns are packed full of them to save space and to keep the instructions concise. Luckily, there's a common core set you'll encounter in almost every pattern. Familiarising yourself with a few basic terms will make your life so much easier. Some examples are;
 
ch: chain (the stitch which following stitches are worked into)
ss: slip stitch (used for joining or fastening off)
inc: increase (adds stitches)
dec: decrease (reduces stitches)
RS: right side
WS: wrong side
 
Now, before I go any further ... I need to warn you that crochet patterns are either written in UK terminology or US terminology. I know, I know, as if things were complicated enough, eh?
 
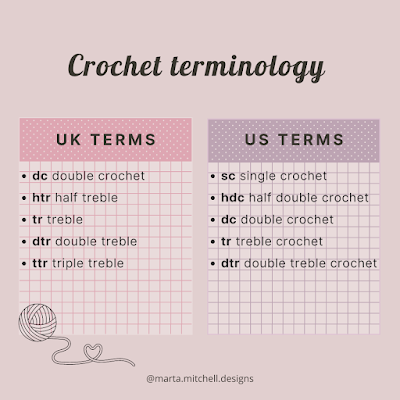
So, a US single crochet is a UK double crochet. A US double crochet is a UK treble crochet, and so on. Patterns should clearly state which terms they use but if you're unsure look for the words "single crochet" to identify US terms because they're never used in UK terms. Remember, it's a shift in names, not the way the stitches are worked!
Patterns should include an abbreviations list which defines all the abbreviations used in that project. There are also handy reference charts available online which you can print and keep by your side. Below is a handy chart to show you the conversion of the basic stitches, I'm working behind the scenes on a printable for you right now!

Text based chart: Crochet terminology. UK terms dc double crochet htr half treble tr treble dtr double treble ttr triple treble. US terms sc single crochet hdc half double crochet dc double crochet tr treble crochet dtr double treble croche


Mastering the Symbols:

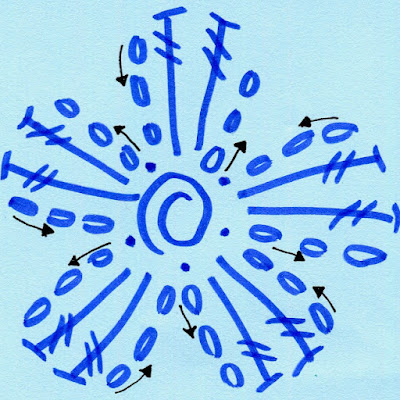
Crochet patterns often include charts to provide a visual aid to reading the pattern. Whilst they may look weird at first, they can actually be super helpful for following more complex patterns. In fact, once you understand how to follow them, they can be used instead of the written pattern. My pro tip for reading charts is to try to follow one after you have finished your project; see if you can trace through your journey from start to finish. I promise that they'll soon start to make sense! Below is the chart for my Simple Flower to give you an idea of what charts look like. 


Symbol chart for a crochet flower


My Tips for Pattern Reading Success:

  • Start with a beginner-friendly pattern so you don't end up overwhelming yourself! By Choosing a project designed for your skill level you're far more likely to succeed.
  • Look for video tutorials - many crochet patterns have accompanying video tutorials which will visually demonstrate the stitches and techniques.
  • If the pattern contains a new stitch or stitch combination, take time to practice it using scrap yarn before beginning the project. When you work and rework yarn over and over it loses it's twist and sheen, so it's best to be able to go for it when you're confident.
  • Don't be afraid to rip out and redo because mistakes will happen. It's best to accept that your first few attempts are not going to look like the samples in the crochet magazines (honestly, you should have seen my first attempts!).
  • If you do encounter a real problem and you're stuck, reach out to the designer and see if they can help you. I wrote a blog post all about what to do if you get stuck with crochet which you can read here.
  • Practice, practice, practice! The more you crochet, the more comfortable you'll become with reading patterns and understanding the instructions.

Armed with these helpful tips and with a little bit of experience, you'll be deciphering crochet patterns in no time. My biggest advice to you is to START ... so, grab your yarn and grab your hook, and get crocheting!
 
If you have any questions, remember that you can leave me a comment below or you can send me a DM on Instagram (@marta.mitchell.designs), I'm more than happy to help you out!

I hope this has been a useful blog post for you. If you like these tips, please consider signing up to my mailing list, lots more good stuff coming your way. When you do so, you'll automatically be sent my PDF with 25 top tips that every crocheter should know! 

Until next time, happy crocheting,


Marta xx

Wednesday, 26 February 2020

Drawing out crochet charts

if at first you don't succeed ...

Hello! A short blog post because there are not so many colourful crochet photos to share this week, it's been all about drawing out crochet charts instead!

my set up

The above photo is from my Instagram stories, it shows my usual drawing set up: sketch pad, pencil, laptop and a mug of rooibos tea (with soya milk). I have just finished drawing out the chart for my Fields of Wheat beanie, and it's been one of the trickiest charts I have ever drawn! I had to think long and hard about exactly how to depict the intricate 3D form of the beanie as a 2D chart. However, it was well worth persevering with and I am pleased with the finished result. The photo at the top of this post shows the finished chart in the top left corner and I love how pretty it turned out, it's like a big flower!


example of a finished chart

This chart, for a yet-to-be-named project has a fascinating geometric pattern going on too! It's only now that I am into crochet pattern writing that I wished I was better at Maths - it's all so mathematical - it must be good exercise for my brain, so that's a bonus I suppose!

Daffodil Shawl chart in progress

I like to daw the charts out in pencil and then carefully go over them in fine coloured pen, usually 2 colours to clearly define the different rows or rounds. I then either scan them or take a high resolution photo before adding them to the pattern pdf. Most of my recent patterns have charts and I am going back and adding them to earlier patterns because I know they can be a real help to people. Personally I prefer following a written pattern but if a chart is included too I will refer to it, especially in the early stages, it helps to visualise what the pattern writer expects. What about you, do you like to follow charts? What do you like about crochet charts? Let me know in the comments.

Until next time,

Marta xx

Thursday, 13 February 2020

"Are your crochet patterns suitable for beginners?"


YES! Many of my crochet patterns are suitable for beginners! It's a question which people frequently ask me, so in this blog post I'm going to share with you which of my crochet patterns are suitable for beginners.

how best  to wear your This Way,
That Way scarf 

I designed my This Way, That Way scarft with the beginner in mind - it only requires double crochet (UK terms). There are ridges running along the length of this reversible scarf, created by changing between working into the front loop and back loop of the stitches, but don't worry - the pattern includes a step-by-step tutorial to keep you right! It's a unisex design which can be made in your own combination of colours in chunky yarn. The pattern is available in UK and US terms.

Calunna Hills cowl

Slightly more challenging, but still with a beginner rating, is my Calunna Hills cowl. It requires just a few simple stitches to create this stunning wave effect. Once you have crocheted a few rows the pattern is repeated and it's easy to remember and get into a routine with. It's available in both UK and US terms.

Jute Plant Pot Cosy

My Jute Plant Pot Cosy pattern is super simple and works up fast in Hoooked 100% natural jute. The finished cosy has a raw, chunky quality which heightens the lush greenery of any plant placed in it. This free pattern can easily be adapted to suit whatever size of plant pot you have.

Small Flower

My Small Flower pattern includes a step-by-step photo tutorial and a chart alongside the full written instructions. You will need to know how to make a magic loop but there are plenty of YouTube videos to keep you right on that! This project is perfect for using up small amounts of left over yarn in any thickness and the flowers can be used to decorate all kinds of things! It's also another of my free patterns! 

Easy Wrist Warmers

Another simple beginners project is my Easy Wrist Warmers pattern - a free Ravelry downoad. There are only a few basic stitches required and the pattern works up quickly giving you an achievable finished item that you can show off to friends and family!


The final pattern I would like to share with you is Zig Zag scarf pattern. It is a super simple stitch repeat which works up really fast! there is an easy to follow chart included with the pattern and it's available in both UK and US terms.

Wow! Six beginner level patterns to choose from! And, once you've mastered a few basic crochet stitches, become more confident with your hook & yarn and learnt to follow a pattern you will be ready to move on to intermediate level patterns. I'm now including charts or video tutorials (or both!) with all my crochet patterns (and going back and adding them to older patterns) because I know they can really help people visualise how the pattern works. If you have any questions relating to my patterns please leave a comment below or send me a message on Instagram (@marta.mitchell.designs)

Until next time,

Marta xx

Friday, 7 September 2018

Free Pattern Release: Heart Shaped Bunting

Hello! Today I am really pleased to be releasing my pattern for Heart Shaped Bunting - and the best thing for all you crochet fans out there? It's FREE!

Heart Shaped Bunting

I wrote this pattern in the summer of 2017 as an exclusive for Crate Crochet's subscription box. Crate Crochet are based in Australia and they deliver mystery boxes through your letterbox with a pattern and the yarn you need to make the item featured as well as a few other goodies - it's a wonderful idea! I have collaborated with Carmela at Crate Crochet on 3 occassions now and I have found it very rewarding, not only because of the coverage it gives me as a designer but due to the lovely, welcoming Facebook Group which she has formed. I love being involved in this project!

bunting hanging in the garden

So, after this period as an exclusive Crate Crochet design I can now release the pattern into the wild and have decided to make it a free pattern as a first Friday in September treat! Today my eldest son, Niall, helped me update my YouTube video with the tutorial for the back back loop stitch. We filmed this together back in October but the lighting was poor and Niall now has a better camera and microphone so I was keen to reshoot it. Today's video was fun to make - my parents' dog is in it, his head on the table in front of me, just out of focus! You can find it here.

My favourite platform for buying and selling patterns is Ravelry.com and this is where you can download the pattern for FREE: https://www.ravelry.com/patterns/library/heart-shaped-bunting

close up!

I hope you enjoy following thi pattern! If you do, please share your creations on social media, particularly Instagram where you can add the hashtag #mrsdaftspaniel for me to see and for the chance to be featured in my Insta gallery!

Marta xx

Thursday, 8 February 2018

Guest Blog Post by Kathryn Vercillo

Hello! Today I am excited to bring you a post by my very first guest blogger, Kathryn Vercillo! If you are a crochet fan and an instagrammer you will probably know Kathryn through the amazing crochet community she has brought together on Instagram via her hashtag #crochetconcupiscence (currently sitting at 55,167 posts!). Kathryn frequently updates her blog too - if you are new to crochet, Kathryn has written an in-depth article covering everything you need to know here.

image @Kathryn Vercillo

I have asked Kathryn to write a post addressing the differences between UK and US crochet terms, something which can often get people in a bit of a muddle. I frequently receive emails from people following one of my patterns stating that they are following the instructions and it looks nothing like my photos. Usually when I ask them to send me a picture of their work I can instantly see that they are using the incorrect crochet terms (even though my patterns clearly state which to use). So, if this sounds familiar to you, read on ...

"One of the first things that you need to look at as you begin a crochet pattern is whether that pattern is written using UK crochet terms or US crochet terms. Although the words are the same, the crochet stitches are different in each of these languages, so if you crochet a project based on a wrong assumption about which terms are being used then chances are your gauge for the project will be way off. Luckily, once you know the differences between UK and US crochet terms, you’ll discover that it’s easy to adapt one pattern to the other if you need to.

Basic Differences Between UK and US Crochet Terms

The basic crochet stitches are named for their height, but those names differ between UK and US patterns. The shortest stitch (other than a chain or slip stitch) is called a “double crochet” in UK language but a “single crochet” in US language. From there, the stitches keep getting taller, so the next one up in the UK is a treble but in the US, it’s a double.

Notice, that means that there is a “double crochet” in both languages. However, the UK “double crochet” is a shorter stitch than the “US” double crochet. Let’s look at how to crochet each of these stitches to gain a better understanding:

UK Double Crochet

  • Yarn over twice
  • Insert hook into stitch
  • Yarn over and pull through
  • Yarn over and pull through two loops
  • Yarn over and pull through two loops
  • Yarn over and pull through two loops

US Double Crochet

  • Yarn over
  • Insert hook into stitch
  • Yarn over and pull through
  • Yarn over and pull through two loops
  • Yarn over and pull through two loops

There is an extra “yarn over and pull through” in the UK version because there is an extra “yarn over” at the beginning. This makes the UK double crochet a taller stitch than the US double crochet (and the same height as a US treble crochet).

This can all seem very confusing at first, but you do get used to it. It really isn’t all that different from traveling between the US and Europe. In Europe, you enter a building on the ground floor and take the elevator one floor up to the “first floor”. In the United States, the floor you enter on is called the first floor and when you take the elevator up one flight you’re on the second floor. In other words, the European first floor is the US second floor. It seems confusing at first but travel enough and it becomes second nature. It’s the same way with crochet.

image @Kathryn Vercillo - UK double crochet/ US single crochet

image @Kathryn Vercillo - UK treble crochet/ US double crochet


Guide to UK vs US Crochet Stitches

Now that you have a basic understanding of the difference between UK and US crochet stitches, here is a helpful guide to the basic stitches in both languages.

UK Term vs US Term

Double crochet vs. single crochet
Half treble crochet vs. half double crochet
Treble crochet vs. double crochet
Double treble crochet vs. treble crochet

So, let’s say that you are reading a UK crochet pattern that calls for a “half treble crochet”. If you are used to working in American terms, you will mentally convert that to a half double crochet stitch and proceed with the pattern accordingly.

A Few Other Things to Know

  • Slip stitch and chains are the same in both UK and US terminology.
  • Techniques are also usually the same across languages; the “magic loop” for example is the same in UK and US patterns.
  • The abbreviations are the same in both languages. Double crochet is always dc, it just refers to a different height of stitch in UK vs US patterns. 
  • In contrast, the symbols used in symbol charts match the height of the stitch, not its name. So, an X on a UK chart means a UK double crochet but the same X means a UK single crochet. The symbol for a US double crochet is a T with a line across the middle.
  • There are a few other words that might be different between UK and US patterns. For example, what is typically called “tension” in UK patterns is called “gauge” in US patterns; what is called “skip” in the US is “miss” in the UK.
  • Australian crochet patterns typically use UK terminology.
  • Many crochet pattern designers offer their patterns in both US and UK language so check to see if your desired pattern is available in the language you prefer.


This is a guest post by Kathryn Vercillo, blogger at Crochet Concupiscence and author of several books including Crochet Saved My Life and Mandalas for Marinke."


image @Kathryn Vercillo 


So, a big thank you to Kathryn for being my first guest being my first guest blogger! I hope this post has been useful for you - if you have any questions about UK vs US terms, please leave them in the comments below. If you are interested in being a future guest blogger, please get in touch!

Happy hooking,

Marta xx


Inspiration in Unexpected Places: Tractor Tracks & Crochet

Hello! I wanted to share a little bit with you today about where I find inspiration for my crochet designs. You see, sometimes it's in t...