

Free Crochet Blanket Pattern!
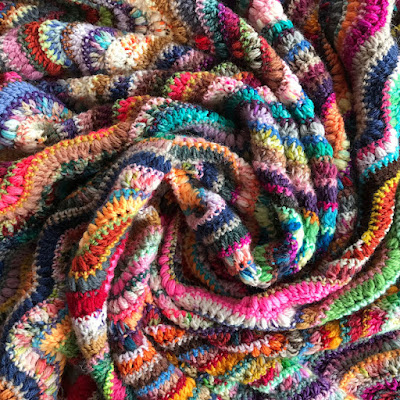
Hello! I'm kicking off 2022 with the first of my free crochet blanket patterns for you! It is, of course, the long awaited release of my Scrappy Blanket II! I was making and designing this crocheted blanket through the second half of last year and because I knew it was going to be a free pattern, other paid for work kept taking priority. I was also crocheting it in 4ply yarn which was very slow going (yet relaxing and enjoyable).
If 4ply yarn isn't your thing, fear not! I have done the maths to enable you to create this blanket in 4ply, DK, aran and chunky! Not only that, I've also worked out the number of stitches & rows for 5 different sizes of blanket, from pram to single bed size (you can see why it's taken me a long time to produce this pattern!)
This is a BEGINNER level pattern, written in UK terms.
You will need …
lots and lots and lots of scraps or odd balls of yarn in the same weight. I made mine in fingering (4ply weight).
appropriate size hook for your yarn thickness (I used 4mm)
scissors
tapestry needle for sewing in ends
Abbreviations (UK terms)
Tension - main pattern repeat per 10cm, in rows
fingering/ 4ply and 4mm hook 23 dc stitches x 14 rows (3.5mm hook)
DK/ 8ply 21 dc stitches x 12 rows (5mm hook)
aran/ 10ply 16 dc stitches x 9 rows (6mm hook)
chunky/ 12ply 10 dc stitches x 6 rows (8mm hook)
Special stitches
Puff stitches are made as follows; yo, pull through a long loop (3 loop on hook), yo, pull through a long loop (5 loops on hook), yo, pull through a long loop (7 loops on hook), yo, pull through all the loops on the hook, complete the stitch with a ch1 = 1 puff made. There's a link below to a useful YouTube tutorial if you need it.Notes …
I’ve designed this pattern in fingering (4ply weight) yarn but it could be made in whichever thickness you like. Simply add more chains for a thinner yarn and create less chains for a thicker yarn. See measurements table for variations.
The pattern is easy to remember once you’ve crocheteded a few rows. On the puff stitch rows pay attention to where your first puff stitch falls, you’ll soon get into a rhythm.
Ch1/ ch3 at the start of rows does not count as a stitch and is not included in the stitch count.
For your stitch counts, I suggest you use the measurements table, select your desired size and work out (17 x ▢) + 1 and then work out (12 x ▢) + 2 and write these figures down at the end of the rows.
To achieve neat colour changes, start using the new colour on the last yarn over of the stitch.
Weave in the ends on whichever side they fall, making your blanket reversible. I tried to keep my colour changes close to the puffs so that they could be well buried inside them.
My top tip for crocheting huge numbers of chain stitches is to add a good few extras - these can always be undone later!
A special thank you to CJ, Tammy de Nobrigo, Hannah Wingfield, Michelle Willis & Jenny Winter for testing out this pattern for me - thanks ladies! xx
Measurements

For guidance, my finished blanket was worked in 4ply yarn and measured 100 x 130cm (unblocked) and weighed around 700g. I started with ch235 and crocheted for 182 rows.
You could wing it and make chains until it looks the right width, turn and begin Row 1. If you have any redundant chains at the end of your first row, simply undo them.
Crochet Blanket Pattern
Begin by looking at the measurements table and finding how many chains you need to make. If you are going for a different size the maths for this is ch(17 x ▢) + 5
Row 1 1tr in 4th ch from hook, (tr2tog in next 2ch) 3 times, [(1puff in next ch) 5 times, (tr2tog in next 2ch) 6 times, ch1] repeat from [ to ] until you have 7ch left, (tr2tog in next 2ch) 3 times, 1tr in last ch. Turn. (12x ▢ + 2sts)
Row 2 Ch1, work 1dc in each st & 1dc in each ch & 1dc into the top of each puff across. Turn. (17x ▢ + 1st)
Row 3 Ch3, 1tr in first dc, (tr2tog in next 2dc) 3 times, [(1puff in next dc) 5 times, (tr2tog in next 2dc) 6 times, ch1] repeat from [ to ] until you have 12dc left, (1puff in next dc) 5 times, (tr2tog in next 2ch) 3 times, 1tr in turning ch. Turn. (12x ▢ + 2sts)
At this point lay your work out flat and assess it for size. If necessary, go back and alter your chain number at the beginning by increasing or decreasing by a multiple of 17.
Row 4 onwards Repeat Rows 2 to 3 until you have the desired length, ending with Row 3. See the measurements table above for the approximate number of rows.
Cut yarn and fasten off.
Video Tutorials
I’ve made a few YouTube videos to help you succeed with this pattern because I really want everyone to feel confident about crocheting this blanket! My pattern should be clear to follow, but if you find yourself stuck the videos should help. If you are still stuck please reach out to me in the comments or via Instagram DMs - I’m more than happy to help!
Starting with a huge numer of chains https://youtu.be/BNvUeegDrfI
How to work the puff stitch https://youtu.be/-ooO5MmU0YA
How to work the main pattern https://youtu.be/KNeKHtJXSAk
How to sew in those pesky ends! https://youtu.be/gb9DK1CUZzE
Finishing off
Weave in all your ends on whichever side they fall. Block your blanket to make the stitches pop!
I hope you enjoyed this pattern! Please subscribe to my newsletter to keep up to date,
receive discounts & free patterns https://martamitchelldesigns.com/pages/about-me
Take it further …
If you’ve followed any of my other patterns, you’ll know that I love to see you taking one of my designs and truly making it your own! A few ideas I have for taking this design further are ...
use only 1 colour - there’s plenty of texture to keep this blanket interesting.
add a border, with a shell edging.
make your puffs with 4 yarn overs to make them pop even more!
do a variation on the puff stitches - pineapple stitch perhaps?.
use the pattern to make a scarf, chain 39 for your width.
What will you do differently with this pattern?
Whatever you do, I’m sure it will be awesome!
Tag me on Instagram so I can see! @marta.mitchell.designs
This pattern is free and always will be! If you’d like to support my work and help me to produce
more free patterns you can Buy Me a Coffee


No comments:
Post a Comment