Hello! Following on from last week's Back to School Sweater CAL blog hop post by Fay (
www.knitit-hookit-craftit.com) it's time for me to share my own cardigan journey. Like most of the CAL participants, I had carefully chosen my yarn, swatched to check tension and was eager to start on the morning of Saturday 16th of September - I crocheted at full speed for a big chunk of the day, everything was going well!
 |
| my swatch and colour choices |
 |
| progress at the end of day 1 |
I had chosen to follow one of my own patterns -
Summer Yoke Cardigan - and give it a winter twist. The first big change was to substitute the summery cotton for cosy alpaca yarn. I chose Eden Cottage Yarns in Whitfell DK - a 100% baby alpaca yarn - and I ordered it directly
online (NB. this yarn is currently in the sale as it is going to be discontinued, go grab a bargain while you can!).
 |
this photo © Inside Crochet Magazine
my original Summer Yoke Cardigan design |
The pattern begins with a plain yoke and then the pop of colour begins! I deliberately chose a muted, neutral shade for the main colour to really give the other colours a chance to dance and shine!
 |
| I love this stage of the making process, when the yoke looks like a rainbow! |
Everything was straight forward and went as I expected at this stage. Apart from the yarn, the only other real change I had made was to follow the instructions for small instead of medium because I wanted a much tighter fitting cardigan for the winter. I used a 3.25mm Knit Pro crochet hook to keep the stitches small and neat too.
 |
| progress photo |
I added 3 more rows of yoke pattern to this version, simply because I felt like it! The next section, from the end of the patterned yoke to the sleeve split was tricky! I spent about a week crocheting, frogging*, crocheting, frogging! The brilliant thing about being part of a CAL was that I wasn't alone; lots of people were unravelling at this stage!
*frogging: term used in knitting and crochet to describe rows of stitches being ripped out - rip it, rip it - like a frog!
 |
| starting the sleeves |
The best thing about top-down crochet designs is the fact that you can try them on as you work. In this way I was able to get the fit exactly as I wanted it. Once I positioned the sleeve split exactly in the right place, I began to work 1 ball at a time on a rotation basis; sleeve, body, body, sleeve, body, body etc. In this way I could work evenly across the sections and the garment grew in a harmonious way.
 |
| finished sleeves and cuffs |
Before I knew it I had reached my desired sleeve length and it was time to think about how to finish at the cuff (my original pattern had 3/4 length sleeves and simply a band of contrast colour to finish). This cardigan was for me and I like snug, draught excluding cuffs on a cosy cardigan so I began with a round of contrast stitches, then a round of half trebles before adding 4 rounds of ribbed crochet cables.
 |
| choosing the perfect button! |
Shortly after I finished the sleeves, the main body section was finished too (hoorah! no more plain stitches!). I wanted to make the most of the pretty yarn so I added 4 rows of pattern to the hem before commencing the button band. The button band - the home stretch! Almost finished! Or so I thought ...
... actually the button band itself was ok, it was when I made the decision to add a colar to finish the neckline that it all went a bit pear shaped!
 |
| 1st collar attempt |
The trouble was that the extra height from the button band with a collar worked into it sat too high around my neck and dragged the whole cardigan out of shape. It was not how I had pictured it in my ahead at all. It was at this point that I threw the cardigan on the naughty step and didn't even look at it for a few weeks! During this time I did think about how to solve the problem - often at unexpected moments new ideas would come and go until suddenly it all became clear, I had a new plan! Sadly, this plan involved more frogging, lots of frogging! The entire button band needed to come out, 75g worth of wool in tiny little seed stitch ...
 |
| final colar design |
The new button band stopped at the neckline, allowing me to work directly into the original chain of stitches at the very beginning of the cardigan. I followed the same increase pattern as the yoke whilst decreasing at either end to create a softer, rounder effect. To finish off I used a row crab stitches (my current fave stitch!). I like the new colar design in the main colour of the cardigan because it focuses all the attention on the pretty yoke.
 |
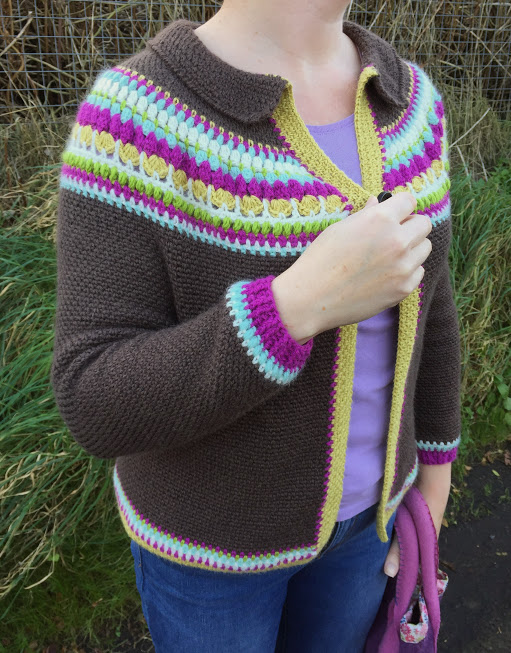
| first photo shoot |
 |
| my finished Back to School Sweater! |
I would like to take this opportunity to thank Helen (
makingatnumber14.blogspot.co.uk) and Tamara (
www.craftyescapism.com) for hosting this CAL - it's been such fun to take part in and to watch other people's sweaters grow and take shape online! Next week Helen and Tamara are going to be sharing a celebration of everyone's making - I can't wait to find out more about it!
Happy hooking,
Marta xx