Friday, 26 April 2024

Your Guide to Joining Crochet Like a Pro

Close up of the corner of a rainbow coloured crochet cushion. There's a visible red crochet join around the edge.

 Seamingly Seamless: Mastering the Art of Joining

Hello! If you've been crocheting for a while, you'll probably have come across a project where you needed to join pieces of crochet together - perhaps granny squares to make a blanket or maybe panels of crochet to form a garment. In this blog post I'm going to share my tips for joining crochet which will help you achieve a really professional look to your finished items.

Just like choosing the right stitch for your project, selecting the perfect joining method is key. Here are a few popular choices:

The Whip Stitch: 

Go grab your tapestry needle! This classic sewing technique wraps around your 2 edges. Simply sew across the top of the two pieces to be joined, working the needle in the same direction. You can use a contrast colour to add a decorative touch.

The Crochet Join: 

A fast and sturdy option for squares or panels. I like this method because you're continuing with your hook! You either slip stitch or double crochet (UK)/ single crochet (US) through both pieces of crochet. If it's squares it's through the back loop only of the square nearest one to you and the front loop only of the square behind. This join can either be worked on the wrong side (where it shows up like sewn stitches on the right side), or on the right side to add a defined ridge to your work. 

Personally, I LOVE the appearance of the ridge on the right side and this is my go-to join for blankets. It's also the joining method I used on my Counterbalance Sweater to accentuate the joins between the different textures. This pattern is currently exclusive to Moorit, issue 6, which is on sale now!

I have a video tutorial demonstrating this join which you can watch on YouTube.


Close up of a woman wearing an orange and purple crochet sweater

image courtesy of Amelia Claudia Photography


The Mattress Stitch: 

Another sewn join, this invisible hero creates a seamless look, which is perfect when you want to conceal your joins. If you're looking to create a really professional finish, this join is much better than using whip stitch. It's used mostly in garments and other items of clothing such as hats and cowls. 

I used the mattress stitch join on my Counterbalance Sweater for sewing up the side seams to create an all round look to the garment.

I made a video tutorial demonstrating this join which you can find on my YouTube channel.

Other joining methods: 

Dig around and you'll find there are many other joining methods, particularly for granny square type motifs. For example, there's the join-as-you-go method (often called JAYGO) which is fab if the idea of joining all your squares at the end of a project daunts you.

Pro tip: 

Whether you are sewing or crocheting your pieces together, keep your tension even. Too tight and you'll pucker your work, too loose and there will be gaps. Seek out that sweet, Goldilocks spot and your crochet will shine!

In conclusion: 

The different joins all have their uses. If you're newer to crochet it's probably best to stick with the suggested join in your pattern. Once you know what you're doing, play around and try them out because over time you'll find which ones work best for you. 

I hope this has been a useful blog post for you. If you like these tips, please consider signing up to my mailing list, when you do so, you'll automatically be sent my PDF with 25 top tips that every crocheter should know! 

Until next time, happy crocheting,


Marta xx


Thursday, 18 April 2024

Crafting with Care: Crocheting for Babies & Toddlers

Image shows baby boy with his back to the camera. He's wearing a crocheted cardigan with a cable design down the back.

 Crocheting For Babies & Toddlers: Safety Considerations

Hello! Let's imagine you've picked out the perfect pattern, chosen the cutest yarn, and your crochet hook is poised – you're ready to create something special for a little one! But before you dive in, it's important to consider safety. Here are some key things to keep in mind when crocheting for babies and toddlers:
 

Yarn 

  • Material Matters: Choose soft, breathable yarns like cotton, wool or bamboo. Avoid yarn with loose fibres which may become a choking hazard - opt for more tightly spun yarn.
  • Skip the Frills: Resist the urge to use novelty yarns with beads, sequins, or other embellishments. These can become choking hazards.
  • Fire Safety: Choose yarns that meet fire safety regulations, especially for items used around sleep. Check the ball band for details.
  • As an extra consideration, think about washability. We all know how babies and toddlers like to spill things! Choose machine washable yarns for easy care.

Choking Hazards

  • Bye-bye Buttons: Consider embroidered closures or details as a safer alternative. If you must use buttons, sew them on securely with strong thread. 
  • Eye Spy: For amigurumi, use safety eyes specifically designed for children's toys. Embroidered eyes are another safe option.
  • Loose Ends: Always weave in yarn ends securely to prevent them from unraveling and becoming a choking hazard.
  • Double check seams: Take time to examine any areas you have joined together, reinforcing them if necessary.
  • Strings & Cords: Long strings & cords are a potential strangulation risk. Keep these short to eliminate risk.

Cuddly and Safe

  • Pattern Play: Avoid open lace patterns or anything with large gaps where fingers or toes could get caught.
  • Blanket Best Practices: Crochet blankets are wonderful for supervised tummy time or car seat use, but avoid using them in cribs or for unsupervised sleep.
  • The Perfect Fit: Make sure clothing items aren't too loose, which could be a tripping hazard, or too tight, which could restrict movement.

General Safety Tips 

  • Never leave a child unattended with a crocheted item.
  • Wash crocheted items before gifting them. This removes any residues from the yarn manufacturing process and any potential allergens which you may have left on the item.
  • Consider the baby or toddlers's age and developmental stage when choosing a design.

Conclusion 

 
By following these simple safety tips, you can create beautiful and cherished crocheted items that are also safe for babies & toddlers to enjoy. Crocheting for little ones can be so rewarding because we can look forward to their happy faces and how cute they will look in our creations. So, apply my tips, use your common sense and don't forget to have fun!
 

Inspiration for you


Top left: baby sitting with her back to the camera, wearing a lilac crocheted cardigan. Top right: Flat lay of crocheted mitts with vintage wooden blocks. Bottom right: close up of a yellow crocheted hat


Looking for crochet pattern inspiration for a baby or toddler? I'm currently expanding my collection, but I do have two suitable cardigan patterns; To The Park Cardigan (at the top of this email) and my Fields of Lavendar Cardigan (top left above). My Mavis Mitts and Saturday Beanie are available in baby & toddler sizes too (above).

I hope this has been a useful blog post for you. If you like these tips, please consider signing up to my mailing list, when you do so, you'll automatically be sent my PDF with 25 top tips that every crocheter should know! 

Until next time, happy crocheting,


Marta xx


Friday, 12 April 2024

From Spring Into Autumn: Cosy Crochet Socks Pattern Launch!

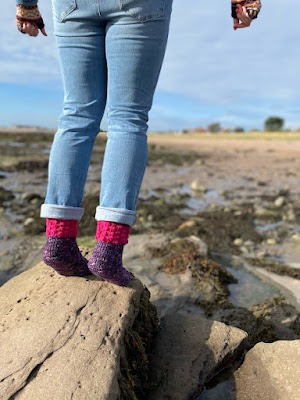
Cropped photo of someone standing on tip-toes at the rock pools. They're wearing jeans and crocheted socks.

Cosy Crochet Socks Pattern Launch!

Hello! Get ready to step into comfort and style with my Spring Into Autumn Socks crochet pattern! Originally this design featured in the October 2022 Crate Crochet subscription box - I'm pleased to announce that it's now available for everyone!

These fun socks feature a unique puff stitch cuff design on the cuffs which adds a touch of texture to this practical & stretchy part of the sock.
 
This is my 9th crocheted sock pattern and each time I've designed a pair I've built on my experience and feedback from crocheters. I've been improving to create the perfect fit and stretch for you, ensuring all-day comfort from your first stitch to your last.

Flatlay photo of crocheted socks on the blockers


Here's what makes this pattern special:

  • There are 6 video tutorials to guide you through every step, from cuff to toe
  • It's designed in 10ply/ aran weight yarn, so they work up fast!
  • Unique and textured puff stitch cuff for a touch of whimsy
  • Comfortable fit and stretch for all-day wear
  • Intermediate level pattern, perfect for crocheters with some experience
  • It's written in both UK and US terms 
  • Fun contrast cuffs & toes!

Cropped photo of someone at the rockpools, sitting with their feet stretched out. they're wearing cosy looking crocheted socks.


I mentioned above that they're designed in 10ply/ aran weight yarn; I used Manos del Uruguay Alegria Grande (180m/ 100g, 75% superwash merino/ 25% nylon), which I love! This yarn comes in 100g skeins and 25g mini skeins which makes it easy to combine colours to create contrast toes, cuffs and heels! It also makes this pattern a potential stash buster! Hooray!
 
Ready to crochet your own pair of cosy & stylish socks? I'm offering you the early bird discount of 15% off for the first week! Use the code AUTUMN at the checkout on my website and on Ravelry!
This could be your new project for the weekend - start crocheting my Spring Into Autumn Socks pattern today!

Any questions? Please reach out to me and ask, I'm more than happy to help you.

Happy Crocheting,

Marta xx
 

Friday, 5 April 2024

New To My Website: Project Notes Printable

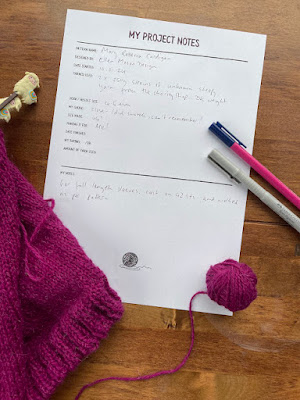
Sheet of A4 paper with printed text and fields filled out in pen. knitting project sits around the paper and pens are placed to the right side of the image.


Hello! Question for you: are scattered notes and forgotten details getting in the way of your crochet and knitting process? We've all been there! I used to have notes here there and everywhere!

I've put together a tool to help you take control - my new Project Notes Printable - you'll be so much more organised with everything jotted down in one place. There's plenty of room for writing and any sketches or doodles you may wish to make. I've created the heading in an outline font for you to colour in too!
 
The image below shows you how your print out will look (obviously without the word "sample" going across it) - it's time to say goodbye to hunting for lost notes and hello to a fun & streamlined crafting experience! 
 
Download your Project Notes Printable today and enjoy 30% off for this weekend only! Use the code PRINTABLE at the checkout on my website. Offer ends 23:59, Sunday 7th April, 2024.


text shows the various fields on my Project Notes Printable


Take your crocheting to the next level! Join my email list and instantly unlock my exclusive PDF with 25 crocheting secrets you won't find anywhere else. Plus, you'll be the first to snag deeper discounts on patterns and supplies (my subscribers just scored a whopping 50% off this printable!).

Don't miss out! Sign up today and watch your crochet skills soar.


Until next time, happy crocheting,


Marta xx


Need a quick last minute crochet gift idea?

Hello!  Are you in need of a quick, last minute crochet gift idea?  Don't stress, I have you covered! Here are 3 of my favourite quick m...