How to Read and Understand Crochet Patterns
Hello! As you've probably come to realise, the world of crochet is filled with endless possibilities, from squishy scarves to adorable amigurumi. This blog post is especially for all the newbies out there, because if you're a beginner staring down at a crochet pattern can feel like deciphering hieroglyphics, can't it?
Fear not, aspiring crocheters! The guide I've put together for you here will equip you with the tools and confidence to decipher patterns and make your crochet dreams a reality.
Understanding the Structure of a Crochet Pattern:
Firstly, let's look at the typical layout of a pattern:Materials: This section usually comes at the top and it lists the yarn, hook size, and any other supplies you'll need. Make sure you have all the required items before you start.
Gauge: Gauge (often referred to as tension) refers to the number of stitches and the number of rows which fall within a square (usually 10cm x 10cm/ 4" x 4"). Crocheting a gauge swatch allows you to adjust your hook size if your tension is too loose or too tight, thus meeting gauge helps ensure your project ends up the correct size. I devoted a whole blog post to this subject, so if you want to know more, you can read it here.
Notes: This section includes any special techniques or stitch variations used in the pattern, as well as useful information such as where the pattern starts, yarn substitution, sizing information etc.
Instructions: Here's where the pattern begins! The instructions are written in rows (for flat pieces) or rounds (for working in circles). They'll tell you exactly which stitches to make and where to place them. Take each row/ round in turn; do what it tells you to do, count your stitches at the end, move onto the next row/ round. It's a good idea to have a skim through the whole pattern to get a general idea of what's expected before you begin.
Learning the Language:
You'll first need to get to grips with abbreviations. Crochet patterns are packed full of them to save space and to keep the instructions concise. Luckily, there's a common core set you'll encounter in almost every pattern. Familiarising yourself with a few basic terms will make your life so much easier. Some examples are;ch: chain (the stitch which following stitches are worked into)
ss: slip stitch (used for joining or fastening off)
inc: increase (adds stitches)
dec: decrease (reduces stitches)
RS: right side
WS: wrong side
Now, before I go any further ... I need to warn you that crochet patterns are either written in UK terminology or US terminology. I know, I know, as if things were complicated enough, eh?
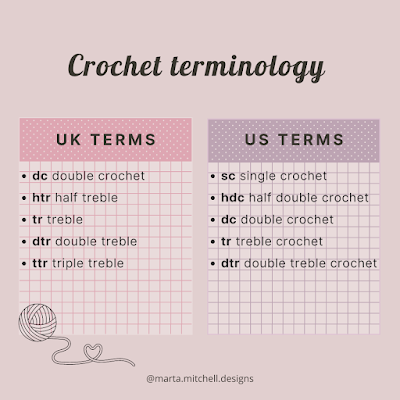
So, a US single crochet is a UK double crochet. A US double crochet is a UK treble crochet, and so on. Patterns should clearly state which terms they use but if you're unsure look for the words "single crochet" to identify US terms because they're never used in UK terms. Remember, it's a shift in names, not the way the stitches are worked!
Patterns should include an abbreviations list which defines all the abbreviations used in that project. There are also handy reference charts available online which you can print and keep by your side. Below is a handy chart to show you the conversion of the basic stitches, I'm working behind the scenes on a printable for you right now!
Mastering the Symbols:
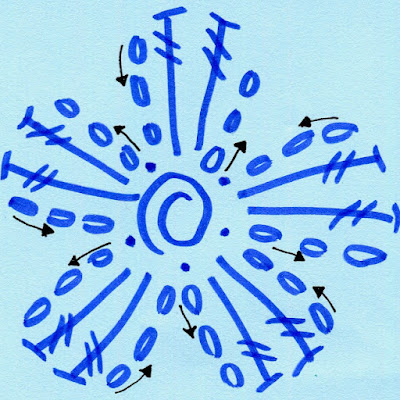
Crochet patterns often include charts to provide a visual aid to reading the pattern. Whilst they may look weird at first, they can actually be super helpful for following more complex patterns. In fact, once you understand how to follow them, they can be used instead of the written pattern. My pro tip for reading charts is to try to follow one after you have finished your project; see if you can trace through your journey from start to finish. I promise that they'll soon start to make sense! Below is the chart for my Simple Flower to give you an idea of what charts look like.
My Tips for Pattern Reading Success:
- Start with a beginner-friendly pattern so you don't end up overwhelming yourself! By Choosing a project designed for your skill level you're far more likely to succeed.
- Look for video tutorials - many crochet patterns have accompanying video tutorials which will visually demonstrate the stitches and techniques.
- If the pattern contains a new stitch or stitch combination, take time to practice it using scrap yarn before beginning the project. When you work and rework yarn over and over it loses it's twist and sheen, so it's best to be able to go for it when you're confident.
- Don't be afraid to rip out and redo because mistakes will happen. It's best to accept that your first few attempts are not going to look like the samples in the crochet magazines (honestly, you should have seen my first attempts!).
- If you do encounter a real problem and you're stuck, reach out to the designer and see if they can help you. I wrote a blog post all about what to do if you get stuck with crochet which you can read here.
- Practice, practice, practice! The more you crochet, the more comfortable you'll become with reading patterns and understanding the instructions.
Armed with these helpful tips and with a little bit of experience, you'll be deciphering crochet patterns in no time. My biggest advice to you is to START ... so, grab your yarn and grab your hook, and get crocheting!
If you have any questions, remember that you can leave me a comment below or you can send me a DM on Instagram (@marta.mitchell.designs), I'm more than happy to help you out!
I hope this has been a useful blog post for you. If you like these tips, please consider signing up to my mailing list, lots more good stuff coming your way. When you do so, you'll automatically be sent my PDF with 25 top tips that every crocheter should know!
Until next time, happy crocheting,
Marta xx


No comments:
Post a Comment