Thursday, 26 February 2015

New Patterns in Progress!

I have been really busy forming two new patterns over the last few weeks. Both projects use Erika Knight wool, one of my favourite brands due to Erika's strong belief of "treading lightly on the earth and celebrating and supporting traditional British skills". One pattern uses maxi wool, a chunky yarn, similar to Rowan big wool. I decided that I wanted to create something with a lot of texture to really show off the luxurious quality of this wool. 

first night's work

One of the ways that I come up with new ideas for patterns is to look through crochet stitch guides, I have several of them! I use the stitch pattern swatches as a starting point and usually add a twist, eg introducing another colour or changing the number of repeats. In this case I took the astrakhan stitch and changed from working in rows to working in the round. I tried it out using double knitting scrap wool and crocheted up 4 rounds to see if my idea would work - it did! I quickly wound the hank of yarn into a ball (the husband's strong arms work well here) and started work immediately. Because the wool is chunky the pattern worked up quickly and I had a clear idea of the end result.

rug in progress, on my table

In the above photo the rug measures 47cm in diameter and is 5cm deep! I have just ordered fresh supplies of yarn from Wool and Co. in Dundee (http://www.woolandco.co.uk/index.php) and I will finish this with more rounds in the main colour. 

I am having fun with this one!

The other project I am working on is proving to be my trickiest pattern writing challenge so far! It's a small child's cardigan loosely based on a technique Kat Goldin used in her cabled yoke cardigan design where the length of yoke is worked first and the neckline and bodice branch off from there.

original sketch

I am using a stepped pattern with raised trebles for the cable yoke and working it in a contrast colour to give a strong shape to the garment.

starting to branch off from the yoke

Working out the decreases to form the neckline gave me a real headache!! I spent a lot of time scribbling away on a piece of paper, calculator to hand before I got it right! Maths was never my strong point!

success with the decreases

Now I have almost finished crocheting the body and have also moved on to the arms. Without a small child to try this on for me, my next step is to look up dressmakers size guides online to insure the garment has the correct proportions. Despite it's brain exhausting qualities I am gaining great satisfaction from creating something more complicated and hope this is the start of many clothing patterns that I will write.

nearly there!

In other news my child's chevron cowl has passed the first pattern test, thank you again to Anthea at  http://www.talesfrommountpleasant.com/ :)

Wednesday, 18 February 2015

2015VAL

One of my Instagram friends, @craftyrie, had launched a challenge called #2015VAL, encouraging people to start making something for themselves this Valentine's Day and a new hat just for me seemed an ideal choice for joining in the fun! The wind has been icy cold here for the last 4 or 5 days so I decided that a new hat was just what I needed to keep myself warm when I am out and about.

 chosen colours next to Kat Goldin's book,
 'Hook, Stitch and Give'

I had followed Kat Goldin's Slouch and Bobble hat pattern a few times (in fact I wrote a blog post about it in September 2014) and then given away the finished beanies as presents. I looked forward to making and then wearing my own hat in this style.

the start of the new hat
I quickly remembered just how fast this beanie hat works up and before I knew it I was half way to finishing! I looked to see how much yarn I had left and realised there was not going to be enough to make the hat as slouchy as I wanted so I ripped it all back to the start. When I began again I used the contrast colour for the ribbed headband, changing for the darker purple for the main body of the hat. I could quickly estimate that this would work out and surprised myself by finding this combination even better than the first!

contrast rib
I used Erika Knight vintage wool, an aran thickness pure wool, made in the UK which I had used for several projects in the past and I chose here for warmth without being itchy! I used 2x 50g hanks of "mulberry" and 1x 50g hank of "pretty". 

purple progress

finished beanie hat

I really enjoyed spending a little bit of time making something to keep for myself and it was lovely to see the projects other people chose to make for themselves too.

Thursday, 12 February 2015

Upcycled Chunky Necklaces

At the weekend I spotted the perfect location for a photo shoot whilst out on a family walk to the beach. This morning I went back with 4 new newly made necklaces to photograph, in preparation for listing them on my folksy shop site.

Upcycled Chunky Necklace, 
pink with red and orange

It was a beautifully crisp, frosty morning and with the warmth of the sun on my face I headed back along to the location. The tide was far out and it was very calm and still, not even any dog walkers were around (I was slightly concerned about adventurous dogs bounding off with my necklaces!)

My spot for the photoshoot, 
Westhaven, Carnoustie

I was able to quickly photograph each necklace without any disturbance and I left the scene exactly as I had found it.

Upcycled Chunky Necklace,
green and yellow

Upcycled Chunky Necklace, 
yellow and cream

I make my necklaces out of reclaimed beads from lots of different necklaces and bracelets. I also crochet around beads with wool or embroidery thread, add felted beads and embroider around some beads. This all adds to the variety of textures in the necklaces - from smooth shiny plastic to soft wool felt.

 Upcycled Chunky Necklace, 
turquoise and pink

I am listing all these necklaces in my folksy shop today, click on the link at the top of this page to take you there and if you would like more information please get in touch.


Friday, 6 February 2015

A Mandrake for Harry Potter Book Night

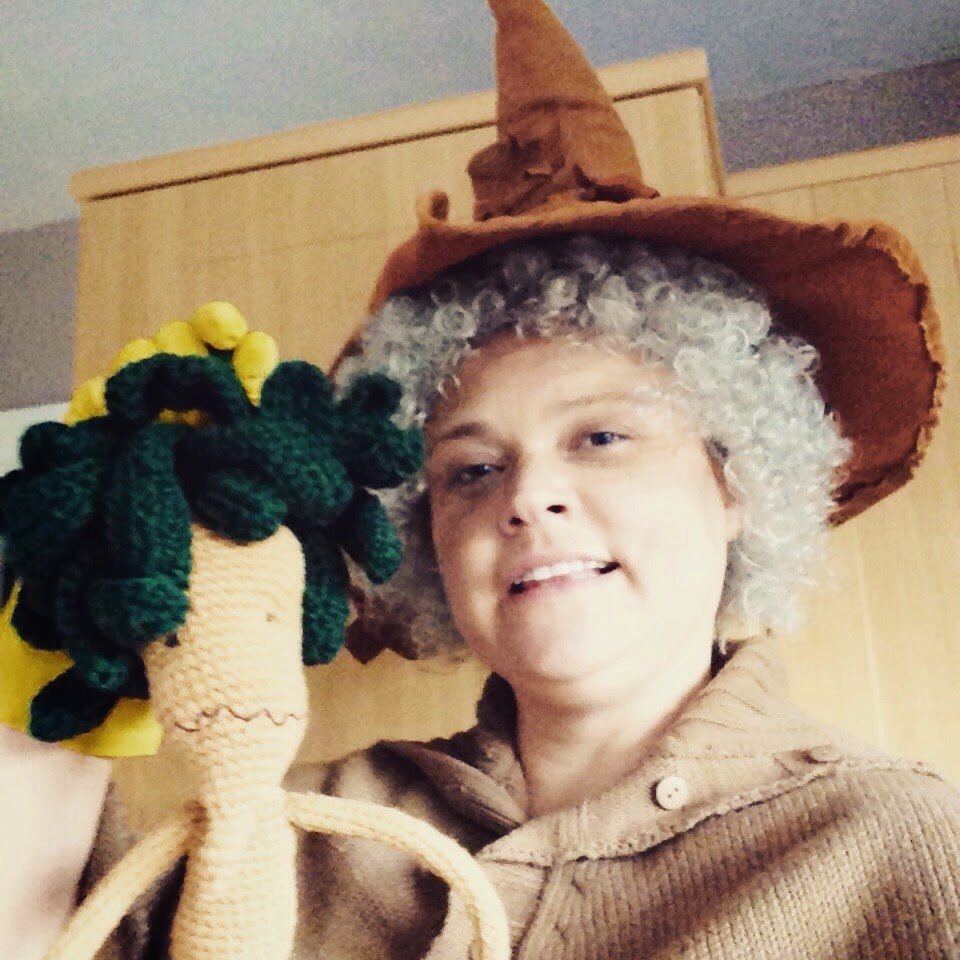
Just over a week ago my friend Karen asked me to crochet a mandrake as part of her costume for Harry Potter World Book Night. Karen works in my local library and she had decided to dress up as Professor Sprout for the occasion. The mandrake plant first appears in 'Harry Potter and the Chamber of Secrets' by J K Rowling and instead of roots the plant has an "extremely ugly baby" living in the soil.

finished mandrake

For the first few days after being commissioned I thought about how I would go about creating this creature. I imagined the plant to be like a root vegetable with long thin roots for limbs. I then looked through my wool stash for appropriate yarn for the project. I found I had some very coarse pure wool which would be ideal for creating the tough skin of the mandrake. I also had a large ball of green acrylic to provide a soft, shiny contrast for the leaves.

work in progress, sitting in my wool bag

Once I had planned out the details in my head I began to crochet. I made up my mind as I crocheted where the increases and decreases would be. My four years at art college studying sculpture certainly help me in this part of the process!

hiding in it's pot!

I thought it would be good finishing touch to find a plant pot and label it, giving the mandrake a home. I delivered him to the library yesterday and Karen tells me he was a great hit with the children! Here's a photo of Karen, dressed as Professor Sprout, with the finished mandrake - I think she looks amazing!!

photo with Karen's permission

I have really enjoyed working on this crochet project and would like to thank Karen for challenge! 

Thursday, 22 January 2015

New Project for 2015 - beekeeper's quilt

One week into the New Year I spotted an Instagram post about making a hexipuff a day and was instantly captivated by the idea! It was my pattern tester friend Anthea's picture and I quickly looked up the hashtags she had added and fell in love with the beekeeper's quilt! If you have not seen or heard of this kind of blanket take a look at this blog post https://tinyowlknits.wordpress.com/the-beekeepers-quilt/


my 1st hexipuff

Anthea (@forestflowerdesigns - Instagram, blog - http://www.talesfrommountpleasant.com/2015/02/the-beekeepers-quilt-2015-knitalong.html ) is hosting a knit along (or KAL) this year. In order to make this vast blanket more achievable the idea is to make 1 hexipuff a day for the year and by the end of the year there should be enough hexipuffs to make a blanket!  


2nd hexipuff, so squishy!

I am using Tiny Owl Knits pattern which can be found on Ravelry (http://www.ravelry.com/). It is very easy to follow and the photos are adorable!


Catching up!

Because I stumbled across the KAL at the end of the first week in January I had to knit fast to catch up. Initially each hexipuff took me around an hour but I can knit one in 40 mins now, so I am speeding up!

Placed side by side in blanket formation

Today I made my 22nd hexipuff and I am really pleased with how they all look together. It is going to be an amazing blanket one day ...


Monday, 29 December 2014

Free Crochet Pattern - Alpaca Wrap - a Christmas gift to all my readers!


Merry Christmas everyone! I am sharing this alpaca wrap pattern as a Christmas gift to all my lovely readers! This pattern has been thoroughly tested and I am happy to share it with you for your personal use. Please respect my original design and do not reproduce this pattern or the wrap made from it for your own financial gain. Happy hooking!

 main photo

Alpaca Wrap Pattern by Marta Mitchell


A warm wrap which drapes beautifully over the shoulders. Worked in one of the neutral King Cole Baby Alpaca shades, this wrap will look pretty worn over blouses and dresses.


Materials


8 x 50g balls King Cole Baby Alpaca, DK (110yds/100m per ball) I used shade 500, “Camel”
4.5 mm crochet hook
tapestry needle for sewing in ends


Tension


20 stitches, 8 rows in 10 cm². The tension should be fairly loose, move up a hook size if you crochet tightly.


Abbreviations (UK terms)


ch chain
ch-sp chain space
dc double crochet
tr treble
shell shell motif (see notes)
fdc foundation double crochet
sl st slip stitch
WS wrong side of work


Notes


This wrap is made of two symmetrical sections which branch out from the centre. It begins with a row of foundation double crochet stitches. I chose this method because it produces a stretchy piece of crochet without any gathering or tightness. If you are unfamiliar with this technique it is worth looking up or you could create a similar effect by chaining 67 stitches and working a dc into the 2nd chain from the hook, and carrying on with 1dc into each ch (65dc across).
The shell motif is produced by working 2tr, ch1, 2tr into the dc stitch indicated.

detail of wrap
Pattern

Edit: This pattern was only free for a short time. It is now available to buy for only £3.60 in my Ravelry Store (http://www.ravelry.com/patterns/library/crocheted-alpaca-wrap) and in my Etsy shop (https://www.etsy.com/uk/listing/462745672/alpaca-wrap-a-crochet-pattern-for-a-cosy?ref=shop_home_active_3)


I am extremely grateful to my online friend Anthea for testing this pattern for me. Anthea's blog is well worth a look - it's full of creative ideas!  http://www.talesfrommountpleasant.com/

If you have a go at making this wrap please send me photos, I would love to see how you get on!

Marta xx

Monday, 8 December 2014

5 Top Tips for Selling at Craft Fairs

Two days ago I had a stall at the Windmill Christian Centre in Arbroath, Scotland. It was the first craft fair I had done since turning my craft from a hobby into a business. I want to share a few top tips of how to make the most of selling to the public at craft fairs and markets.

1. Pack a small bag with items which might just save your day - eg blu tac, scissors, drawing pins, a pen, pencil, rubber - you never know exactly what your space will be like and these small items have always come in useful to me in the past.


2. Make friends with stall holders round about you. They can be a great help watching your stall while you nip to the toilet or grab a bite to eat. Fellow stall holders often offer each other discounts or freebies which is a great way to network too!


3. Have everything clearly priced. Customers often believe that if they have to ask the price it must be expensive.


4. Make sure the event has been well publicised. Ask the people running the event if they have created a Facebook event and invite your friends, offer to put up posters or hand out flyers.


5. Take a cloth to cover your table and use boxes or crates to create different heights to your display. This will add interest and make your stall more interesting. If it's Christmas time perhaps add fairy lights or battery operated tea lights to give it a festive look.


I hope these small tips help you if you are setting up a craft stall, please let me know if they do!

Need a quick last minute crochet gift idea?

Hello!  Are you in need of a quick, last minute crochet gift idea?  Don't stress, I have you covered! Here are 3 of my favourite quick m...