Showing posts with label Erika Knight. Show all posts

Friday, 1 April 2016

How to Crochet a Simple Flower

Hello! I've a simple crochet flower pattern to share with you, right here in this blog post! The pattern is also available as a free download on Ravelry. The pattern is suitable for a confident beginner.

This all came about because last night I was playing about with some cotton yarn, trying to make a very small flower and getting frustrated because the centre was so big and taking up a lot of wasted space! I was using the magic loop method, ch 1, 12dc (UK terms) into the loop and then on to round 2 for the petals, when I suddenly thought "can I skip round 1?" ... And yes, I can, so you can too!


finished flowers


I'm going to give you a complete step-by-step photo tutorial for the flower below, but firstly I'll give all the instructions in the written format for both UK and US terms. 

NB. You will need to know how to make a magic loop! If this is new to you, my YouTube tutorial below will guide you through the process.


Materials

Small amount of yarn
Appropriate size of crochet hook (I used Erika Knight vintage wool and a 5mm crochet hook for the step by step tutorial)
Needle for sewing in ends


3 crocheted flowers stuck on a piece of card to form a greetings card. There's an envelope behind the card and a pen to the right.

finished flowers turned into a simple greetings card


UK instructions

ch - chain
dtr - double treble
ss - slip stitch

Begin with a magic loop, [ch3, 2dtr into loop, ch3, ss into loop] 5 times. Pull starting tail to tighten magic loop. Finish off.

US instructions

ch - chain
trc - triple crochet
ss - slip stitch

Begin with a magic loop, [ch3, 2trc into loop, ch3, ss into loop] 5 times. Pull starting tail to tighten magic loop. Finish off.

That's it, a very small flower which can be used for all sorts of decorative purposes! Top tip - if you leave your tails nice and long these can be used to secure your finished flower to your project.

Step-by-step photo tutorial


begin by wrapping the yarn around
your fingers to make a magic loop


insert yarn from front to back, pull 
a loop through


extra photo to show the start of the magic loop


chain 3 (to begin petal)


first dtr (UK) / trc (US) into the loop

second dtr (UK) / trc (US) into the loop

chain 3 (to finish petal)

slip stitch into loop

Continue around the loop, working the above pattern 5 times in total

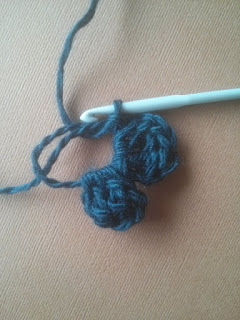
Here's the start of petal no. 2 

2 completed petals

5 completed petals

pull the starting tail 
to tighten the loop

you can leave the centre open or
pull it completely closed.

Weave in your ends and you are finished!

a pile of finished flowers in various 
different yarn weights and textures

Conclusion

I would love for you to get in touch and show me your flowers or let me know how you have found this pattern! You could comment below or tag me on Instagram with the tag #martamitchelldesigns. This pattern is now available as a free pdf download from Ravelry.com!

Happy hooking!

Marta xx


Wednesday, 26 August 2015

Free crochet pattern; wave pattern beanie hat

This beanie hat pattern was first published in the "free patterns" section on the Lemonadeyarns shop website. Since then, due to the fabulous increased range in the online shop (seriously, go check it out!), there is no longer room for the free pattern section. I am now able to share the pattern with you here, I hope you like it! 


This textured hat is crocheted with super chunky wool and works up really fast. It is worked in the round from the brim to the crown.

Materials

1 hank Erika Knight maxi wool (I used shade no. 32, “steve”)
10 mm crochet hook
stitch marker / contrasting piece of yarn
large needle for sewing in ends

Tension

11 stitches x 4.5 rows per 10 cm²

Abbreviations (UK terms)

ch chain
ss slip stitch
dc double crochet
dc2tog double crochet 2 stitches together
tr treble
prev. previous
beg. beginning

Advice

The wave pattern is created by crocheting 4 stitches into the dc of the previous round. It may help to have a stitch marker or contrasting length of wool to mark the beginning of each round.


Pattern

Ch 40, ss into first ch to form large ring (making sure it isn’t twisted)

Round 1  ch1, dc into each ch, ss into ch1 at beg. of round 1 (40 stitches)

Round 2  ch1, *(1dc, 3tr into dc), miss 3dc* repeat 9 times, (1dc, 3tr into ss of round 1), ss into ch1 at beg. of round 2

Rounds 3 - 6  ss into dc, ss into 1st tr, ch1, *(1dc, 3tr into next dc)* repeat 9 times, (1dc, 3tr into ss of prev. round), ss into ch1 at beg. of round

Rounds 7 - 8  ss into dc, ss into 1st tr, ch1, *(1dc, 2tr into next dc)* repeat 9 times, (1dc, 2tr into ss of prev. round), ss into ch1 at beg. of round (31 stitches)

Round 9  ss into dc, ch1, *(1dc, 1tr into dc)* repeat 9 times, (1dc, 1tr into ss of round 8), ss into ch1 at beg. of round 9 (21 stitches)

Rounds 10 ch1, dc, dc2tog to end, ss into ch1 at beg. of round 10 (16 stitches)

Round 11 ch1, dc2tog to end, ss into ch1 at beg. of round 11 (9 stitches) Leaving a long tail, weave in and out of front loops of remaining stitches, pull closed, fasten off.

Finishing off
Secure ends and weave in on reverse side.


Beanniehat.jpg

I can assure you this pattern has been thoroughly tested. I am happy to share it with you for your personal use, but please respect my original design and do not reproduce this pattern or the hat made from it for your own financial gain. Please comment below if you make a beanie hat, I would love to see your projects. Happy hooking!

Tuesday, 10 March 2015

A little bit of this and a little bit of that!


I've been jumping about from project to project recently and thought I would share a few photos of what I have been up to on here.

I'm still making hexipuffs!


hexipuff blanket so far


my youngest son made the raccoon, I made the fox


started something completely different
 with an embroidery hoop


close up of finished hoop art, it's a present, 
can't show any more just now!


finished deep pile crocheted rug


close up of the rug showing the textured finish

I hope to be back soon with a fresh update. Happy crafting in the meantime! 


Thursday, 26 February 2015

New Patterns in Progress!

I have been really busy forming two new patterns over the last few weeks. Both projects use Erika Knight wool, one of my favourite brands due to Erika's strong belief of "treading lightly on the earth and celebrating and supporting traditional British skills". One pattern uses maxi wool, a chunky yarn, similar to Rowan big wool. I decided that I wanted to create something with a lot of texture to really show off the luxurious quality of this wool. 

first night's work

One of the ways that I come up with new ideas for patterns is to look through crochet stitch guides, I have several of them! I use the stitch pattern swatches as a starting point and usually add a twist, eg introducing another colour or changing the number of repeats. In this case I took the astrakhan stitch and changed from working in rows to working in the round. I tried it out using double knitting scrap wool and crocheted up 4 rounds to see if my idea would work - it did! I quickly wound the hank of yarn into a ball (the husband's strong arms work well here) and started work immediately. Because the wool is chunky the pattern worked up quickly and I had a clear idea of the end result.

rug in progress, on my table

In the above photo the rug measures 47cm in diameter and is 5cm deep! I have just ordered fresh supplies of yarn from Wool and Co. in Dundee (http://www.woolandco.co.uk/index.php) and I will finish this with more rounds in the main colour. 

I am having fun with this one!

The other project I am working on is proving to be my trickiest pattern writing challenge so far! It's a small child's cardigan loosely based on a technique Kat Goldin used in her cabled yoke cardigan design where the length of yoke is worked first and the neckline and bodice branch off from there.

original sketch

I am using a stepped pattern with raised trebles for the cable yoke and working it in a contrast colour to give a strong shape to the garment.

starting to branch off from the yoke

Working out the decreases to form the neckline gave me a real headache!! I spent a lot of time scribbling away on a piece of paper, calculator to hand before I got it right! Maths was never my strong point!

success with the decreases

Now I have almost finished crocheting the body and have also moved on to the arms. Without a small child to try this on for me, my next step is to look up dressmakers size guides online to insure the garment has the correct proportions. Despite it's brain exhausting qualities I am gaining great satisfaction from creating something more complicated and hope this is the start of many clothing patterns that I will write.

nearly there!

In other news my child's chevron cowl has passed the first pattern test, thank you again to Anthea at  http://www.talesfrommountpleasant.com/ :)

Wednesday, 18 February 2015

2015VAL

One of my Instagram friends, @craftyrie, had launched a challenge called #2015VAL, encouraging people to start making something for themselves this Valentine's Day and a new hat just for me seemed an ideal choice for joining in the fun! The wind has been icy cold here for the last 4 or 5 days so I decided that a new hat was just what I needed to keep myself warm when I am out and about.

 chosen colours next to Kat Goldin's book,
 'Hook, Stitch and Give'

I had followed Kat Goldin's Slouch and Bobble hat pattern a few times (in fact I wrote a blog post about it in September 2014) and then given away the finished beanies as presents. I looked forward to making and then wearing my own hat in this style.

the start of the new hat
I quickly remembered just how fast this beanie hat works up and before I knew it I was half way to finishing! I looked to see how much yarn I had left and realised there was not going to be enough to make the hat as slouchy as I wanted so I ripped it all back to the start. When I began again I used the contrast colour for the ribbed headband, changing for the darker purple for the main body of the hat. I could quickly estimate that this would work out and surprised myself by finding this combination even better than the first!

contrast rib
I used Erika Knight vintage wool, an aran thickness pure wool, made in the UK which I had used for several projects in the past and I chose here for warmth without being itchy! I used 2x 50g hanks of "mulberry" and 1x 50g hank of "pretty". 

purple progress

finished beanie hat

I really enjoyed spending a little bit of time making something to keep for myself and it was lovely to see the projects other people chose to make for themselves too.

Friday, 11 April 2014

Dundee Yarn Crawl

A few weeks ago my friend Jo posted a link on my Facebook page asking if I had been to 'Fluph', a yarn shop in Dundee. A week or so later I posted a link on her page, asking if she had been to 'The Knitting Pin', another Dundee wool shop. Several comments later we agreed we would do a yarn crawl of the 4 main Dundee wool shops!

After a little more organising, I caught the no. 73 bus into Dundee with Jo and her daughter, who loves to knit. I had my youngest and eldest sons with me too because they are just getting into knitting and crocheting. Our first stop was 'The Knitting Pin' up Albert Street (here is a link to their facebook page https://www.facebook.com/pages/The-Knitting-Pin/249792755194830?rf=263565830472270  ). We timed it well because my friend Liz, who had a greed to meet us there, had arrived moments before us. We spent a happy 20 minutes looking high and low at all the different wools. This shop is jam packed, bursting at the seams with hundreds of different types of yarn! There is something for everyone, and if you can't find what you are looking for the super friendly staff will help you. It was the owner's husband who was in charge today and he kindly gave the children lollipops too! I bought a ball of Sirdar Eco wool, DK which I have been using lately to dye with natural dyes.


inside The Knitting Pin

Next we strolled down the hill to the town centre (about a 15 minute walk). It was a sunny day and we all chatted away as we walked. We soon reached 'Wool Craft' which is a hidden gem in The Keilor Shopping Centre. The shop was very busy as usual, both with customers and stocks of wool everywhere! A large and unusual variety of knitting and crochet books were displayed for sale. There were special offers and bargain buckets too. I bought 4 little Anchor tapestry wools in different colours to fit into my latest granny square project. I can't find a website for the shop, but here is a link with a little more info and a map  https://plus.google.com/111923526296304615649/about?gl=uk&hl=en .

Wool shop no. 3 was only a 5 minute walk and we headed straight through the city centre towards it. Wool&co. is the newest of the Dundee wool shops and immediately we noticed how different it was to the others! The shop had a simple, uncluttered layout set against clear white walls. All the wool was set out beautifully on the shelves. There were some gorgeous knitting books and patterns on display too. We noticed that this shop also caters for machine knitters with lots of cones of wool. The yarn was high quality luxury brands, such as a large selection of Erika Knight wool (one of my favourite brands!), Blue Sky Alpaca and several types of Rowan wool, including their popular Big Wool. My youngest son spent his pocket money on a ball of Erika Knight's british blue wool and some bamboo needles to knit it with. This is a link to the shop's website  http://www.woolandco.co.uk/index.php .


me and my eldest, outside Wool&co.

From here we had another 15 minute walk (up hill this time) to 'Fluph' (here's a link to shop's Facebook page  https://www.facebook.com/fluphshop ). I think our tiredness left us immediately as we entered the beautiful shop. We were full of wonder as we looked around at the beautiful wool and quirky handmade decorations. The wool was a mix of skeins and balls of pure wool, alpaca and silk. The owner Leona and her super cute cocker spaniel made us feel very welcome, inviting us to rest our weary legs on the comfy sofas and work on our current projects too.


concentrating in Fluph

While the others caught their breath I nipped across the road and attached a yarnbomb to the lampost. It was my first yarnbomb of the year and it felt good to put it up as everyone walked past or sped past on bikes and in cars. When I went back to the shop I bought 3 balls of Drops alpaca, 1 ball of Drops karisma and my sons bought a ball of Drops eskimo each.


yarnbomb on Blackness Rd, opposite Fluph

We left Fluph with our purses lighter and our bags bulging with wool agreeing it had been a fantastic morning, full of discovery!

Thursday, 20 March 2014

Finishing Projects


I have written on here before about my tendency to have many different creative projects on the go. I have since found that it's common for crafters to do this, moving from project to project as their mood takes them. However, things have reached the point where I want to finish as many of my ongoing projects as I can before launching into the many fresh ideas I have!


Detail of completed blanket

The large granny square blanket I started in October was completed at the start of this week. The weather is still cold enough to snuggle under it in the evenings so I am happy to have finished it. I have very nearly crocheted a pixie hood, following an aran crochet pattern from Mollie Makes magazine. Also, I have almost completed a crochet pattern for a headband using Jenny Watson merino; there are a few changes required, but the design is almost there.

Another ongoing project is another large blanket I am making for my youngest sister and her husband. I am using up ends of wool to make granny square motifs so I can only work on it from time to time as I gather enough odds and ends together. My deadline is Christmas 2014 and I am confident it will be finished by then. On top of all these I am knitting my first pair of socks! Knitting doesn't come as naturally to me as crochet, so work on these is going to be slow. As long as they are finished by the autumn I will be happy, and so will my dad because I am making them for him!.


Work in progress, the blanket for my sister

I have good news on the Lemonadeyarns pattern competition I entered; I was chosen as one of the two winners! My wave pattern beanie hat crocheted using Erika Knight maxi wool was my winning entry. You can read all about it on the Lemonadeyarns blog ( http://www.lemonadeyarns.co.uk/blog/ ). This is an exciting opportunity for me because my pattern will be listed in the Free Patterns section of Lemonadeyarns' shop ( http://www.lemonadeyarns.co.uk/ ). I would like to thank everyone who has tested patterns for me, I really appreciate it!


Elevate Your Crochet Photoshoots with the Effective Use of Props

Hello! This week I've been taking photos of my crochet and i n this blog post I’m going to pass on my tips on how to make the best use o...