Showing posts with label Artesano. Show all posts

Thursday, 14 April 2016

Why This Shawl is on the Naughty Step!!


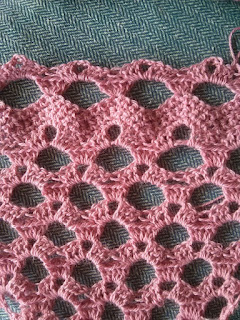
I have been crocheting this shawl, designing the pattern as I go, since the 2nd of March this year. It's been one of those projects I've picked up and put down, working on other things as the mood takes me. It's also been the work-in-progress (WIP) that I've taken with me to appointments, on train journeys, to cafes and most recently on our short break to North Berwick.

the shawl, with my notebook

So, why is it on the naughty step? Well, because it has been picked up and put down so often and not looked at too closely or stretched out for photographs I hadn't noticed the shape had all gone wonky! If you look at the photo below you can see it tapers from left to right - this should be the straight stretch - Noooooooo! When I noticed I threw it in the corner in disgust and it's only now, 4 days later, that I can look at it and figure out where to go from here!

tapering when it should be straight!

beginning the shawl

The shawl started out well with a simple 2 row repeat, worked back and forth, creating an ever increasing triangle. I was happy with how it was progressing.

progress

Then I decided to mix things up a little and add a section of plain double crochet stitches. This would help to break the shawl up - both for the crocheter and for the look of the finished item. Again, I was happy.


getting bigger!

At this point I had created a large triangle and I knew the shawl could go in two directions; keep increasing the triangle until it reached the right size or stop the increases, work a straight section and then decrease to a point again. I thought option 2 would suit me and my crochet style best and went for that, first working out (or so I thought, ha!) how to stop increasing and crochet in a rectangular fashion. 

So, what now? Well, me and the wool (which is gorgeous Artesano alpaca silk 4ply by the way, should have mentioned that!) have become friends again. I think I will rattle back to the start and see where it takes me. I like the pattern repeat and it is perfect as a project for on the go, I just need to pay more attention when I'm designing!

Marta xx


Wednesday, 2 March 2016

Free Crochet Pattern; Cabled Boot Cuffs

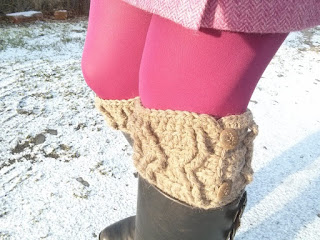
This month's pattern is for a pair of boot cuffs, designed in Artesano aran wool which provides a cosy and stylish addition to any boots.


The pattern is suitable for those with intermediate level of crochet ability.


There are 4 adult sizes available; small, medium, large and extra large. The photos show the medium size.

My pattern is for your personal use. If you follow my pattern and go on to sell the item, please state that I am designer. Thank you!


Materials
Small [medium, large, extra large] 1 [1,2,2] x 100g skein Artesano aran (132m / 144yds per 100g) any colour, I used “birch”
7 mm crochet hook
tapestry needle (for sewing in ends)
4 x 2cm diameter buttons
needle and thread for sewing on buttons


Tension
11 stitches x 8 rows in  a 10cm² / 4 inch²


Abbreviations (UK terms)
ftr foundation treble
ch chain
st stitch
dc double crochet
htr half treble
fpttr front post triple treble
blo back loop only
prev previous
cont continue
rep repeat
RS right side
patt pattern


Notes
The pattern begins with foundation treble stitches. If you are unfamiliar with how to do foundation stitches it is worth looking up on you tube. You could substitute these stitches with regular chain stitches and a row of trebles. Please note that if you take this option you will finish up at the wrong end of the boot cuff - simply reattach the yarn and carry on.


The front post stitches (fpttr) are worked into the front post of the stitches 2 rows below.


The turning chains all count as 1htr and the 1st stitch is missed. At the end of the row work 1htr into the turning chain.

The left and right cuffs differ slightly to allow the button overlap to fall correctly on each side. When starting the left cuff leave an 80 cm tail of wool - after completing the rows this will be used to add the button loops down the side. The right cuff has the loops on the opposite side - an extra length of wool needs to be joined in for this.


Pattern
Left Cuff
Foundation Row Using 7 mm hook, leaving an 80 cm tail, ftr 30 [38,46,54]. Turn


Row 1  Ch2 (counts as 1htr), 1htr into each st across, 1htr into turning ch. Turn (30 [38,46,54] stitches)


Row 2 Ch2 (counts as 1htr), 1fpttr into each of next 2ftr (foundation row), miss 3 st *1htr in each of next 4htr (row 1), 1fpttr in each of next 4 ftr (foundation row), miss 4 htr* rep from * to * 1 [2,3,4] more times, 1htr in each of next 4htr, 1fpttr in next 2 ftr, miss 2, 1htr in each st until end, 1htr in turn ch. Turn


Row 3 Ch2 (counts as 1htr), 1htr into each st across, 1htr into turning ch. Turn (30 [38,46,54] stitches)


Row 4 Ch2 (counts as 1htr), 1htr in each of next 2htr, 1fpttr in 1st 2fpttr (row 2), 1fpttr in each of next 2fpttr (row 2), *miss 4htr (row 3), 1htr in each of next 4htr, 1fpttr in each of next 4fpttr (row 2),* rep from *to* 1 [2,3,4] more times, 1htr in each st until end, 1htr into turning ch. Turn


Row 5 Ch2 (counts as 1htr), 1htr in each of next 8st, *1htr into next htr catching blo of fpttr of row 3, 1htr in each of next 7st* rep from * to * 1 [2,3,4] more times, 1htr in each st until end, 1htr in turn ch. Turn


Row 6 Ch2 (counts as 1htr), 1fpttr in 1st 2fpttr (row 4), miss 3st, *1htr in each of next 4htr (row 5), 1fpttr in each of next 4fpttr (row 4), miss 4htr* rep from * to * 1 [2,3,4] more times, 1htr in each of next 4htr, 1 fpttr in each of next 2fpttr, 1htr in each st until end, 1htr into turning ch. Turn


Row 7 Ch2 (counts as 1htr), 1htr in each of next 12st, *1htr into next htr catching blo of fpttr of row 5, 1htr in each of next 7st* rep from * to * 1 [2,3,4]  more times, 1htr in each st until end, 1htr in turn ch. Turn


Row 8 Ch2 (counts as 1htr), 1fpttr in 1st 2fpttr (row 6), miss 3htr, *1htr in each of next 4htr (row 7), 1fpttr in each of next 4fpttr (row 6), miss 4htr* rep from *to* 1 [2,3,4]  more times, 1htr in each of next 4htr (row 7), 1fpttr in each of next 2fpttr (row 6), 1htr in each st until end, 1htr into turning ch. Turn


Row 9 As row 7. Finish off, weaving in ends.


Button loops Using long 80 cm tail from ftr, RS facing, Ch1, working down side 1dc into next 2 end of row, ch2, 1dc into each of next 5 end of rows, ch 2 1dc into each of next 2 end of rows. Finish off, weaving in ends.


Right cuff
Foundation Row Using 7 mm hook, (no need for long tail) ftr 30 [38,46,54]. Turn


Row 1  Ch2 (counts as 1htr), 1htr into each st across, 1htr into turning ch. Turn (30 [38,46,54] stitches)


Row 2 Ch2 (counts as 1htr), miss 1htr, 1htr in each of next 5htr ... beg patt as left cuff


Row 3 - 9 As left cuff, with button space on opposite side


Button loops
RS facing, join wool at top left corner, ch1, working down side 1dc into next 2 end of row, ch2, 1dc into each of next 5 end of rows, ch 2 1dc into each of next 2 end of rows. Finish off, weaving in ends.


Finishing off
Using photo as a guide sew buttons on.

I hope you will enjoy following this pattern. 
Look out for more free patterns at mrsdaftspaniel.blogspot.com
Follow me on Instagram @mrsdaftspaniel

I am listing this and all my crochet patterns for free this month on Ravelry - go have a look here!

Happy hooking,

Marta xx

Thursday, 14 January 2016

Inspiring start to the year

I have had a lot of inspiration for new work so far this year which is not the way I expected January to turn out! I decided to challenge myself to write (and type up!) one new crochet pattern each month of 2016 because last year my pattern writing was somewhat unfocused and sporadic. I thought if I stuck to a seasonal item each time it would give me the focus I needed to create. Today is the 14th of January and so far I have a boot cuff pattern written (typed up and at the testing stage) and a hat pattern on the go!

boot cuff design

The boot cuffs use the crocheted cable method to produced a raised, textural effect. I began with pen and paper, sketching out the cable pattern then transferred it to crochet. I chose Artesano aran alpaca wool blend for the project because I am slightly addicted to alpaca yarn at the moment and I knew this particular wool would be soft and cosy. The small and medium size boot cuffs use one skein, larger sizes use two skeins; you can buy Artesano aran here. Once I am happy that the pattern is fully tested I will publish it, keep your eyes peeled!

fresh off the hook


last night's dusting of snow provided the 
perfect back drop for my photo shoot 

My second crochet design is a beanie hat, made in two colours using spike stitches. Up until now I have tended to focus on single colour patterns when I am designing because they are so much easier to write up. Now that I have more experience I am going to bring my love of colour into my work. This is something I am really excited about for this year and I hope it will bring a pop of colour into the world!

design in progress

This time I am using MillaMia naturally soft merino aran, which you can buy here. I love these two intense colours together, they will make a super bright hat! There may even be enough yarn left over from two balls to make a pompom, I'm not sure at this stage. I will finish this design in the next few days and type it up promptly (not leave illegible scribbles in my notebook to be forgotten!). Again, once it is tested I will share it with you.

My third creative burst this year is a new sewing design which I hope to sell in my online Folksy shop later this month. I started with a simple idea of using a covered button and played around with various fabrics and textures to go with it to create a brooch. I had soon come up with something I liked and I hope others will too!

new brooch design

So, I seem to be off to a good start this year and I hope it continues to be a year full of inspiration and creativity! What about you? Have you any creative plans for the year? Have you made something exciting? Please share below, I'd love to see!

Marta xx

Need a quick last minute crochet gift idea?

Hello!  Are you in need of a quick, last minute crochet gift idea?  Don't stress, I have you covered! Here are 3 of my favourite quick m...