Wednesday 6 December 2017

Pattern Release: Lark's Knot Scarf

Hello! I have released another crocheted scarf pattern - my Lark's Knot Scarf! I designed this scarf using Queen of Purls Citadel DK which is a beautifully hand dyed, Blue Faced Leicester yarn. I fell in love with the colours when I visited the  Queen of Purls shop in Glasgow, which you can read all about in one of my july blog posts here.

detail of the tassles on the Lark's Knot Scarf

The name of my latest design is inspired by the lark’s head knot which I used in the tassels for the ends. I was a Girl Guide when I was younger and my dad was in the Royal Naval reserves, so I have always taken great pride in learning and knowing my knots!

the scarf together with its inspiration

This is an easy crochet pattern to follow, requiring only a few stitches and it works up quickly - an achievable project for the weekend! I have included an easy-to-follow chart too, which will really help anyone who prefers visual instructions. The pattern is available in US and UK terms, simply select the correct version for you at the time of purchase.

I chose 2 striking colours to show off the simplicity of the stitch pattern

So, this pattern is now available alongside my other patterns, in my Ravelry store - and hurry! - because it's on special offer at half price for 1 week only!!

I have one more pattern to release before the year is out and I have lots of ideas chugging away for the New Year which I can't wait to share with you!

Happy hooking,

Marta xx

Thursday 16 November 2017

Pattern Release; Fields of Lavender Cardigan

Hello! I am super excited to be ready to release my Fields of Lavender Cardigan crochet pattern today!! This pattern is possibly my favourite of all the patterns I have designed so far and I am really pleased to be able to share it with you at last!

cover photo for my Fields of Lavender Cardigan

The pattern includes two sizes; 3-6 months and 6-12 months, it is suitable for intermediate crocheters and it's written in UK terms throughout. The intricate lavender stalks may look like a complex design but I can assure you, they are not as tricky as they look to create!

I chose King Cole merino blend DK for this design for two reasons, firstly it's a superwash wool (a must for baby garments) and secondly because the finished cardigan will be really warm and snuggly for the little one. You will need 3x 50g balls for the smaller size and 4x 50g balls for the larger size.


cuff and waistband detail

The garment is constructed from the waist up, splitting into 3 sections at the armpit and then the sleeves are crocheted seperately before being sewn up and sewn into position.


the lavender stalks

The pattern is currently available as a pdf download from my Ravelry store and for the first week it will be on special offer for only £1.80. If you would like to purchase and download a copy you can find it here.

back of the cardigan

Look out for more pattern releases coming very soon - I have another winter project for you in the next week or so ...

Until then,

happy hooking,

Marta xx

Friday 10 November 2017

Back to School Sweater CAL - my cardigan


Hello! Following on from last week's Back to School Sweater CAL blog hop post by Fay (www.knitit-hookit-craftit.com) it's time for me to share my own cardigan journey. Like most of the CAL participants, I had carefully chosen my yarn, swatched to check tension and was eager to start on the morning of Saturday 16th of September - I crocheted at full speed for a big chunk of the day, everything was going well!

my swatch and colour choices

progress at the end of day 1

I had chosen to follow one of my own patterns - Summer Yoke Cardigan - and give it a winter twist. The first big change was to substitute the summery cotton for cosy alpaca yarn. I chose Eden Cottage Yarns in Whitfell DK - a 100% baby alpaca yarn - and I ordered it directly online (NB. this yarn is currently in the sale as it is going to be discontinued, go grab a bargain while you can!).

this photo © Inside Crochet Magazine
my original Summer Yoke Cardigan design

The pattern begins with a plain yoke and then the pop of colour begins! I deliberately chose a muted, neutral shade for the main colour to really give the other colours a chance to dance and shine!

I love this stage of the making process, when the yoke looks like a rainbow!

Everything was straight forward and went as I expected at this stage. Apart from the yarn, the only other real change I had made was to follow the instructions for small instead of medium because I wanted a much tighter fitting cardigan for the winter. I used a 3.25mm Knit Pro crochet hook to keep the stitches small and neat too.

progress photo

I added 3 more rows of yoke pattern to this version, simply because I felt like it! The next section, from the end of the patterned yoke to the sleeve split was tricky! I spent about a week crocheting, frogging*, crocheting, frogging! The brilliant thing about being part of a CAL was that I wasn't alone; lots of people were unravelling at this stage! 

*frogging: term used in knitting and crochet to describe rows of stitches being ripped out - rip it, rip it - like a frog!

starting the sleeves

The best thing about top-down crochet designs is the fact that you can try them on as you work. In this way I was able to get the fit exactly as I wanted it. Once I positioned the sleeve split exactly in the right place, I began to work 1 ball at a time on a rotation basis; sleeve, body, body, sleeve, body, body etc. In this way I could work evenly across the sections and the garment grew in a harmonious way.

finished sleeves and cuffs

Before I knew it I had reached my desired sleeve length and it was time to think about how to finish at the cuff (my original pattern had 3/4 length sleeves and simply a band of contrast colour to finish). This cardigan was for me and I like snug, draught excluding cuffs on a cosy cardigan so I began with a round of contrast stitches, then a round of half trebles before adding 4 rounds of ribbed crochet cables. 

choosing the perfect button!

Shortly after I finished the sleeves, the main body section was finished too (hoorah! no more plain stitches!). I wanted to make the most of the pretty yarn so I added 4 rows of pattern to the hem before commencing the button band. The button band - the home stretch! Almost finished! Or so I thought ...

... actually the button band itself was ok, it was when I made the decision to add a colar to finish the neckline that it all went a bit pear shaped!

1st collar attempt

The trouble was that the extra height from the button band with a collar worked into it sat too high around my neck and dragged the whole cardigan out of shape. It was not how I had pictured it in my ahead at all. It was at this point that I threw the cardigan on the naughty step and didn't even look at it for a few weeks! During this time I did think about how to solve the problem - often at unexpected moments new ideas would come and go until suddenly it all became clear, I had a new plan! Sadly, this plan involved more frogging, lots of frogging! The entire button band needed to come out, 75g worth of wool in tiny little seed stitch ...

final colar design

The new button band stopped at the neckline, allowing me to work directly into the original chain of stitches at the very beginning of the cardigan. I followed the same increase pattern as the yoke whilst decreasing at either end to create a softer, rounder effect. To finish off I used a row crab stitches (my current fave stitch!). I like the new colar design in the main colour of the cardigan because it focuses all the attention on the pretty yoke.

first photo shoot

my finished Back to School Sweater!

I would like to take this opportunity to thank Helen (makingatnumber14.blogspot.co.uk) and Tamara (www.craftyescapism.com) for hosting this CAL - it's been such fun to take part in and to watch other people's sweaters grow and take shape online! Next week Helen and Tamara are going to be sharing a celebration of everyone's making - I can't wait to find out more about it!

Happy hooking,

Marta xx


Saturday 7 October 2017

Designing a Crocheted Garment

Hello, for those of you who don't know me I'm Marta and it's my turn to contribute to the Back To School Sweater CAL Blog Hop! Last week's post was by Fay and was crammed full of advice on blocking and finishing garments and you can find it here www.knitit-hookit-craftit.com. Today I am going to have a look at the topic of crochet garment design; starting with the various different construction techniques, where to begin yourself, a very basic template for making a garment, writing up and finally a bit about working with pattern editors.


Once you have crocheted a few jumpers or cardigans you will begin to notice the way in which a garment is constructed. There are 5 basic construction techniques out there: top-down; bottom-up; individual sections sewn or crocheted together; freeform crochet and one-piece construction. I have crocheted jumpers and cardigans in all of these ways except for the one-piece and each has its own merits ...

  • In top-down design you begin with a short length of chains which are worked into and rapidly increase to form a yoke which is later split to form front, back and armholes, picked up again and continued in the length. The huge advantage of this process is that you (or your recipient) can try it on as you make.
Top-down is perfect for pretty yokes eg. my Summer Cardigan


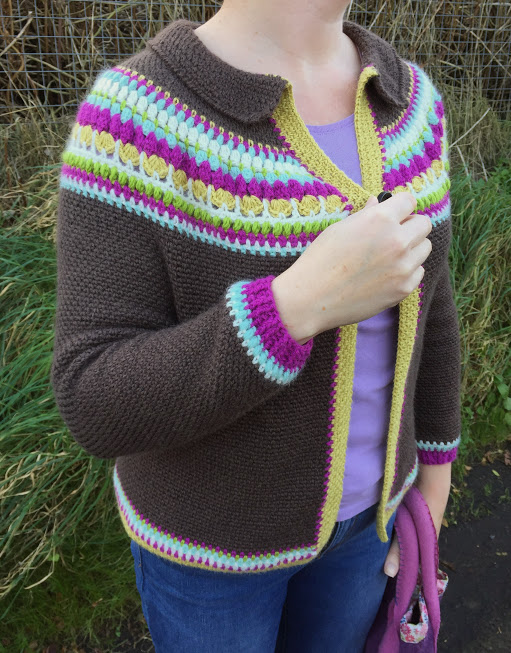
  • Bottom-up starts with a chain to fit the hip or waist circumference and is worked up towards the chest, splitting for armholes and decreasing for the neck. This technique does allow you to try on as you go, but with gravity against you it is a little harder to tell for sure how it is looking.

Bottom-up - to achieve the lavender motifs my
Lavender Cardigan had to be worked in this way 


  • For an individual section garment, pieces are worked up in a similar way to a dressmaking pattern and can either be sewn or crocheted together later. One huge advantage of this technique is that stitches can go in any direction, horizontal, vertical or even diagonal - opening up a world of possibilities! The pieces can be placed against the body to give an idea of fit, but it's not as reliable as top-down.

an individual section garment from Vogue Guide to Crochet, 1971


  • Freeform crochet is one of the most artistic ways to make a garment where lots of much smaller pieces (eg. flower shapes) are made and then sewn or crocheted together to form a more loose and free garment shape. Erika Knight's Asymmetrical Cardigan is an excellent example of this, I made one 4 years ago, it's a brilliant pattern!


Freeform crochet - Erika Knight's Asymmetrical Cardigan


  • One-piece construction is possibly the simplest technique out there; a simple rectangular shape is crocheted and joined at the short ends to make arm holes. A variation of this is to start with a circle and work outwards, adding arm holes as you go. I haven't tried this method so here is a link to a pattern I really like over on Ravelry.
Once you have chosen your construction technique, the best place to start your garment design process is with a set of measurements either from your own body if the garment is for yourself or from the intended recipient of the cardigan or sweater. Measure the bust or chest circumference at the fullest part, the waist and the widest part of the hips (this will depend on your figure and your intended length), the length from the most prominent bone at the base of the neck to where you wish the garment to end, the diameter of the upper arms and the arm length from wrist to the centre of the back at the neck. If you are making for yourself it will be best to ask someone else to measure you to achieve more accurate measurements.

If you have been following this Blog Hop series you will have read the post from  thecrochetproject.com covering guage, measurement and fit. If you missed it I would go and check it out because it offers invaluable advice on how to measure properly amongst other things!

The above blog post also covers ease, ie. the amount of movement the garment has around the body. Tight fitting jumpers have less ease whilst floaty summer cardigans have a lot of ease. As a general rule for adults - slim, figure hugging jumpers have up to 5cm of ease and looser fitting garments have about 10 - 15cm of ease. Obviously these measurements will be much smaller if you are designing for babies and toddlers!

Another website I refer to all the time is www.craftyarncouncil.com because it has all the standard body measurements used for crocheted and knitted garments.

When I designed and crocheted my first adult cardigan I had a look at my favourite shop-bought cardigan and took measurements from it, then throughout the making process I placed my WIP on top of my shop-bought cardigan to compare and check I was on track. This method was very successful and I still wear this first cardigan with pride!

A huge source of inspiration for me are crochet stitch dictionaries - there are all sorts of different swatches in them and I often I combine a few together or change them from working in rows to working in the round. I have a growing collection of vintage crochet books too and I love the stitch samples in them! Crocheting from other crochet designers' patterns can also spark new ideas - perhaps using their construction technique or stitch combination and altering it to make it your own. Caution: do not outright copy their work because you will be found out, you will loose your credibility as a designer and could even end up in legal trouble!

A few of my vintage pattern guides

Choose some yarn and a stitch pattern and swatch to see how it feels, how it drapes and how well the stitches are defined. If you are happy with it, calculate the number of stitches and rows per 10cm to give you your guage or tension (see The Crochet Project's post above for how to do this). From here I am going to take you through a very basic template for crocheting a bottom-up jumper. For this example, your hip measurement is 90cm+10cm of ease = 100cm and your pattern swatch has a 10 stitch repeat per 10cm, giving us 10 repeats per row pattern. Rather than launching into the main pattern, you will probably want to start with a band of plain stitches or a cable rib (2fptr, 2bptr will work well in this example).

So, you have chained 100, joined into a ring to work in the round, cable ribbed for 6 rounds and begun crocheting in your main pattern. Taking your underarm to hip measurement of 43cm, work straight for 41cm in total, including the waistband. Stopping short of 43cm allows for ease. If this jumper was for a woman you would portion slightly more stitches for the front than for the back to compensate for the bust, but to keep things super simple this is a man's sweater! 100 stitches÷2=50 stitches for the front and 50 for the back. Begin to work on the first 50 stitches only, turn and start working in rows rather than in the round. At this point you may wish to use a contrast pattern because your stitches will no longer be the same as when you were working in the round.

Your measurement from the hip to the prominent bone at the base of the neck is 65cm, so continue to crochet evenly until the total length of the work measures 62cm then fasten off. Go back and crochet into the 50 unworked stitches for the back section and repeat the same steps as the front section until it measures 62cm in total. Join back into the round and work 6 rounds of rib for the collar.

At this point it would be perfectly acceptable to work into the ends of the rows with a round of double crochet stitches to finish off and you would have a simple vest top. Or you could carry on and add sleeves ...

Measure the length from armpit to collar, it should be 19cm. Doubling this gives a 38cm circumfence and you can calculate the number of stitches needed for this in the same way as you did for the waistband above. Work evenly from shoulder to cuff, or if you prefer with a slight taper - decreasing as you go - until you are a few cm short of the cuff. Join into the round and work the same rib as you did for the collar. Either sew or crochet the sleeve seam together before pinning to the armhole and sewing/ crocheting the join. Et voilà! A very simple, box style sweater! To stop this blog post from turning into a book I have avoided shaping for the neckline, raglan sleeves and for a woman's jumper it is likely that you would have some increases for the bust.

One top tip I find useful when I am planning a design for an adult size garment is to make it baby or toddler size first. This allows me to visualize my design and any frogging will be a lot less painful!

an almost-ready-to-publish
top-down cardigan design of mine
Perhaps you want to design your own crocheted garment so that you can wear a totally unique sweater that no one else in the whole wide world can possibly have or perhaps you want to write up your design for publishing and selling your pattern. The Craft Yarn Coucil website (link above) is really useful for listing all the correct crochet abbreviations and covers what needs to be included in your pattern too. If I am working on a small item, such as a scarf, then I tend to prefer the freedom of crocheting with a notebook at my side, then later I type these scribbles up into the official pattern format. However if I am designing a garment I have my crochet and my laptop on my knee because I know that inputting the lengthy pattern onto my computer will be a long and daunting task!

After I have finished typing up any crochet design and I am satisfied with it I send it to 3 or 4 crochet friends for testing. I now have an excellent team of testers, some are real life friends but most of them I only know throught the amazing Instagram community. Testers are great at picking up things that you can't see because you have simply spent so long looking at your pattern your eyes have gone cross eyed!

Once your pattern has been tested and you are intending to publish your garment design I would thoroughly recommend employing a technical editor to proof read your pattern. Tech editors are amazing at spotting everything from typos, incorrect abbreviations to missing information. A second editor will be required if you need help to add smaller and larger sizes to your range. I have successfully worked with 2 pattern editors; Sam - singasimplemelody.blogspot.co.uk and Deb - findmeknitting.co.uk.

I hope you have found this blog post useful. If you have questions about any aspect crochet garment design please leave them in the comments and I will try and answer them (or find someone who can!). The next blog hop post in the series will be from Tamara in which she will share a little of her Back To School Sweater CAL progress - you will find it at www.craftyescapism.com

Happy hooking,

Marta xx

Wednesday 20 September 2017

Crochet charts - a helpful bonus included with some of my patterns

Hello, last week I was hard at work on a new design for Crate Crochet in Australia. I was beginning to get very frustrated with my stitch counts and the exact positioning of some of my stitches when I decided to step away from the yarn and turn to pencil and paper to try and draw my idea in chart form. This was a real eureka moment for me because I was finally able to see the exact placement of the stitches and every single stitch was accounted for.

I need to keep this particular project under wraps for now but it did lead me to have a think about adding charts as a helpful bonus in some of my patterns. Looking through my published patterns I chose 2 that could quickly and easily be turned into chart form and set to work!


The first is this Simple Flower pattern that I had already produced a photo tutorial for. The addition of the chart will make it really easy for other people to understand how the pattern works. This pattern is available as a free pdf download on Ravelry, you will find it here.

Secondly, I looked to one of my very first designs, my Zig Zag Scarf. It turned out that this pattern neeeded more than just a chart, it needed a lot of TLC! I can't believe how much my pattern writing and layout style have changed in 3 and a half years! So, I drew out the chart and then fixed the formatting and layout - it really did look so clunky and alien to me! Another thing I managed to do with this pattern is translate it into US terms - it's always useful to cover both if I can. I then used the scanner at my local library to scan my drawn charts into the computer and from there added them to the documents.


The Zig Zag Scarf pattern is available for £3.60 to download from Ravelry here. Please do let me know if you follow either of these patterns, I love to see how different people interpret my designs!


My Lark's Knot Scarf pattern is almost ready for publishing and it will have a chart too. Thanks also for your patience waiting for my Lavender Cardigan design - it is still stuck at the photo editing stage - nearly there, I want it to be perfect! Not long now ...

Marta xx


Friday 15 September 2017

Using every scrap!

This week I noticed a common theme with all my current crochet WIPs - they are all scrap busting projects! I love this because apart from the economical use of yarn it is creative in using up every scrap from its source (whether plant, animal or man-made) to spinning then dying and finally retail.

The longest standing of these projects is my Virus Blanket. It is crocheted in 4ply and some of the scraps in this I have had for ages! The pattern is by Joanna Martinez and you can find it on Ravelry here.


Next up is this chunkier aran weight blanket. I hadven't made an aran weight blanket before, I always us double knitting thickness and this is working up so much faster, I love it! The pattern is Granny Shell Blanket and it's a twist on the traditional granny square, written by Remade By Sam. I have written my own final rounds to join the squares together, using the join-as-you-go method. Because of the weight I think I will keep this as more of a lap blanket, much smaller than usual. The colours are particularly clashy in this one, I'm not aiming for my usual colour harmony.


Something much smaller ... crocheted socks! This is only the second pair of crocheted socks I have ever made. The first were my own design (which I didn't write down, they never got past the experimental stage!) and now these by Joanne Scrace of The Crochet Project - you can find the pattern in the book, Crochet Yeah! or on Ravelry here.


My forurth WIP is one I have blogged about twice now, my 100 Days Project blanket. Progress is still going strong on this one - I have just passed the 50 square milestone! Below is a photo to show you some of the many, many coulours involved in this blanket. 


Finally, not a stash busting project but an exciting pattern release announcement! My Lavender Cardigan is at the final photo editing stage and is very, very nearly for release! I have been working on this project since the spring and I can not wait to share it with you! It will be available next week to download from Ravelry and Etsy.


Happy hooking,

Marta xx


Wednesday 23 August 2017

Yarn delivery from Eden Cottage Yarns

Earlier today I was really excited to come home from my grocery shop and find my order from Eden Cottage Yarns had arrived! The shopping was all flung to one side as I tore open the outer packaging straight away. Inside the wool had been carefully wrapped up in brown paper bags with the pretty Eden Cottage Yarns logo - all snug and perfect!


On opening further, I immediately fell in love with the baby alpaca wool - it is incredibly soft and delicate. I ordered the yarn because I plan to use it for the #BackToSchoolSweaterCal starting this Saturday. This CAL (short for crochet-along) has been organised by Tamara (craftyescapism.com) and Helen (makingatnumber14.blogspot.co.uk) and is a great way to encourage everyone to crochet a sweater (jumper) or cardigan between now and Christmas. A blog hop has been organised to accompany the CAL and it will take you on a journey via the participants blogs, finding out about all sorts of differnt aspects of garment making, starting with Tamara on Saturday (see link above). Helen approached me back in early summer, asking if I would like to be involved with this project and of course I was super keen to hop on board!! I will be writing 2 blog posts: the first in October will be all about designing a garment and my second will be in November with an update on my personal crocheted sweater progress.


For the CAL, I decided that I wanted to create a warm, winter version of my own design - Summer Cardigan. As well as changing the yarn from summery cotton to cosy alpaca I will be altering the fit to make it a more close fitting, snug cardigan. I have chosen Eden Cottage Yarns Whitfell DK which is a beautifully soft baby alpaca yarn and I can't wait to get started! The colours will be totally different too - the main colour will be dark brown "Ebony" and the colourful yoke will be in "Laburnum", "Fuchsia" and "Natural". My first step will be to work up a swatch and see how the yarn behaves in comparison with my original cotton design. From this point I will calculate my guage and sizing and the rest should fall into place ...

Anyone else joining in this CAL? Leave a comment below if you are!

Happy hooking,

Marta xx

Crochet and Sustainability: Your Guide to Being More Eco-Friendly

Hello! Are you l ooking for ways to reduce the environmental impact of your crochet? There are so many opportunities to create what we do in...