Wednesday, 17 March 2021

2 shawls to crochet for Sping!


Hello! Today I would like to highlight two of my shawl patterns which are perfect for Spring! The weather is starting to get warmer here in the northern hemisphere and it's time to think about replacing hats, gloves & thick scarves for something lighter.

First up is my Crocheted Alpaca Wrap - a warm yet light wrap which would look pretty worn over a blouse or dress. It's worked up in one of the neutral King Cole baby alpaca shades. 

The Crocheted Alpaca Wrap is available on LoveCrafts here on Ravelry here (please note Ravelry may cause issues for people with photosensitivity).

The Daffodil Shawl is gorgeously soft and drapes gracefully around your shoulders. It's crocheted in Koigu Mori (50% merino wool/ 50% mulberry silk) giving it such a delicate, light feeling. The filet crochet design creates staggered rows of daffodil motifs.

You can find the pattern on LoveCrafts here and on Ravelry here (please note Ravelry may cause issues for people with photosensitivity).

I hope you like these shawl patterns, as always, let me know if you follow one!

Marta xx

Friday, 12 March 2021

Inspiration for a Mother's Day card


Hello! It's Mother's Day here in the UK this Sunday and if you're still looking to make a card I have some crochet card inspiration for you here!

I was wondering what kind of card to make my own mum when I remembered a pattern I had written for a simple crocheted flower. I thought it might look quite cute stuck on a card and began playing around with different ideas, with and without the added pen lines.

When I looked up the pattern, written back in 2016, I found it looked totally alien to my current way of writing so I gave it a makeover! This design includes both UK & US terms, a chart AND a photo tutorial! It's rated beginner level and I'm confident that even if you're new to crochet you will manage to make a cute flower.

I used DMC Natura Just Cotton (310m/100g, 100% cotton) in Cerise, Giroflee and Passion for these cards. For the smaller pink (Cerise) flowers I used a 2.5mm hook and pulled the centres in really tightly. For the larger flowers I used a 3mm hook and left the centres open slightly. My plain white cards are square 12.5mmx12.5mm (I think I bought these in Hobbycraft but they're widely available or you could fold a sheet of card in half). I used PVA glue for sticking - a glue gun would work too, especially if you're in a real hurry!

The beauty of this pattern is that it will work with ANY yarn and the appropriate size hook. Of course, the finished flower can be used for all sorts of decorative purposes, it can be sewn on to items as well as glued.

You can find the FREE pdf download for the Simple Flower on Lovecrafts here and on Ravelry here (please note that the Ravelry website can cause issues for people with photosensitivity).

I hope this inspires you if you're making a last minute card - please tag me on Instagram if you make one, or leave a comment below, I'd love to know how you get on!


Friday, 26 February 2021

3 tips to help you choose colours for your projects


Hello again! Have you ever struggled with choosing colours for a crochet or knitting project? I'm frequently asked how I go about choosing my colour schemes and so in this blog post I am going to share 3 practical tips to help you make the most of colour.


Tip no. 1.  Play with colour! 

Start by keeping things simple with just 3 colours at a time. Choose balls of yarn from your stash to help you with this or perhaps you have yarn wound round pegs or you could even use paint swatch cards from the DIY store. Look at your 3 colours and ask yourself "Do they go together?  Are they working in harmony?" If you like them, take a quick photo, if not substitute just one colour and try again. 

The more you play around with colours and experiment with what works for you, the easier it will become. Back in June 2017 I wrote an extensive blog post about choosing colours with a little bit of colour theory thrown in too. If you'd like to read that blog post, you can find it here.


Tip no. 2.  Create a mood board

Pinterest is an amazing resource to use when planning projects. You can create a board that saves colour schemes you like and can refer back to (f you like, you can make it a secret board). Try not to overthink it, simply save pins with colour schemes that appeal to you. Once you've saved a few pins have a look and see what they have in common. Ask yourself "Which colours work well together? What colours am I drawn to?" If you haven't used Pinterest before it's a wonderful resource - think of it as a big search engine for looking for creative ideas. Warning: pinning can become addictive! 

If Pinterest isn't your thing, you can always create scrap book pages with colour combinations you find pleasing. Rip out colour schemes you like from the interiors section of magazines, add in strands of yarn, buttons, bits of food packaging, ribbons, photos, paint swatch cards, feathers and other found items. Keep adding new pages with new colour combinations to look back on. (These torn pages were taken from Mollie Makes magazine).


Tip no. 3.  Look to the natural world

Go for a walk outside and bring your camera with you! Take time to notice colours that sit side by side in nature and look good together. If you spot a pleasing colour combination, take a photo! You can even print it and add it to your mood board, helping to build a bigger picture. 

Think of seasonal colours that work in harmony: oranges, rich browns, burgundays in the autumn; pale blues, lilacs and fresh green in the spring. Or consider the colours of the landscape: blues, sandy oranges and yellow at the seaside; a range of greens and browns in the forest. Nature has an amazing colour range - copy it!


I hope you have found these 3 tips helpful. Leave me a comment below or find me on Instagram if you have any questions or want to share your recent colour combinations, I'd love to see them!

Marta xx

Wednesday, 24 February 2021

Bee Happy - child's scarf crochet pattern published!

Hello, I'm on a roll with the crochet pattern releases this year with yet another pattern published this week! The latest pattern is my Bee Happy child's scarf - a practical, cosy accessory with a fun twist - there's a honeycomb shaped pocket with room for a little amigurumi bee! 


This scarf is designed for a young child, 3-8 years of age. It's inspired by my 4 year old niece who does not like layering up to go out in the cold and I thought the little bee would make putting on a scarf more fun. The bee can go along for all her adventures!


To make the scarf you will need just 3x 100g balls of Paintbox Yarns wool mix aran (50% wool/ 50% acrylic); 1x pure black, 1x champagne white, 1x daffodil yellow. You will also need 2x 6mm safety eyes and a small amount of toy stuffing. The pattern is rated intermediate; the scarf is worked in linked half trebles and the bee is crocheted in the amigurumi style.


The pattern is available from Lovecrafts here. This listing has direct links to the correct colours of yarn sold on Lovecrafts, so only 1 payment required. It's also available to download from Ravelry here.

I designed the pattern at the end of last year and quickly had it tested ready for release in the new year. However, I was holding off for a photo shoot with my niece to show it off at its best. With the current Covid restrictions I can't see her and her family at the moment so decided to go ahead and publish without model photos. I can always rerelease once we do get together later in the year! I hope you like the current photos, I tried to aim for a playful look.

I'm chuffed that I am keeping up with blogging this year too, next post shouldn't be too long,

Marta xx


Tuesday, 16 February 2021

Recent crochet pattern releases

Hello everyone, I'm excited to announce the release of 2 crochet patterns; my Bandwagon Mitts and my Elsie Beanie. The photo shoots for both patterns were done on the same day and they do go well together.


Last week I published the Bandwagon Mitts design and I'm pleased with the response so far. They are the perfect pair of mitts to wear on a winter's walk - indeed, I wore them to go sledging on several occassions! The pattern begins with a stretchy rib worked as a long strip, next it's joined to make a round and then crocheted up to the fingertips in a continous spiral. A gap is made for the thumb and the thumb is crocheted in at the end. It's rated intermediate level.


You can find the Bandagon Mitts pattern on Ravelry here and on Lovecrafts here. The pattern is available in 6 sizes ranging from child to adult XL and requires between 50g of DK weight yarn for the smallest, to 150g of DK weight yarn for the largest. On Ravelry one of the download options is for a full photo tutorial accompanying the pattern, ideal if you are fairly new to crochet.


Here I am wearing the Bandwagon Mitts and the Elsie Beanie throwing a snowball at my eldest, Niall, who was my photographer for the afternoon!


Yesterday I published my Elsie Beanie pattern. This pattern was originally a collaboration with Crate Crochet Subscription Box in Australia, and the pattern was exclusive to subscribers. I wrote the pattern for DK weight for the box but since then added a 4ply weight version too. Again, it's an intermediate rated design. If you purchase the pattern your pdf will include both versions - you can find it on Ravelry here and on Lovecrafts here and if you're quick you can catch it at the early bird price of £2.50.


The Elsie Beanie is crocheted sideways and has a lovely drape to it created by modified linked trebles. If you haven't tried linked crochet stitches before this small project is perfect for you to give them a try. The pattern is a simple 4 row repeat which will soon become very rhythmic and mindful. There is an accompanying YouTube video which will help to keep you right here (note to self - film in landsacpe next time!). These last 2 photos were taken by Niall back in May 2020 and show the DK version of the hat.


I hope you like these new patterns, please do share your photos online if you follow one (or both!) I do love to see them.

Catch you soon,

Marta xx


Wednesday, 20 January 2021

Happy Scrappy Blanket Instructions


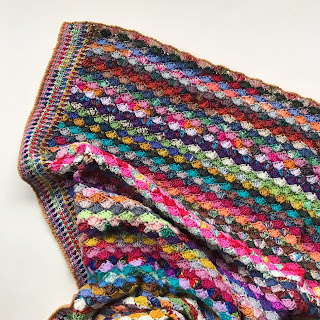
Hello everyone! I'm starting this year's blogging off with the FREE instructions to crochet your very own happy scrappy blanket! Does that sound good? This is a blanket I began making last summer, working just a few rows at a time as the mood took me and allowing it to gradually grow as scraps of sock yarn became available from knitted or crocheted sock and shawl projects. I'm using the term "instructions" rather than "pattern" because I'm simply going to give basic information for you to use and make this project your own.


So, what do you need? Lots and lots of scraps and odd balls of sock weight yarn. If, like me, you are addicted to knitting or crocheting socks and shawls you will know how quickly these leftovers mount up and it seems a shame to leave them and not turn them into something beautiful. Of course, this blanket would work in thicker or thinner yarn too - simply adjust the number of chains at the start. If you don't have a stash of scrap yarn you could always skip the collecting stage and buy sock minis, many indie yarn dyers sell these (I caved and treated myself to 1 or 2 pretty skeins such as this one below from Lichen and Lace which I bought from Loop London).


UK terms and standard UK abbreviations.
Using the appropriate hook for the thickness of your yarn, begin by chaining a load of chains to the length you would like the width of your blanket to be. Chain a multiple of 6 + 4 (I chained 184, my finished blanket is 90cm across excluding border). 

Turn, 2tr in 4th ch from hook, (miss 2ch, 1dc in next ch, miss 2ch, 5tr in next ch) across to last 6ch, miss 2ch, 1dc in next ch, miss 2ch, 3tr in last ch. Cut yarn.

Row 1. RS facing, join new yarn in top of ch3 at beginning of last row (ch1, 1dc in same sp), miss 2tr, (5tr in next dc, miss 2tr, 1dc in next tr, miss 2tr) across row to last 3tr, miss 2tr, 1dc in last tr. Cut yarn.

Row 2. RS facing, join new yarn in 1st dc of Row 1 (ch3, 2tr in same sp), (miss 2tr, 1dc in next tr, miss 2tr, 5tr in next dc) across to last 6st, miss 2tr, 1dc in next tr, miss 2tr, 3tr in last dc. Cut yarn.

Rows 1 and 2 form the pattern, just keep going until your blanket is half the length you would like it to be. Next, with RS still facing, you are going to work into your chain stitches and begin crocheting out in the opposite direction. You can begin this stage at any time, I liked to work on both ends simultaneously.

RS facing, join yarn in 1st ch (ch3, 2tr) in same sp, (miss 2ch, 1dc in next ch, miss 2ch, 5tr in next ch) across to last 6ch, miss 2ch, 1dc in next ch, miss 2ch, 3tr in last ch. Cut yarn.

Continue as before, repeating Rows 1 and 2 until you have the same number of rows each side of your foundation chain (or perhaps do 1/3 in one direction, 2/3 in the other - the possibilities are endless here, I'm simply giving you a starting point). For reference, I worked 68 rows (57cm) in each direction.


Once you have crocheted the blanket to the size you're happy with, it's time to an add the side borders - these edgings really bring the blanket to life!

RS facing, beginning in either top left corner, join yarn into the side of the last tr created (ch1, 2dc) in side of tr, (ch1, 1dc in side of next dc, ch1, 1dc in side of next tr) across to end. Cut yarn.

Row 1, RS facing, join new yarn in 1st dc, (miss 1dc, ch1, 1dc in chsp) across to last dc, 1dc in last dc. Cut yarn.

Row 2. RS facing, join new yarn in 1st dc of Row 1, (1dc in chsp, miss 1dc, ch1) across to lastdc, 1dc in last dc. Cut yarn.

Work Rows 1 and 2 until you are happy with the width (I did 13 rows on each side).


To finish off the blanket I went right around the whole blanket in crab stitch (also known as reverse double crochet) to give a slightly weighted corded edging. You could simply go round with dc stitches if you wanted - or any other variation. I would love to see how you interpret these basic instructions and make them your very own. You can email your photos to martasecocrafts@gmail.com or share them on Instagram, tagging me @marta.mitchell.designs and using the #marta.mitchell.designs hashtag - please help share the love! Also, if you enjoy this pattern you can find lots more of my patterns on Ravelry and Lovecrafts.


Until next time (I'll try not to leave it too long this time!),

Marta xx

Monday, 29 June 2020

crocheted doll CAL

Hi everyone! I have decided to launch my very first CAL (crochet-a-long) starting next Wednesday 8th July! You can follow ANY crocheted doll pattern, it doesn't have to be my pattern - however, if you do follow mine it will give you double the chances of winning a prize!

Coral, Gabriella & Leo
Last week I published the crochet pattern for these dolls (known as Coral, Gabriella & Leo) on Ravelry, you can find the pattern here at the early bird price of just £3.50! I will keep it at this intoductory price until the start of the CAL. You may remember seeing Coral and Leo back in January of this year, they were part of my Fun-a-Day Dundee project. When I was preparing the pattern for release I decided they needed a friend and crocheted them Gabriella. I think the trio make a lovely set, don't you?

close up of Gabriella
If you are working on a crocheted doll just now (or maybe have one lurking in a cupboard somewhere?) feel free to dig it out and use it for the CAL, WIPs are definitely welcome!

close up of Leo's shoes
The time frame for the CAL will be 3 weeks, ending at midnight on Tuesday 28th July (BST). This should allow plenty of time to crochet a doll and make some lovely clothes for them to wear. If you have time left you could crochet another season's wardrobe, or a bag, or a toy for them, or ... the possibilies for creativity are endless!

Coral has the amazing hair!
At the end of the CAL I will look through all the photos on Instagram under the hashtag #crocheteddollCAL and choose the winners! There will be an overall First Prize for my favourite crocheted doll - the winner will receive the pattern for Coral, Gabriella & Leo (or reimbursement) AND all the yarn to make their own doll! There will be lots of runners up - every photo posted will enter you into the daw - and these prizes will be pdf copies of my doll pattern (or reimbursement). Like I said at the start, if you follow my pattern each photo you post will count as 2 entries.

me and my crocheted dolls
all photos in this blog post by Niall Mitchell
If you have any questions please leave them in the comments or get in touch directly via Instagram. I can't wait to see all your creations,

Marta xx

Need a quick last minute crochet gift idea?

Hello!  Are you in need of a quick, last minute crochet gift idea?  Don't stress, I have you covered! Here are 3 of my favourite quick m...