Friday, 1 April 2016

How to Crochet a Simple Flower

Hello! I've a simple crochet flower pattern to share with you, right here in this blog post! The pattern is also available as a free download on Ravelry. The pattern is suitable for a confident beginner.

This all came about because last night I was playing about with some cotton yarn, trying to make a very small flower and getting frustrated because the centre was so big and taking up a lot of wasted space! I was using the magic loop method, ch 1, 12dc (UK terms) into the loop and then on to round 2 for the petals, when I suddenly thought "can I skip round 1?" ... And yes, I can, so you can too!


finished flowers


I'm going to give you a complete step-by-step photo tutorial for the flower below, but firstly I'll give all the instructions in the written format for both UK and US terms. 

NB. You will need to know how to make a magic loop! If this is new to you, my YouTube tutorial below will guide you through the process.


Materials

Small amount of yarn
Appropriate size of crochet hook (I used Erika Knight vintage wool and a 5mm crochet hook for the step by step tutorial)
Needle for sewing in ends


3 crocheted flowers stuck on a piece of card to form a greetings card. There's an envelope behind the card and a pen to the right.

finished flowers turned into a simple greetings card


UK instructions

ch - chain
dtr - double treble
ss - slip stitch

Begin with a magic loop, [ch3, 2dtr into loop, ch3, ss into loop] 5 times. Pull starting tail to tighten magic loop. Finish off.

US instructions

ch - chain
trc - triple crochet
ss - slip stitch

Begin with a magic loop, [ch3, 2trc into loop, ch3, ss into loop] 5 times. Pull starting tail to tighten magic loop. Finish off.

That's it, a very small flower which can be used for all sorts of decorative purposes! Top tip - if you leave your tails nice and long these can be used to secure your finished flower to your project.

Step-by-step photo tutorial


begin by wrapping the yarn around
your fingers to make a magic loop


insert yarn from front to back, pull 
a loop through


extra photo to show the start of the magic loop


chain 3 (to begin petal)


first dtr (UK) / trc (US) into the loop

second dtr (UK) / trc (US) into the loop

chain 3 (to finish petal)

slip stitch into loop

Continue around the loop, working the above pattern 5 times in total

Here's the start of petal no. 2 

2 completed petals

5 completed petals

pull the starting tail 
to tighten the loop

you can leave the centre open or
pull it completely closed.

Weave in your ends and you are finished!

a pile of finished flowers in various 
different yarn weights and textures

Conclusion

I would love for you to get in touch and show me your flowers or let me know how you have found this pattern! You could comment below or tag me on Instagram with the tag #martamitchelldesigns. This pattern is now available as a free pdf download from Ravelry.com!

Happy hooking!

Marta xx


Tuesday, 15 March 2016

Yarn Review; Three Bears Yarn

I thought it would be interesting to start a series of blog posts reviewing my favourite yarns. At the moment I am working with Three Bears Yarn, affection, DK (double knitting) so I will start with this yarn!

my yarn delivery!

I ordered from Three Bears Yarn after following them on Instagram for some time. They post lots of colourful photos there including many reposts of other people's projects which gave me a good idea of how it was to work with as well as the many endorsements from satisfied customers. For me Instagram is a fantastic place to find inspiration, new friends and new wool, fabric etc ... there's a whole new blog post in that! 

I had decided to follow Spincushions latest mystery crochet-a-long (CAL) and the special 29th of February yarn pack (29 balls for £29!) that Three Bears Yarn had on offer seemed like an excellent choice for this new project. You can find all the details of Spincushions CAL here.


first square

I began the CAL last Monday morning when the first part was released and I loved crocheting with this 100% cotton straight away! It feels very soft and smooth which makes it easy to crochet with. Unlike many cotton yarns I have worked with, this one does not split when I am working, which creates a very neat finish. I think you will agree the stitch definition is amazing too!

4 squares complete

Three Bears Yarn is based in Lancashire in the UK. It was founded in 2015 out of Blackburn Yarn Dyers Ltd. and is a family run business with real passion and enthusiasm for producing quality yarns. 

I am enjoying the mix of colours in this yarn pack and having fun putting different combinations together. I have a feeling this blanket is going to be lovely and colourful! 

I love this yarn!

You can follow my work in progress on Instagram and on Ravelry where there will be lots more colourful photographs. 

Has anyone else tried this yarn? If you have, share a photo in the comments below, I would love to see what you think.

Marta xx


Wednesday, 2 March 2016

Free Crochet Pattern; Cabled Boot Cuffs

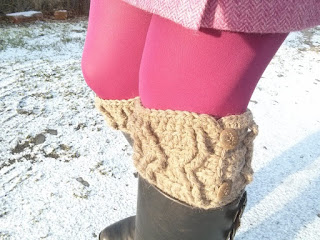
This month's pattern is for a pair of boot cuffs, designed in Artesano aran wool which provides a cosy and stylish addition to any boots.


The pattern is suitable for those with intermediate level of crochet ability.


There are 4 adult sizes available; small, medium, large and extra large. The photos show the medium size.

My pattern is for your personal use. If you follow my pattern and go on to sell the item, please state that I am designer. Thank you!


Materials
Small [medium, large, extra large] 1 [1,2,2] x 100g skein Artesano aran (132m / 144yds per 100g) any colour, I used “birch”
7 mm crochet hook
tapestry needle (for sewing in ends)
4 x 2cm diameter buttons
needle and thread for sewing on buttons


Tension
11 stitches x 8 rows in  a 10cm² / 4 inch²


Abbreviations (UK terms)
ftr foundation treble
ch chain
st stitch
dc double crochet
htr half treble
fpttr front post triple treble
blo back loop only
prev previous
cont continue
rep repeat
RS right side
patt pattern


Notes
The pattern begins with foundation treble stitches. If you are unfamiliar with how to do foundation stitches it is worth looking up on you tube. You could substitute these stitches with regular chain stitches and a row of trebles. Please note that if you take this option you will finish up at the wrong end of the boot cuff - simply reattach the yarn and carry on.


The front post stitches (fpttr) are worked into the front post of the stitches 2 rows below.


The turning chains all count as 1htr and the 1st stitch is missed. At the end of the row work 1htr into the turning chain.

The left and right cuffs differ slightly to allow the button overlap to fall correctly on each side. When starting the left cuff leave an 80 cm tail of wool - after completing the rows this will be used to add the button loops down the side. The right cuff has the loops on the opposite side - an extra length of wool needs to be joined in for this.


Pattern
Left Cuff
Foundation Row Using 7 mm hook, leaving an 80 cm tail, ftr 30 [38,46,54]. Turn


Row 1  Ch2 (counts as 1htr), 1htr into each st across, 1htr into turning ch. Turn (30 [38,46,54] stitches)


Row 2 Ch2 (counts as 1htr), 1fpttr into each of next 2ftr (foundation row), miss 3 st *1htr in each of next 4htr (row 1), 1fpttr in each of next 4 ftr (foundation row), miss 4 htr* rep from * to * 1 [2,3,4] more times, 1htr in each of next 4htr, 1fpttr in next 2 ftr, miss 2, 1htr in each st until end, 1htr in turn ch. Turn


Row 3 Ch2 (counts as 1htr), 1htr into each st across, 1htr into turning ch. Turn (30 [38,46,54] stitches)


Row 4 Ch2 (counts as 1htr), 1htr in each of next 2htr, 1fpttr in 1st 2fpttr (row 2), 1fpttr in each of next 2fpttr (row 2), *miss 4htr (row 3), 1htr in each of next 4htr, 1fpttr in each of next 4fpttr (row 2),* rep from *to* 1 [2,3,4] more times, 1htr in each st until end, 1htr into turning ch. Turn


Row 5 Ch2 (counts as 1htr), 1htr in each of next 8st, *1htr into next htr catching blo of fpttr of row 3, 1htr in each of next 7st* rep from * to * 1 [2,3,4] more times, 1htr in each st until end, 1htr in turn ch. Turn


Row 6 Ch2 (counts as 1htr), 1fpttr in 1st 2fpttr (row 4), miss 3st, *1htr in each of next 4htr (row 5), 1fpttr in each of next 4fpttr (row 4), miss 4htr* rep from * to * 1 [2,3,4] more times, 1htr in each of next 4htr, 1 fpttr in each of next 2fpttr, 1htr in each st until end, 1htr into turning ch. Turn


Row 7 Ch2 (counts as 1htr), 1htr in each of next 12st, *1htr into next htr catching blo of fpttr of row 5, 1htr in each of next 7st* rep from * to * 1 [2,3,4]  more times, 1htr in each st until end, 1htr in turn ch. Turn


Row 8 Ch2 (counts as 1htr), 1fpttr in 1st 2fpttr (row 6), miss 3htr, *1htr in each of next 4htr (row 7), 1fpttr in each of next 4fpttr (row 6), miss 4htr* rep from *to* 1 [2,3,4]  more times, 1htr in each of next 4htr (row 7), 1fpttr in each of next 2fpttr (row 6), 1htr in each st until end, 1htr into turning ch. Turn


Row 9 As row 7. Finish off, weaving in ends.


Button loops Using long 80 cm tail from ftr, RS facing, Ch1, working down side 1dc into next 2 end of row, ch2, 1dc into each of next 5 end of rows, ch 2 1dc into each of next 2 end of rows. Finish off, weaving in ends.


Right cuff
Foundation Row Using 7 mm hook, (no need for long tail) ftr 30 [38,46,54]. Turn


Row 1  Ch2 (counts as 1htr), 1htr into each st across, 1htr into turning ch. Turn (30 [38,46,54] stitches)


Row 2 Ch2 (counts as 1htr), miss 1htr, 1htr in each of next 5htr ... beg patt as left cuff


Row 3 - 9 As left cuff, with button space on opposite side


Button loops
RS facing, join wool at top left corner, ch1, working down side 1dc into next 2 end of row, ch2, 1dc into each of next 5 end of rows, ch 2 1dc into each of next 2 end of rows. Finish off, weaving in ends.


Finishing off
Using photo as a guide sew buttons on.

I hope you will enjoy following this pattern. 
Look out for more free patterns at mrsdaftspaniel.blogspot.com
Follow me on Instagram @mrsdaftspaniel

I am listing this and all my crochet patterns for free this month on Ravelry - go have a look here!

Happy hooking,

Marta xx

Wednesday, 17 February 2016

A Bunny for Easter

I have been very productive over the last week or so, designing and crocheting new things! I was asked by my brother in law, Ian, to make a bunny for his goddaughter's birthday, a challenge I immediately accepted! I love crocheting soft toys and a wee bunny sounded like a cute idea! I decided that as it was coming up for Easter it was an excellent opportunity to design the pattern myself and write it up for others to make one too!

finished bunny

I have been making various crocheted animals for years and have designed a few myself already so I simply followed basic construction techniques I have learnt along the way to "build" the bunny up. Ian was lucky that I had some appropriate wool in my stash to get started right away - I used James C. Brett "Legacy", a really soft pure wool.
progress photo

The ears were one of the hardest things for me to crochet, I had to keep going back and forth asking family members for their opinions but eventually they turned out how I wanted them!

completed bunny

Once I had finished crocheting I still had a day until Ian was popping round to collect her so I decided to have some fun making a dress! I chose some pretty Liberty fabric, which was actually from a vintage blouse I found in a charity shop and cut up. I made up a simple gathered style maxi dress and studded it at the back to show off the bunny's cute tail!

back view

The bunny was opened up by her new owner yesterday. Apparently she was pulled out by the ears (ouch!) and then hugged and kissed! Awww, I love my job!

close up

Now the bunny is finished I have started a new project which I will share in my next blog post, or hop over to Instagram if you can't wait till then! 


Marta xx


Tuesday, 9 February 2016

Geometric Hat Pattern

This week I have finalised the pattern for my Geometric Hat! I did most of the designing on this hat back in September but didn't get as far as transferring my scribbles into neatly typed up format! I won't make that mistake again in a hurry - I ended up having to make another hat to make sense of it all! 

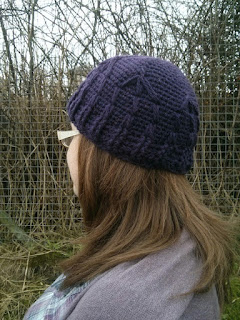
finished hat, with optional pompom

This hat uses spike stitches to create the surface geometric pattern. I had fun playing around with the placing of the spikes and I'm happy with how this one turned out. I have designed the hat in two adult sizes, large and medium.

me and Gwen, wearing matching hats! 

My friend Gwen came around for a cuppa and a catch up on Sunday and we had chat about my latest projects. When she tried on the purple version of this hat it suited her so well I said she could keep it if she modelled it for me! 

Gwen modelling the hat

I really like the above photo - it will be the cover shot for the pattern. The model's beautiful hair, dusky lilac cardigan and the wintry backdrop show off my design perfectly. A big thank you to Gwen for modelling for me!

This pattern is at the testing stage and I hope to publish it at the end of the month.

Edit: The pattern is now available for £3.60 in my Ravelry Store (http://www.ravelry.com/patterns/library/geometric-beanie-hat) and in my Etsy shop (https://www.etsy.com/uk/listing/462743720/geometric-beanie-hat-crochet-pattern?ref=shop_home_active_4)

Marta xx
Saturday, 6 February 2016

How To Make Your Own Happy Scrappy Wool

I made this You Tube video of how I make my "happy scrappy wool" because I was frequently asked how I did it and after so many lengthy explanations I decided it would be easier to produce a video and actually show people! The technique uses needlefelting tools to produce a length of multicoloured wool which can be used for all sorts of fun crocheted or knitted projects.


I would love to see how you get on with making your own happy scrappy wool, please share a photo if you do!


Marta xx


Thursday, 14 January 2016

Inspiring start to the year

I have had a lot of inspiration for new work so far this year which is not the way I expected January to turn out! I decided to challenge myself to write (and type up!) one new crochet pattern each month of 2016 because last year my pattern writing was somewhat unfocused and sporadic. I thought if I stuck to a seasonal item each time it would give me the focus I needed to create. Today is the 14th of January and so far I have a boot cuff pattern written (typed up and at the testing stage) and a hat pattern on the go!

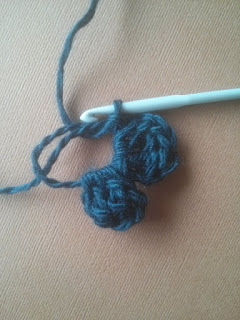
boot cuff design

The boot cuffs use the crocheted cable method to produced a raised, textural effect. I began with pen and paper, sketching out the cable pattern then transferred it to crochet. I chose Artesano aran alpaca wool blend for the project because I am slightly addicted to alpaca yarn at the moment and I knew this particular wool would be soft and cosy. The small and medium size boot cuffs use one skein, larger sizes use two skeins; you can buy Artesano aran here. Once I am happy that the pattern is fully tested I will publish it, keep your eyes peeled!

fresh off the hook


last night's dusting of snow provided the 
perfect back drop for my photo shoot 

My second crochet design is a beanie hat, made in two colours using spike stitches. Up until now I have tended to focus on single colour patterns when I am designing because they are so much easier to write up. Now that I have more experience I am going to bring my love of colour into my work. This is something I am really excited about for this year and I hope it will bring a pop of colour into the world!

design in progress

This time I am using MillaMia naturally soft merino aran, which you can buy here. I love these two intense colours together, they will make a super bright hat! There may even be enough yarn left over from two balls to make a pompom, I'm not sure at this stage. I will finish this design in the next few days and type it up promptly (not leave illegible scribbles in my notebook to be forgotten!). Again, once it is tested I will share it with you.

My third creative burst this year is a new sewing design which I hope to sell in my online Folksy shop later this month. I started with a simple idea of using a covered button and played around with various fabrics and textures to go with it to create a brooch. I had soon come up with something I liked and I hope others will too!

new brooch design

So, I seem to be off to a good start this year and I hope it continues to be a year full of inspiration and creativity! What about you? Have you any creative plans for the year? Have you made something exciting? Please share below, I'd love to see!

Marta xx

Need a quick last minute crochet gift idea?

Hello!  Are you in need of a quick, last minute crochet gift idea?  Don't stress, I have you covered! Here are 3 of my favourite quick m...