Thursday, 23 February 2017

Working with a Pattern Editor

I have been designing crochet patterns for about 5 years now and this year my goal is to reach an even bigger audience. My patterns have been available on Ravelry.com for a few years and recently I started adding them to Etsy. On Ravelry many of the patterns are free with several of them proving very popular, which is fantastic!

In January I began a new design for a hat which caught the eye of one of my followers on Instagram. Sam, known as @samsimplemelody approached me and asked if I would like to try out the services of her new technical editing business. I of course jumped at the opportunity, fascinated by how exactly the process worked.


So, after having my pattern tested by two of my online friends, Michelle Willis and Jill Porter, I sent a copy of the pdf to Sam to have a look. I received a quick response and a brief idea of what to expect. Within a week my pattern was returned to me with an overlay of changes which needed to be made and changes which were more optional, down to individual preference. I have to say it looked like my pattern was riddled with mistakes but once I began working through them they were easy to fix.


After I had made the changes I sent the updated pdf back to Sam for another look. There were still a few tweaks needing to be made (my fault, some of my corrections had brought to light new problems!) which were again added in overlay form. Once these were sorted the pattern was sent back for final approval. The whole process was very satisfactory and I now have a pattern that I am very pleased with!

If you are interested in having a crochet or knitting pattern technical edited then I would thoroughly recommend Sam! Her new blog, A Simple Melody, has details about her technical editing, what to expect and pricing.


Sunday, 18 September 2016

Yarn Review: Ginger's Hand Dyed Bleating Velvet 4ply

I have only been crocheting with Ginger's Hand Dyed Bleating Velvet 4ply for a week and it has shot into 1st place in my top yarn list! Dyed on a base of 80% superwash merino/ 10% cashmere/ 10% nylon it has a soft texture that feels wonderful to work with. But the main appeal for me is the stunning colourways available!


Last Saturday my husband and I had a child free day in Edinburgh. We took an early train through and spent the day exploring the city of my birth with no real fixed plan or agenda ... except a visit to Ginger Twist Studio! I had visited Ginger Twist Studio's stall at the Edinburgh Yarn Festival in March and although I didn't buy anything, knew I had to go and visit the shop and see all the gorgeous yarn together.


So, after leaving Waverley train station we wandered down to Edinburgh's east side and found the pretty shop with a little help from Google maps (how did we cope before all this technology?). The shop really is like it says on its website description - "a sweetie shop for knitters, crocheters, spinners and weavers"! There were so many colours to take in, I had a hard job choosing just one or two colour palettes for future projects!

There is an extensive choice of the shop's own hand dyed range called Ginger's Hand Dyed. The above photo shows the 2 skeins of Bleating Velvet 4ply I chose. They were hanging side by side from the shelf and I thought the vibrant orangey red was perfect beside the cooler blue grey. I had a shawl in mind from The Shawl Project: Book Two by Joanne Scrace and Kat Goldin which required 2 different coloured skeins of 4ply and thought these two would do very nicely.


The colours I chose have descriptive names - they are "Grey Gardens" and "Girl on Fire" and the pattern, by Joanne Scrace, is called "Missed Kingfisher". The subtle shifts and changes in the colour of the wool make each row unique and compelling to crochet. 


I'm using a 5mm crochet hook, slightly narrower than the recommended 6mm but I'm particularly loose with my tension. The large hook helps the shawl flow and takes away any rigidity a finer hook would produce. Ginger's Hand Dyed Bleating Velvet 4ply drapes beautifully and feels so soft against my skin, I can't wait to wear it around my shoulders (oh yes! This one is for me!!).


My new-to-me vintage basket holds this project perfectly, I just had to take a photo or two for my Instagram gallery ...


If you are in or around Edinburgh I would highly recommend a visit to Ginger Twist Studio, if you're further afield you can buy online at www.gingertwiststudios.com

At the moment I am only a few rows away from finishing this shawl, then I will give it a light blocking before I can wear it. I can't wait!


Wednesday, 25 May 2016

Crocheting at Loch Tay

Last week I was fortunate to head into the heart of Scotland to Ardeonaig, Loch Tay. I was a parent helper on my middle son's Primary 7 adventure week; a residential holiday with lots of outdoor based activities. Of course, I brought along a new crochet project!

Loch Tay, viewed from our house 
on the evening of our arrival

Last month I had received "The Shawl Project: Book One" by Joanne Scrace for The Crochet Project as a birthday present, so this seemed the ideal inspiration for a new WIP to take with me! I chose some random, no label yarn which had been passed on to me and decided on the "Transposition" pattern. 

Crochet, tea and a beautiful view!

The children had a fair amount of free time to explore the grounds so I had some time to sit down, take in the view and crochet! The pattern is easy to understand and written in 4 sections which are very easy to memorise - an ideal project if you are going to be distracted.

I crouched down in the grass for
this atmospheric shot of Ben Lawers
in the clouds

I accompanied the children on a hike one day. We climbed up into the hills which gave us fantastic views of the loch and surrounding mountains. Ben Lawers, across the loch from us, is the 10th highest peak in the UK and I remember climbing it when I was 17! On our final full day we sailed across Loch Tay and back in a gig, a substantial sized sailing boat. 

The "Dawn Treader", our trusty boat

shawl progress

Back home now, I am about two thirds of the way through the shawl and it is working out beautifully. I shall enjoy finishing it and remember my special time away as I do so.


Thursday, 14 April 2016

Why This Shawl is on the Naughty Step!!


I have been crocheting this shawl, designing the pattern as I go, since the 2nd of March this year. It's been one of those projects I've picked up and put down, working on other things as the mood takes me. It's also been the work-in-progress (WIP) that I've taken with me to appointments, on train journeys, to cafes and most recently on our short break to North Berwick.

the shawl, with my notebook

So, why is it on the naughty step? Well, because it has been picked up and put down so often and not looked at too closely or stretched out for photographs I hadn't noticed the shape had all gone wonky! If you look at the photo below you can see it tapers from left to right - this should be the straight stretch - Noooooooo! When I noticed I threw it in the corner in disgust and it's only now, 4 days later, that I can look at it and figure out where to go from here!

tapering when it should be straight!

beginning the shawl

The shawl started out well with a simple 2 row repeat, worked back and forth, creating an ever increasing triangle. I was happy with how it was progressing.

progress

Then I decided to mix things up a little and add a section of plain double crochet stitches. This would help to break the shawl up - both for the crocheter and for the look of the finished item. Again, I was happy.


getting bigger!

At this point I had created a large triangle and I knew the shawl could go in two directions; keep increasing the triangle until it reached the right size or stop the increases, work a straight section and then decrease to a point again. I thought option 2 would suit me and my crochet style best and went for that, first working out (or so I thought, ha!) how to stop increasing and crochet in a rectangular fashion. 

So, what now? Well, me and the wool (which is gorgeous Artesano alpaca silk 4ply by the way, should have mentioned that!) have become friends again. I think I will rattle back to the start and see where it takes me. I like the pattern repeat and it is perfect as a project for on the go, I just need to pay more attention when I'm designing!

Marta xx


Friday, 1 April 2016

How to Crochet a Simple Flower

Hello! I've a simple crochet flower pattern to share with you, right here in this blog post! The pattern is also available as a free download on Ravelry. The pattern is suitable for a confident beginner.

This all came about because last night I was playing about with some cotton yarn, trying to make a very small flower and getting frustrated because the centre was so big and taking up a lot of wasted space! I was using the magic loop method, ch 1, 12dc (UK terms) into the loop and then on to round 2 for the petals, when I suddenly thought "can I skip round 1?" ... And yes, I can, so you can too!


finished flowers


I'm going to give you a complete step-by-step photo tutorial for the flower below, but firstly I'll give all the instructions in the written format for both UK and US terms. 

NB. You will need to know how to make a magic loop! If this is new to you, my YouTube tutorial below will guide you through the process.


Materials

Small amount of yarn
Appropriate size of crochet hook (I used Erika Knight vintage wool and a 5mm crochet hook for the step by step tutorial)
Needle for sewing in ends


3 crocheted flowers stuck on a piece of card to form a greetings card. There's an envelope behind the card and a pen to the right.

finished flowers turned into a simple greetings card


UK instructions

ch - chain
dtr - double treble
ss - slip stitch

Begin with a magic loop, [ch3, 2dtr into loop, ch3, ss into loop] 5 times. Pull starting tail to tighten magic loop. Finish off.

US instructions

ch - chain
trc - triple crochet
ss - slip stitch

Begin with a magic loop, [ch3, 2trc into loop, ch3, ss into loop] 5 times. Pull starting tail to tighten magic loop. Finish off.

That's it, a very small flower which can be used for all sorts of decorative purposes! Top tip - if you leave your tails nice and long these can be used to secure your finished flower to your project.

Step-by-step photo tutorial


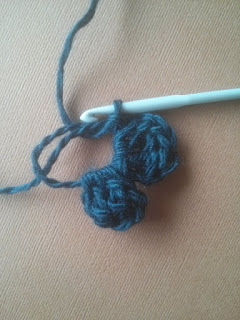
begin by wrapping the yarn around
your fingers to make a magic loop


insert yarn from front to back, pull 
a loop through


extra photo to show the start of the magic loop


chain 3 (to begin petal)


first dtr (UK) / trc (US) into the loop

second dtr (UK) / trc (US) into the loop

chain 3 (to finish petal)

slip stitch into loop

Continue around the loop, working the above pattern 5 times in total

Here's the start of petal no. 2 

2 completed petals

5 completed petals

pull the starting tail 
to tighten the loop

you can leave the centre open or
pull it completely closed.

Weave in your ends and you are finished!

a pile of finished flowers in various 
different yarn weights and textures

Conclusion

I would love for you to get in touch and show me your flowers or let me know how you have found this pattern! You could comment below or tag me on Instagram with the tag #martamitchelldesigns. This pattern is now available as a free pdf download from Ravelry.com!

Happy hooking!

Marta xx


Tuesday, 15 March 2016

Yarn Review; Three Bears Yarn

I thought it would be interesting to start a series of blog posts reviewing my favourite yarns. At the moment I am working with Three Bears Yarn, affection, DK (double knitting) so I will start with this yarn!

my yarn delivery!

I ordered from Three Bears Yarn after following them on Instagram for some time. They post lots of colourful photos there including many reposts of other people's projects which gave me a good idea of how it was to work with as well as the many endorsements from satisfied customers. For me Instagram is a fantastic place to find inspiration, new friends and new wool, fabric etc ... there's a whole new blog post in that! 

I had decided to follow Spincushions latest mystery crochet-a-long (CAL) and the special 29th of February yarn pack (29 balls for £29!) that Three Bears Yarn had on offer seemed like an excellent choice for this new project. You can find all the details of Spincushions CAL here.


first square

I began the CAL last Monday morning when the first part was released and I loved crocheting with this 100% cotton straight away! It feels very soft and smooth which makes it easy to crochet with. Unlike many cotton yarns I have worked with, this one does not split when I am working, which creates a very neat finish. I think you will agree the stitch definition is amazing too!

4 squares complete

Three Bears Yarn is based in Lancashire in the UK. It was founded in 2015 out of Blackburn Yarn Dyers Ltd. and is a family run business with real passion and enthusiasm for producing quality yarns. 

I am enjoying the mix of colours in this yarn pack and having fun putting different combinations together. I have a feeling this blanket is going to be lovely and colourful! 

I love this yarn!

You can follow my work in progress on Instagram and on Ravelry where there will be lots more colourful photographs. 

Has anyone else tried this yarn? If you have, share a photo in the comments below, I would love to see what you think.

Marta xx


Wednesday, 2 March 2016

Free Crochet Pattern; Cabled Boot Cuffs

This month's pattern is for a pair of boot cuffs, designed in Artesano aran wool which provides a cosy and stylish addition to any boots.


The pattern is suitable for those with intermediate level of crochet ability.


There are 4 adult sizes available; small, medium, large and extra large. The photos show the medium size.

My pattern is for your personal use. If you follow my pattern and go on to sell the item, please state that I am designer. Thank you!


Materials
Small [medium, large, extra large] 1 [1,2,2] x 100g skein Artesano aran (132m / 144yds per 100g) any colour, I used “birch”
7 mm crochet hook
tapestry needle (for sewing in ends)
4 x 2cm diameter buttons
needle and thread for sewing on buttons


Tension
11 stitches x 8 rows in  a 10cm² / 4 inch²


Abbreviations (UK terms)
ftr foundation treble
ch chain
st stitch
dc double crochet
htr half treble
fpttr front post triple treble
blo back loop only
prev previous
cont continue
rep repeat
RS right side
patt pattern


Notes
The pattern begins with foundation treble stitches. If you are unfamiliar with how to do foundation stitches it is worth looking up on you tube. You could substitute these stitches with regular chain stitches and a row of trebles. Please note that if you take this option you will finish up at the wrong end of the boot cuff - simply reattach the yarn and carry on.


The front post stitches (fpttr) are worked into the front post of the stitches 2 rows below.


The turning chains all count as 1htr and the 1st stitch is missed. At the end of the row work 1htr into the turning chain.

The left and right cuffs differ slightly to allow the button overlap to fall correctly on each side. When starting the left cuff leave an 80 cm tail of wool - after completing the rows this will be used to add the button loops down the side. The right cuff has the loops on the opposite side - an extra length of wool needs to be joined in for this.


Pattern
Left Cuff
Foundation Row Using 7 mm hook, leaving an 80 cm tail, ftr 30 [38,46,54]. Turn


Row 1  Ch2 (counts as 1htr), 1htr into each st across, 1htr into turning ch. Turn (30 [38,46,54] stitches)


Row 2 Ch2 (counts as 1htr), 1fpttr into each of next 2ftr (foundation row), miss 3 st *1htr in each of next 4htr (row 1), 1fpttr in each of next 4 ftr (foundation row), miss 4 htr* rep from * to * 1 [2,3,4] more times, 1htr in each of next 4htr, 1fpttr in next 2 ftr, miss 2, 1htr in each st until end, 1htr in turn ch. Turn


Row 3 Ch2 (counts as 1htr), 1htr into each st across, 1htr into turning ch. Turn (30 [38,46,54] stitches)


Row 4 Ch2 (counts as 1htr), 1htr in each of next 2htr, 1fpttr in 1st 2fpttr (row 2), 1fpttr in each of next 2fpttr (row 2), *miss 4htr (row 3), 1htr in each of next 4htr, 1fpttr in each of next 4fpttr (row 2),* rep from *to* 1 [2,3,4] more times, 1htr in each st until end, 1htr into turning ch. Turn


Row 5 Ch2 (counts as 1htr), 1htr in each of next 8st, *1htr into next htr catching blo of fpttr of row 3, 1htr in each of next 7st* rep from * to * 1 [2,3,4] more times, 1htr in each st until end, 1htr in turn ch. Turn


Row 6 Ch2 (counts as 1htr), 1fpttr in 1st 2fpttr (row 4), miss 3st, *1htr in each of next 4htr (row 5), 1fpttr in each of next 4fpttr (row 4), miss 4htr* rep from * to * 1 [2,3,4] more times, 1htr in each of next 4htr, 1 fpttr in each of next 2fpttr, 1htr in each st until end, 1htr into turning ch. Turn


Row 7 Ch2 (counts as 1htr), 1htr in each of next 12st, *1htr into next htr catching blo of fpttr of row 5, 1htr in each of next 7st* rep from * to * 1 [2,3,4]  more times, 1htr in each st until end, 1htr in turn ch. Turn


Row 8 Ch2 (counts as 1htr), 1fpttr in 1st 2fpttr (row 6), miss 3htr, *1htr in each of next 4htr (row 7), 1fpttr in each of next 4fpttr (row 6), miss 4htr* rep from *to* 1 [2,3,4]  more times, 1htr in each of next 4htr (row 7), 1fpttr in each of next 2fpttr (row 6), 1htr in each st until end, 1htr into turning ch. Turn


Row 9 As row 7. Finish off, weaving in ends.


Button loops Using long 80 cm tail from ftr, RS facing, Ch1, working down side 1dc into next 2 end of row, ch2, 1dc into each of next 5 end of rows, ch 2 1dc into each of next 2 end of rows. Finish off, weaving in ends.


Right cuff
Foundation Row Using 7 mm hook, (no need for long tail) ftr 30 [38,46,54]. Turn


Row 1  Ch2 (counts as 1htr), 1htr into each st across, 1htr into turning ch. Turn (30 [38,46,54] stitches)


Row 2 Ch2 (counts as 1htr), miss 1htr, 1htr in each of next 5htr ... beg patt as left cuff


Row 3 - 9 As left cuff, with button space on opposite side


Button loops
RS facing, join wool at top left corner, ch1, working down side 1dc into next 2 end of row, ch2, 1dc into each of next 5 end of rows, ch 2 1dc into each of next 2 end of rows. Finish off, weaving in ends.


Finishing off
Using photo as a guide sew buttons on.

I hope you will enjoy following this pattern. 
Look out for more free patterns at mrsdaftspaniel.blogspot.com
Follow me on Instagram @mrsdaftspaniel

I am listing this and all my crochet patterns for free this month on Ravelry - go have a look here!

Happy hooking,

Marta xx

Need a quick last minute crochet gift idea?

Hello!  Are you in need of a quick, last minute crochet gift idea?  Don't stress, I have you covered! Here are 3 of my favourite quick m...